Monday Morning Art School: notan

Notan differs from value study because it is based not just on what we observe. It is the orderly restriction of shapes into patterns. It is reality subservient to beauty.

Sextant, c. 1917, Marsden Hartley, oil on panel, courtesy Philadelphia Museum of Art


When I saw this collection of eight paintings based on the color orange, I realized they could demonstrate notan as neatly as traditional value-based examples do. Orange is uniquely high in chroma, so it’s easy to notice. It’s easy to see how the artists made a pattern based on it. From there, it’s not a great leap to see how great paintings can be constructed around a value-pattern too.

The Gossip, 1912, John White Alexander, oil on canvas, courtesy Philadelphia Museum of Art 

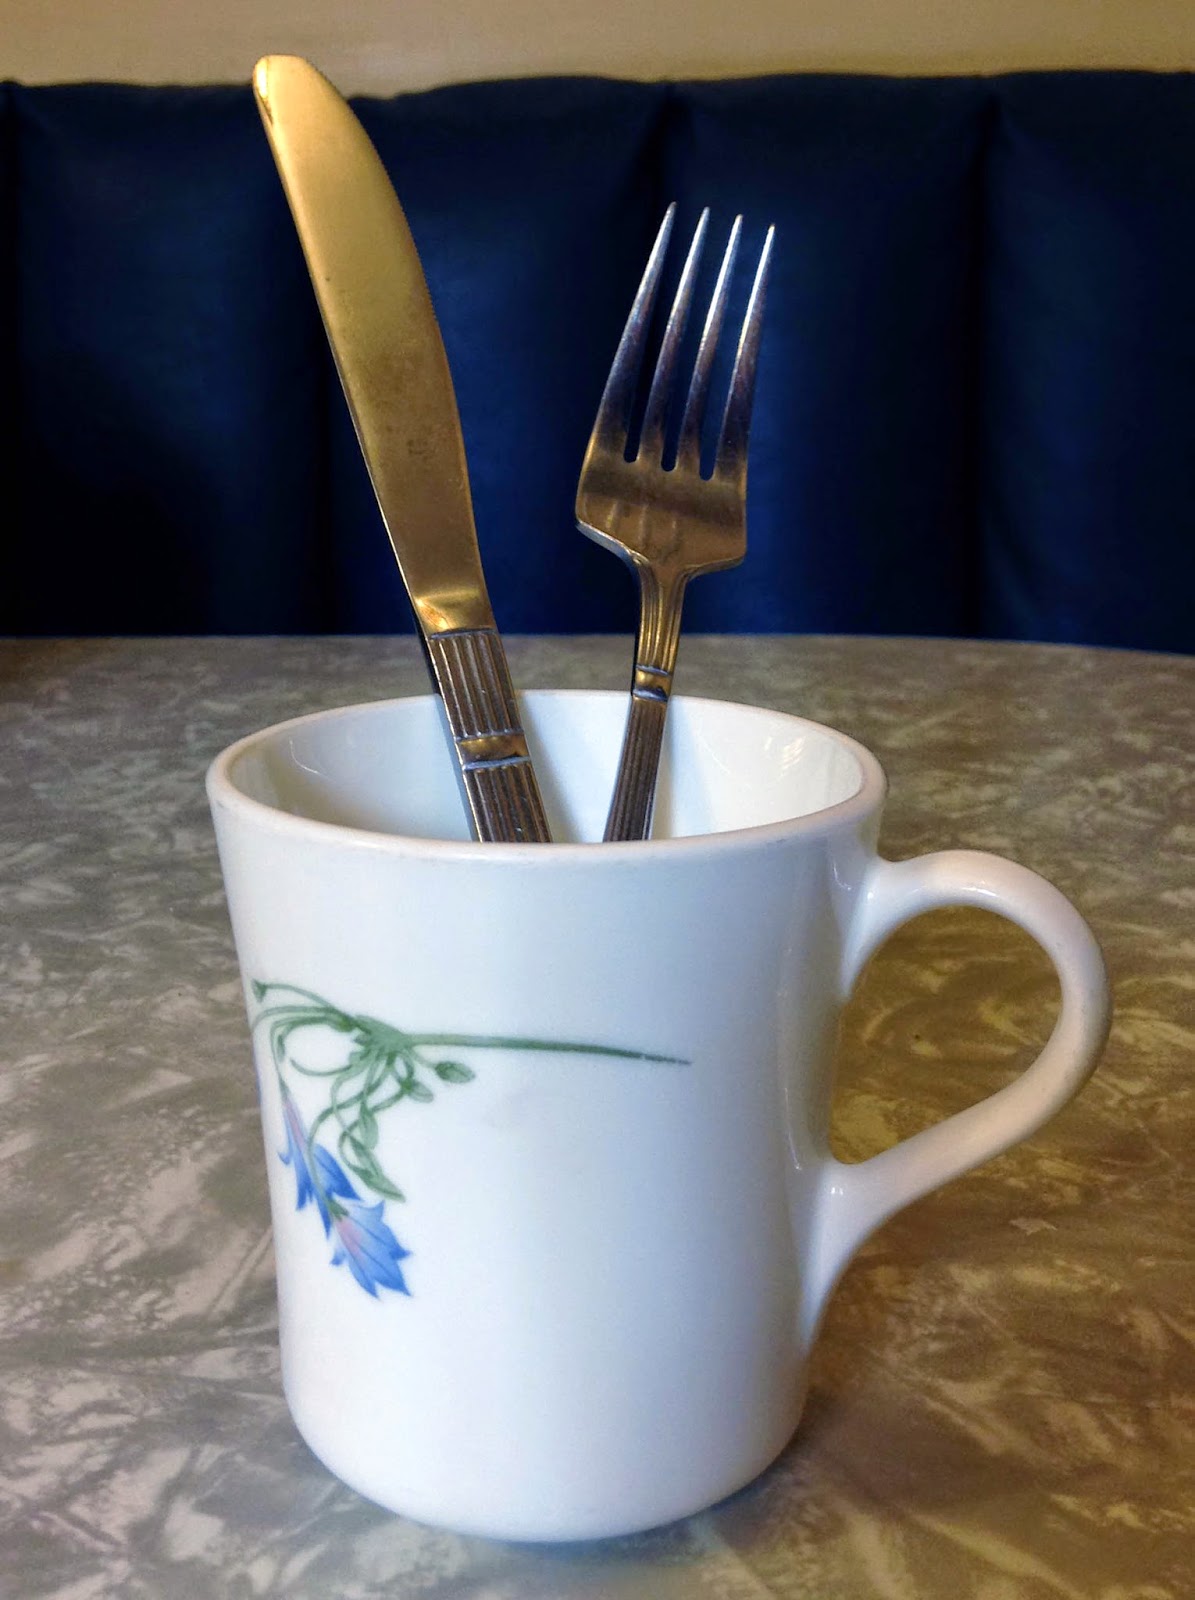
Notan is a traditional concept that refers to the harmony of light and dark elements in a painting. It’s been integral to East Asian art for centuries, and it was introduced in the West in the middle of the 19th century.

On paper it is easy to see that dark shapes do not exist without boundaries, which are made by a surrounding area of light. Equally, light shapes don’t exist without dark to define them. (This is the Chinese philosophical construct of yin-yangin a nutshell.)

Card, 1971, Helen Frankenthaler, color lithograph with crayon, courtesy the Art Institute of Chicago

This concept of notan reached its apogee in the East Asian artform of brush painting. This was the fourth and final discipline a Chinese scholar-gentleman was expected to learn, because it was the most difficult. Through brush painting, a Chinese noble demonstrated his mastery over the art of line, which had supreme artistic (and cultural) importance.

Excavation at the White House, c. 1941, Mitchell Jamieson, watercolor on paper, courtesy Smithsonian American Art Museum

The idea of notan came to the west with our 19thcentury mania for all things Asian. It was introduced as a teaching system by Arthur Wesley Dow, who wrote the definitive book on composition for twentieth-century painters. He taught students to restrict the infinite range of tonal values in the visible spectrum to specific values—perhaps black, white and one grey. He wanted students to realize that all compositions are, underneath, a structure of light and dark shapes.

Beth, 1960, Morris Louis, acrylic on canvas, courtesy Philadelphia Museum of Art

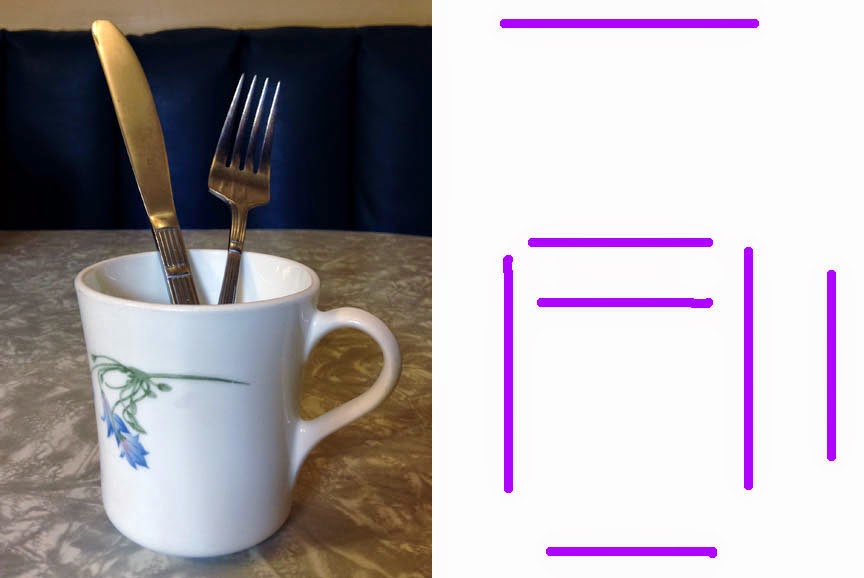
But before Dow ever let his students get that far, he had them start with line drawing. Composition is above all about cutting the picture frame into shapes, which Dow called “space cutting.” We’re doing that every time we think about negative space, for example.

Untitled, 1958, Kenneth Noland, acrylic on canvas, courtesy Smithsonian American Art Museum

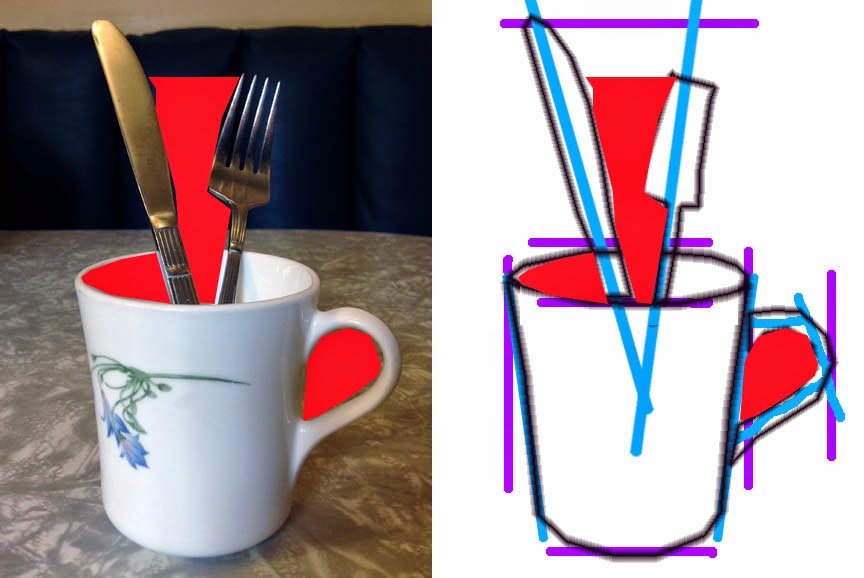
Only when his students had created beautiful shapes did he allow them to start adding value. First black, then greyscale, and then—step by slow step—they could add color.

Child in Orange Dress with White Pinafore, 1911, Egon Schiele, gouache, watercolor and pencil on paper, courtesy Sothebys

Today we use the word notan as a noun, as a substitute for a value study before we paint. But the word never meant that to Dow or in the eastern cultures from which he borrowed it. Notan differs from value study because it is based not just on what we observe. It is the orderly restriction of shapes into patterns. It is reality subservient to beauty.

Church with Red Roof and White Walls, 1914, Maurice Utrillo, oil on canvas, courtesy Barnes Collection

Of course, notan encourages a specific aesthetic, one that we’ve pretty much abandoned over the last century. But it’s worth practicing and understanding, as a way to start thinking about the important tenets of composition.

A special thanks to Bruce McMillan, for cheerfully sharing his collection of orange paintings.

Monday Morning Art School: make that negative space work for you

The background of your painting is a key element of its composition.

Prom shoes, oil on canvasboard, Carol L. Douglas

Last week I wrote about the lost-and-found edge, and techniques to make edges and lines sink. That allows the viewer to focus on other passages that are more important.

The painter has three tools to drive the viewer’s eyes: hue, chroma (saturation) and value. These are the three aspects of color. The human eye is designed to respond to value shifts first, so that’s where we usually start. However, hue and chroma are also important.

Amp up the contrast in any combination of these three elements and you emphasize a focal point. Soften the contrast and the viewer’s eyes can glide past.

Peppers, oil on canvas, Carol L. Douglas

Negative space is the area around and between the subjects in a painting—it’s what we generally call the background. It should not be an afterthought. Negative space should be carefully designed to be as interesting as the subjects themselves. One of the many ways in which still life is a great training tool is in teaching painters to control this supposedly ‘empty’ space.

Still Life with Partridge and Pear, 1748, Jean-Baptiste-Siméon Chardin, courtesy StÀdelscher Museums-Verein e.V.

Jean-Baptiste-SimĂ©on Chardin was a master of still life. His Still Life with Partridge and Pearshows just how dynamic supposedly-empty negative space can be in a painting. The brushwork is lively, and the light is concentrated on the shadow side of the pear to drive our eye to that edge. Contrast then drives us to look at the snare and then the bird’s tailfeathers and foot. The background seems quick and loose, but it’s very elegant in its design.

Self-portrait, 1771, pastel, Jean-Baptiste-SimĂ©on Chardin, courtesy MusĂ©e du Louvre, Paris, 

Twenty years later, Chardin carried that technique forward in his own self-portrait. The shifting light across the background throws the figure into stark relief. While the focal point is the light side of the face, he makes the shadows earn their keep by creating a vigorous edge down the shadow side of the figure. That line is at least as interesting as the line on the light side of the face, and it’s made visible by the light thrown onto the background.

Tin foil hat, oil on canvas, Carol L. Douglas

That, of course, was the 18th century, and we don’t tend to paint in such high contrast today. That doesn’t mean we aren’t using the same basic techniques. The modern painter can use any of the following in his work:

  • Heighten the contrast between positive and negative shapes with lighting;
  • Use lively brushwork in the background;
  • Carefully plan interesting negative shapes;
  • Bring background color into the foreground objects and vice-versa;
  • Imply background with brushwork, color and shadow;
  • Eliminate background detail, and just imply a shadow;
  • Break or minimize the edges of tables or drapes. 

Monday Morning Art School: how to draw a tree

Trees have limbs, so it’s no surprise that you draw them much like you do the human figure.

Old barnyard tree, by Carol L. Douglas. 6X8, oil on canvas.

All drawing starts with careful observation. Start by observing the branching structure and overall shape of your tree. Opposite branching means that side branches, twigs and leaf stems grow directly across from each other from a main trunk. These include maple, ash, dogwood and buckeye. Alternate branching is much more common. It’s where side branches, leaves and twigs do not grow opposite each other, but grow in either a spiral pattern or an alternating one. The oak family are alternate branchers; stems grow out in a spiral pattern with no two branches coming from the same node. This creates the oak tree’s distinctive silhouette.

Every variety of tree has a distinctive shape.

It’s very easy to fall into the trap of making trees two-dimensional cutouts, with branches extending to the left and right. In fact, branches extend in all directions, including straight at you. How do you render this with authority?

Wire-frame drawing of the basic shape of my White Oak.

Don’t try to sort all that complexity out in one shot. Rather, start with the major structure. Just as with the human figure, I start with a wire-frame drawing. In the case of trees, I start by reducing the trunk and branches into a series of tubes in space.

Check those negative spaces!

As you finish each major branch, check to be sure the negative space between the branches is accurate.

If you’ve done this phase correctly, you might notice that these simplified branches are almost human in movement and shape. This should be no surprise; we’re all part of the same creation.

That’s the basis of your line drawing.

Connect the tubes with flowing lines to create your tree’s wooden structure. Don’t obliterate the circles too fast; they will be your guides to setting shadows.

Time to set the shadows.

Identify the light source—is it coming from the left or the right? Once you’ve identified the light source, set the shadows.

The foliage doesn’t need to be fully articulated, just suggested.

Add foliage as masses of dark. If you want to articulate the individual leaves more carefully, you can do so, but be selective. Too much detail will obliterate the charm of your tree.

Presto, it’s a White Oak!

Refine the shadows and you’re done.

Why do we draw? (Part 3)

Two pieces of silverware and a coffee cup: a tricky thing to draw. But when you’re done, you’ll have the basic tools to draw anything.
Yesterday’s lesson on the pencil and thumb method was easy to teach in person, but difficult to write out in steps. Today’s lesson, on using angles, is easier to write, but will be a little trickier to master.
This has to do with how our brains are wired, not how “talented” you may or may not be. We simply don’t ‘read’ angles and negative space when we’re not focusing on them. This is why we use our pencil as a visual aide. It forces our brains to pay attention.
The good news is that you can rapidly teach your brain to notice angles and negative space.
Once again, close one eye and focus on the pencil, not the object you’re measuring. Hold the pencil along an imaginary plate glass window in front of you, and tilt it to match the angle you’re measuring. Then reproduce the line on your paper.
If at first you screw up, it’s probably that you’ve canted one end of the pencil away from you. Straighten it up and try again.
Once you’ve mastered measuring with the pencil and thumb method and learned to see and copy angles on to your paper, you can draw anything from portraits to animals to landscapes to figure. I promise.
Start by measuring the basic shapes using the pencil and thumb method we learned yesterday. Mark off the  heights and widths of all the basic shapes.
Use your pencil to determine the angles at which the silverware, the sides of the cup, and the handle are traveling. Draw them in as straight lines. This takes a little practice, so be patient and take your time looking at each one.
Use your measuring and angle hash marks to block in the major shapes.
Often, you can see distortions, objects that are too close together, etc. more easily in the negative space than you can in your drawing of the positive objects. It’s best to check this before you go on to finish your drawing.
You can use angles to check your work. Here I checked the angle from the right tine of the fork to the handle of the cup, and the angle across the top of the two pieces of silverware.

 Message me if you want information about next year’s classes and workshops.