Monday Morning Art School: why follow the rules?

There is broad consensus on how paint is applied, even if you take your craft to places I’ve never dreamed of.
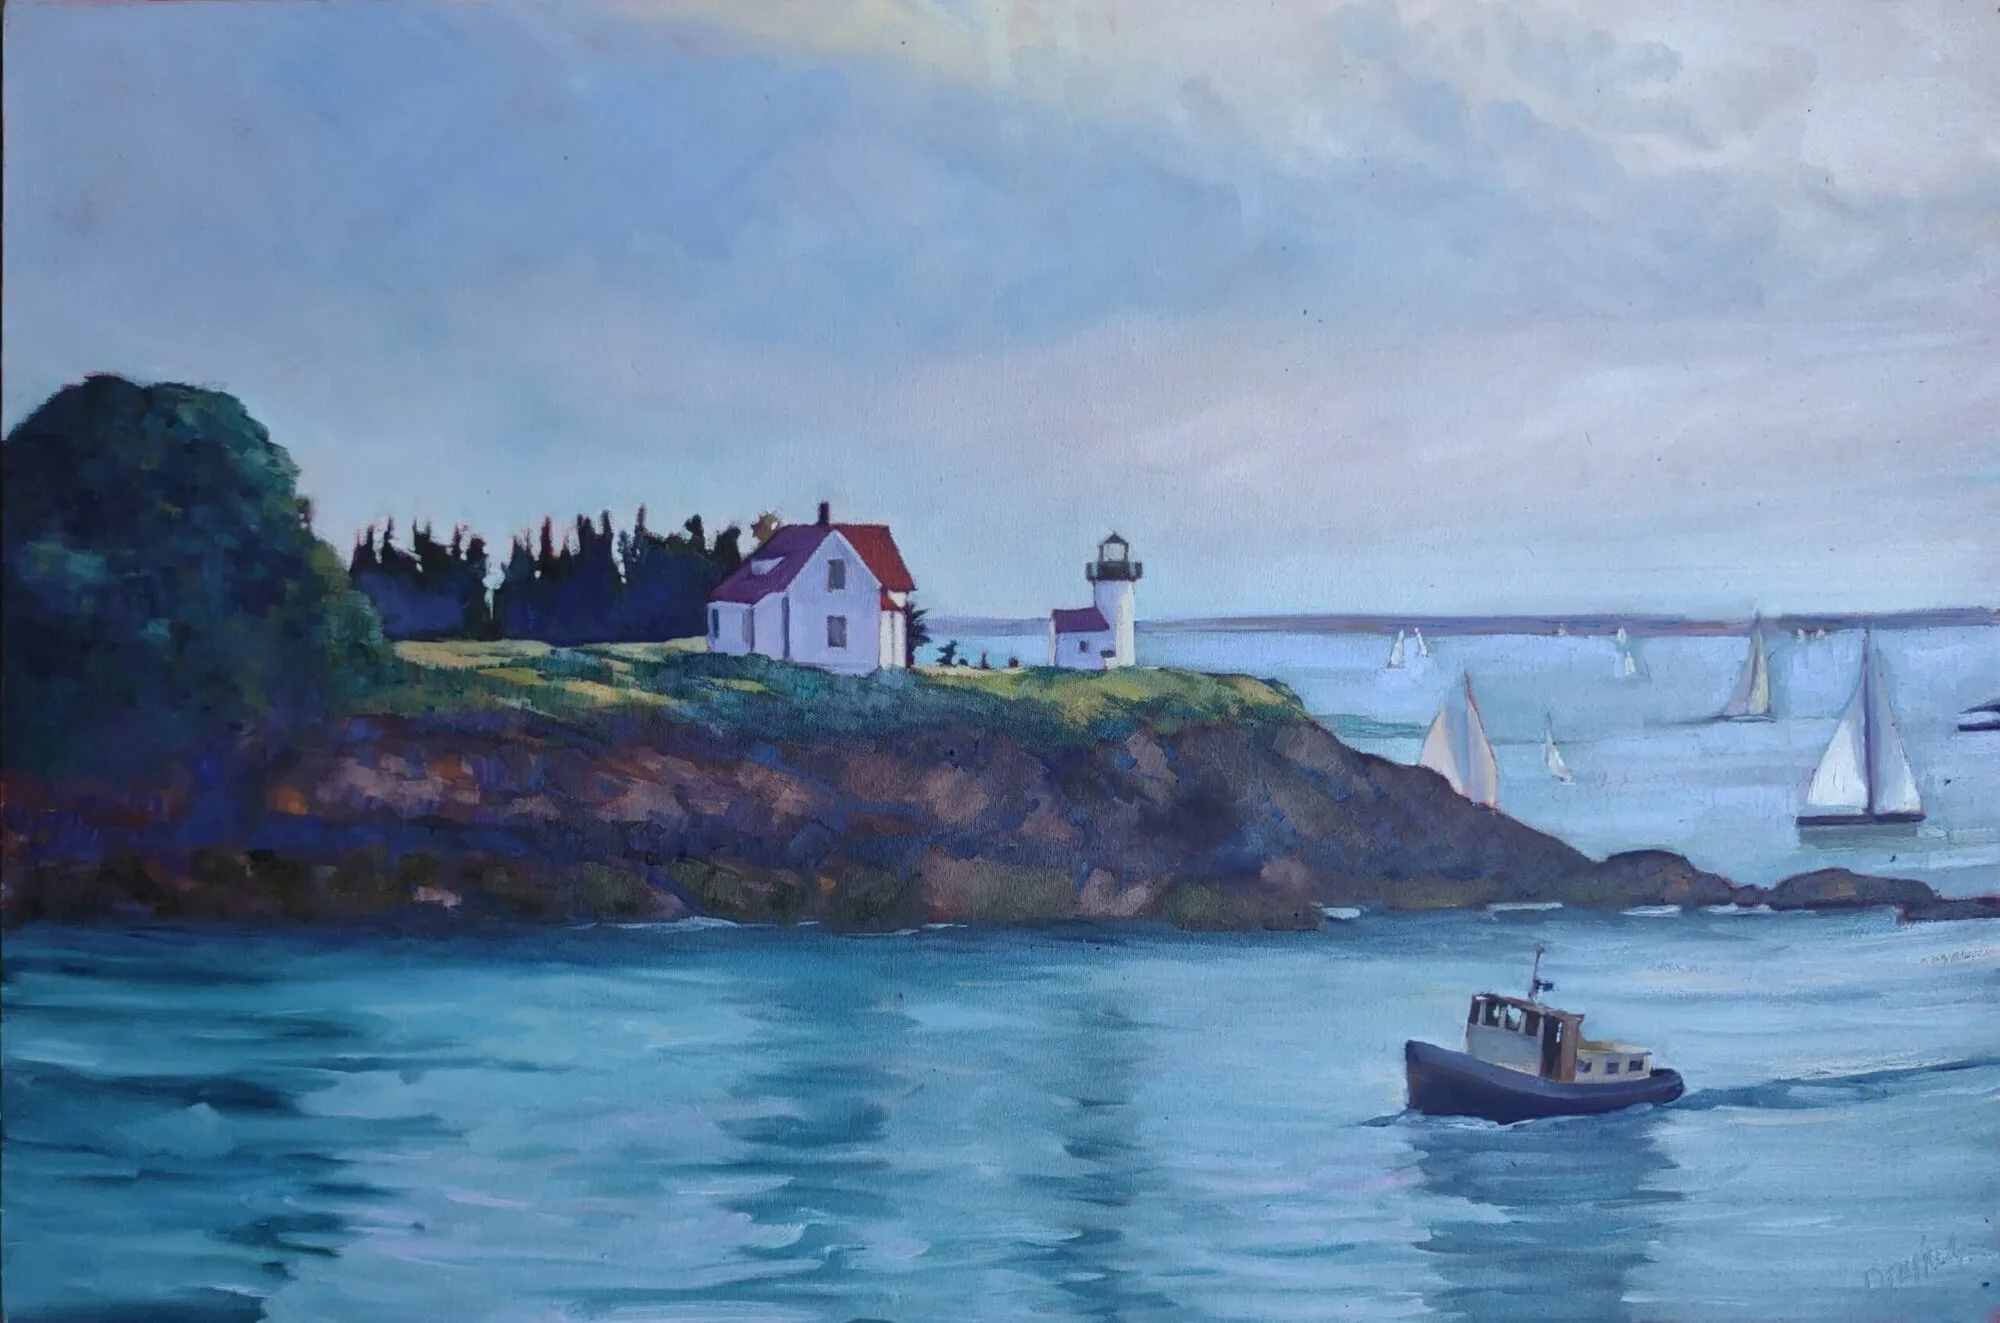
The Race, by Tim Moran, watercolor on cold-press paper.
If you’ve studied with me for any length of time, you know I’m big on protocol. “Do it this way now,” I urge my students. “Then when you go back to your everyday painting, you can incorporate the things that work and discard what doesn’t work for you.”
The business of laying down paint is a craft, one that’s been developed over millennia. It’s possible to take this craft to new places, but only on a firm foundation of technique. That doesn’t mean I think that things don’t change; if they didn’t, we’d all be still painting encaustic funerary portraits a la the Romans. But there is still broad consensus on how oil paint and watercolor paint are applied. When you take my class, you’re not getting anything new. Everything I tell you, I learned from someone else.
Tim’s first value sketch.
What’s different is that I’ve written these instructions down as protocols. I’ve already shared them with you: here in oil, and here in watercolor. Students usually balk at the idea of spending so much time in the preparatory stages, particularly if they know an excellent painter who doesn’t bother. There are some. These are usually people who have a tremendously refined sense of design, and can do the first steps in their heads. People who do that well, by the way, are not that common.
I also assign homework to make sure these protocols are locked down in my students’ heads. Last week, watercolor student Tim Moran came in with such a perfectly-executed process that I asked him if I could share it with you.
Tim’s redesign, done after he did his monochromatic painting.
Tim started with a value drawing in his sketchbook of four sailboats racing off Camden. He did that because identifying a strong value structure at the beginning is the most important thing a watercolor artist can do to make a strong painting.
Then he did a monochromatic value study, using a combination of burnt sienna and ultramarine to make a dark neutral. This was where he made choices of his values for lights and darks. It’s a crucial step in being able to apply watercolor confidently. Being unsure of the color makes us naturally diffident.
But Tim was not just blindly following my instructions here. He was also thinking. And what he thought was that the four-boat structure was static. So, he went back—literally—to the drawing board, and reconfigured his drawing to be three boats.
Tim’s monochromatic painting, at top, and his final painting, at bottom. Note that he’s testing his paints before he applies
He didn’t have to redo the monochromatic value study because the value structure was the same whether there were three or four boats. Instead he moved directly to the final painting.
Note that he tested his pigments on the left side of his paper. That test strip is another important part of watercolor that many people skip. The more thinking you’ve done about placement and composition before you start, the less likely you are to obliterate your light passages.
It’s a little harder to see those phases in an oil-painting student’s work because the monochromatic underlay gets obliterated in the final phase. But this is a class that’s taking my instruction very seriously. It’s days like this that remind me of how much I love to teach.

Don’t be so quick to judge

If it’s not love at first sight, maybe it’s because you’re doing something right.

Captain Linda Striping, oil on canvasboard, by Carol L. Douglas
One of my old painting pals frequently scrubs out paintings that she feels are going wrong. “Look, I’ve saved a good board,” she’ll say. My surplus plein air paintings, if stacked in one pile, would be about the same height as me. They’re almost all on expensive boards, so I see her point. Nevertheless, I think scrubbing out is generally a terrible idea.
Art growth is all about taking risks. The bravest paintings are sometimes the ones you hate as you’re doing them. That’s particularly true if your experiments are about mark-making. Most of us would rather have someone else’s brushwork; ours is somehow too self-revelatory. That’s not to say that mark-making can’t be taught or learned. Just like handwriting, it starts with general rules and ends up being very individual.
Sea Fog, oil on canvasboard, by Carol L. Douglas
I have a student who paints lyrically until he reaches the top layer in his paintings. Then he feels the need to apply a higher level of finish. It squeezes the energy right out, and obscures his basic ebullience.
(This is not, by the way, the same thing as ‘overworking.’ That’s a bogeyman used to scare beginning painters into not figuring out how to finish a painting. Paint is far more forgiving than most people think, and nothing on your canvas is so precious as to be irreplaceable.)
Scrub a painting out or obsessively overpaint, and you may murder a new idea before it’s even hatched. I’ve lost count of how many times I have set a painting aside in disgust, and then looked at it a few years later and realized it was very good. That’s one reason I keep all those surplus plein air paintings.
Captain Doug on the ratlines, oil on canvasboard, by Carol L. Douglas
We’re not good judges of our own work as we’re doing it. The disconnect between what we’ve envisioned and what actually happened is too pronounced. You may set out to paint the iridescence of lustreware, and fail miserably. You are so focused on that failure that you never notice that the color, structure and paint handling in your work is simply stunning. That’s where a teacher can be helpful, and why positive criticism is so useful. But time itself is a great healer. It allows you to stop seeing the painting from inside your own head.
All this assumes that you have a painting protocol that you follow, one which includes significant design steps. A poorly-designed painting is really the only thing you can do that’s unsalvageable. Your process ought to include thumbnails, notan studies, paint studies, or value drawings. Many people waste lots of time producing mediocre paintings because they’re too impatient to design carefully. But if the design is good, you have to work hard to wreck a painting.
Tricky Mary in a Pea Soup Fog, oil on canvasboard, by Carol L. Douglas
Still, you often can’t tell until the end whether you’re going to pull it off or not. RebeccaGorrell once told me, “I was really unhappy with it till the last half hour—a good recurring lesson.” She’s so right. Paintings sometimes gel after a long hard fight. The only way you’ll know is by continuing to slug it out.

Monday Morning Art School: painting on demand

Sometimes it’s not fun. Sometimes it’s almost painfully stressful. What do you do then?
Sunrise, oil on canvasboard, is available through my studio at 394 Commercial Street, Rockport.
At my first plein air competition, I was a nervous wreck. “Come on, Carol,” my exasperated friend said. “Get a grip! You know how to do this.” At that moment, it wasn’t exactly true; I’d forgotten everything I ever knew about paint.
For some of us, commissions result in painter’s block. For others, plein air competitions are painfully stressful. Occasionally, I’ll have a student who freezes in my workshops. I used to suffer terrible performance anxiety, which is why I’m a painter and not a musician. As I’ve gotten older, I’ve found ways to cope. These strategies have in turn lessened my overall anxiety.
Glade, watercolor on Yupo, will be at the Jackson Memorial Library, Tenants Harbor, ME, in September.
The first of these is to have a plan. It may seem counterintuitive to go into a painting with a process mapped out, but in fact that’s what you have to do to complete any project within an allotted time. When I painted a portrait in Edinburgh in April, I had a tight deadline. I planned how long I had for the charcoal drawings, how long for the underpainting, and how long to finish the top coat. When I do a quick-draw, I know I must finish the drawing and underpainting in the first hour in order to finish the top layers in the allotted time.
You might think that a flow plan is inhibiting, but it’s exactly the opposite. I learned this many years ago while painting a portrait commission for my late friend Dean Fero. It was a surprise birthday gift for his wife. That meant a precise deadline, which he didn’t let me forget. As I worked, I found the tight schedule liberating. I couldn’t perseverate and noodle endlessly on passages. That, in turn, meant freer, better brushwork.
Bracken Fern, oil on canvasboard, is available through Trove on Main, Thomaston, ME.
Playwright Robert More was finishing a comedy when I last saw him. “I can rewrite this ending eight times, and the last one won’t necessarily be better,” he told me. “I’ll just end up with eight different versions.”
Having a set protocol is invaluable for quelling nerves. In addition to providing consistent results, it focuses your mental energy on the doing, rather than on worry. (I’ve given you protocols for oilsand watercolor; you can follow them or write your own.)
Once you’ve established a painting process, practice it repeatedly—not concentrating on the results, but on mastering the process. Being absolutely prepared is the best cure for performance anxiety. This is the great benefit of painting-a-day schemes; they’re not about producing great artwork, but about getting a hammerlock on your process.
Castine Sea Fog, oil on canvasboard, Carol L. Douglas, available.
As you go on, stop thinking about all the ways you can screw up the painting. Instead, think only about the phase you’re in. If something goes wrong, don’t berate yourself, and above all, ignore the voices in your head that tell you you’re no good. They’re wrong. Instead, ask yourself where in your process you made a wrong turn.
In other words, develop enough self-awareness that you can monitor your own progress. When I’m agitated, I develop a nervous tic of constantly rinsing my brush. That’s a mud-making mistake in any medium. Because I know I do it, I can stop doing it before it’s out of hand—and ask myself what’s gotten me upset.
The Golden Hour, oil on canvas, Carol L. Douglas (private collection)
Even in pressurized painting situations, take time to eat decently and get some exercise. While in Edinburgh, I enjoyed taking my model’s dog, Poppy, out in the magnificent local parks. Exercise lifts the mood and reduces anxiety.
Above all, don’t waste time worrying about whether the client will like the work, or whether you’ll make a sale or win a prize. Focusing on the results, rather than the process, can effectively kill a painting.

Monday Morning Art School: basic protocol for painting in watercolor

An efficient plan for fast plein air painting in watercolors.

Surf at Marshall Point, by Carol L. Douglas

Last week I gave you a basic primer for oil painting in the field. This week, I’ve done the same for watercolor.

1. Set up your paint box/palette with pigments arranged in a rainbow pattern.
You don’t need as many colors as you think you do. But be sure to replace a color when you run out, not when you think you’ll next need it.
2. Do a value drawing of the scene in question, in your sketchbook.
Identifying a value structure at the beginning is the single most important thing a watercolor artist can do to make a strong painting.

Blueberry Barrens, by Carol L. Douglas
3. Crop your drawing, and identify and strengthen big shapes and movements.
If you start by filling in a little box, you only allow yourself one way to look at the composition. Instead, draw what interests you first, and then contemplate how it might best be boxed into a painting.
A watercolor value study. I sometimes do this in oils as well, when I’m a little concerned about my composition.
4. Do a monochrome value study, using a combination of burnt sienna and ultramarine to make a dark neutral.
This is where you solidify your choices of lights and darks. It’s a ‘practice swing’ for the final painting. I took a watercolor workshop from the incomparable Poppy Balser a few years ago and was chuffed to see that she teaches the same thing.
5. Transfer contour drawing to watercolor paper.
The more thinking you’ve done about placement and composition before you start, the less likely you are to obliterate your light passages.
Glade, by Carol L. Douglas
6. Apply Initial Washes
Using a large brush, start with the sky and work down. Allow lighter washes to bleed across spaces for darker objects and let the sky bleed into the sea, if applicable.
7. Add darks and definition
Work down from medium to smaller brushes, remembering to leave some white space showing.
8. Paint the Cast Shadows
The cast shadows should be transparent and colorful, not gray.