Whoops, I should have listened to Ed

The human brain has an unfortunate tendency to skip over the parts of a plan it doesn’t like.

Desert long view, 9X12, oil on canvasboard, $696 unframed.

I never expected to be flying back from my workshop in Sedona with four wet canvases, so I only brought a two-canvas PanelPak. Whoops, bad planning—but it was based on prior experience. I seldom have time for anything but a basic demo when teaching workshops.

“Do you want me to mail those?” Ed Buonvecchio, my monitor, asked me. No, I could jury-rig something using waxed-paper and an elastic band. I’ve done it many times before, but this time, something slid. My dawn painting of the Grand Canyon smeared. Whoops, I should have accepted help when it was offered.

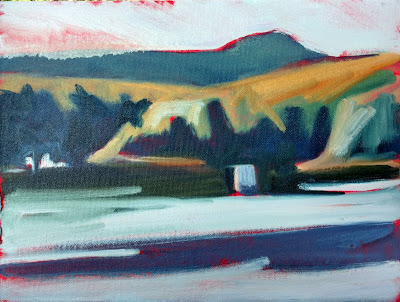
Camel Head, 9X12, oil on canvasboard, $696 unframed.

Oh, well. That gave me the opportunity to demonstrate glazing to my Monday night Zoom class, but I think the painting is irreparably damaged. It will have to be completely repainted, and at that point it’s no longer plein air, meaning I’m no longer interested.

That happened after I dropped both Grand Canyon paintings jelly-side down on the sidewalk. Whoops, I should have made two trips to the car.

That’s not usually a deadly problem, as I tend to paint leaner in the field than in the studio. Thin paint sticks to the canvas better than its juicy cousin. The twigs and leaf litter will brush out when the paintings are fully dry.

South Rim of the Grand Canyon, 9X12, oil on canvasboard, $696 unframed.

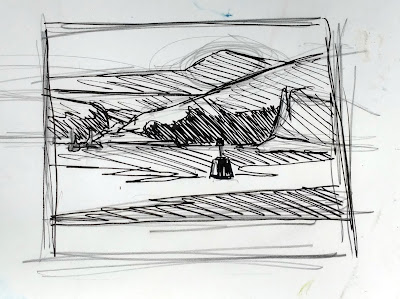
“Do you always do a value sketch first?” Ed asked me—with a small dash of skepticism—during the workshop.

“Only when I want my painting to come out well,” I replied.

The human brain has an unfortunate tendency to skip over the parts of a plan it doesn’t like, and the less articulated the plan, the more opportunities for bad assumptions. The consequences have come to be known as Murphy’s Law: anything that can go wrong, will.

We see that law of unintended consequences in every endeavor, not just painting. Looking back on mistakes, we can almost always identify where we went wrong. “If only I’d…” is our universal response. Advance planning can’t eliminate all disasters, but it sure cuts down on them.

Painting, super-briefly, at the Grand Canyon.

Planning means different things to different painters. To many (including me) it’s a simple, rough value sketch or notanoutlining the basic composition. To others, like Andrew Wyeth, it means a complex series of sketches working out all the problem areas in a painting.

But there is no planning hack in art that allows you to skim over the critical composition questions.

“I don’t want to spend all my time doing a sketch!” one student complained. It’s a common misconception that a painting moves faster and is more visceral if we don’t spend time on the value sketch and grisaille. But a painting without a plan takes longer to finish, is more tentative, and often is just a hopeful approximation of what we first envisioned.

But at dawn at the Grand Canyon, I ignored my own oft-stated instructions. Like everyone else, I have excuses: I was exhausted, it was still pitch-black, and the light would change fast. The result was a sub-optimal composition. So, I’m not really that heartbroken that the painting was ruined by my bad packing. It was the only one of the four that I was ambivalent about.
Monday Morning Art School: designing value masses

How could I have even taken a photo this bad, let alone make a painting out of it?

Early November: North Greenland, 1932, Rockwell Kent, courtesy the Hermitage.

The focal points of a painting are not necessarily the subject. In Rockwell Kent’s Early November: North Greenland, above, our eyes go first to the iceberg in the foreground. Kent has made it the most luminous, warmest part of the scene, and set it off against the briny depths. Next, we look at the hillside behind, which is almost as bright as the iceberg. Only after that does our eye travel to the human activity at the bottom. Here we’re arrested by an ageless story: man wrestling against the vast power of nature for his very survival. We spend a long time looking at these tiny fishermen, which we wouldn’t have done had they been what we noticed first.

Kent has borrowed a technique beloved of Pieter Bruegel the Elder four hundred years earlier. In his Census at Bethlehem, all the bustle and contrast of the midfield drive our eyes down to the least important part of the painting, the lower left corner. We nearly miss the Holy Family and their donkey, in the center bottom. Just as in the Bible story, the critical event happens in an unimportant place.

The painter must get used to thinking in terms of composition instead of subjects. Every representational painting has (we hope) a subject, but if we just drop that subject in the center of the canvas, there will be no drama or order to the painting.

Why did we read Rockwell Kent’s painting in that order? Because the light and dark masses drove our eyes inexorably through the painting in a planned way.

Often the beginning painter is fixated on the details, but it’s the value masses that will ultimately carry the painting. Start by figuring out a way to stop seeing detail. I’m slightly nearsighted; I take off my glasses and detail dissolves. Those of you blessed with better eyesight have to squint. But if you do so, you’ll realize that you can easily fool the brain into seeing big shapes rather than detail. Minor differences in values disappear.

A really bad photo of a cypress swamp near Marion, Alabama, taken by yours truly.

It’s a little more difficult when working with reference photos, where the detail is always there, teasing you. Above, I’ve posted a snapshot I took in a swamp in Alabama. In terms of subject matter, it interests me; I’m from the north where we don’t have trees with knees. In terms of composition, it’s awful. How could I have even taken a photo this bad, let alone make a painting out of it?

I have to address three questions:

  1. Where does the visual strength in these cypress knees lie? There’s power in almost any image, although you sometimes have to dig for it.
  2. How can the picture plane be broken into light and dark passages?
  3. How will I crop my picture to strengthen the composition?
Shapes that I can base a painting on.
I identified two things in this cypress swamp that are powerful: repetition and reflection. I based my sketch on them, but I could just have easily emphasized the diagonal shadows. The photo is peripheral in this design phase; it was there primarily to give me a source for shapes and motifs. My initial drawing looks more like a Clyfford Still painting than anything ‘real’, and that’s a good thing, since it means my focus was on design, not facts. Get that right and it’s a relatively simple matter to apply realism to the stronger abstract masses.
Looking at this on the computer, I really wish I hadn’t chosen the crop I did. I’m blaming the lack of coffee and the dog, who’s begging for a walk.

Will it paint? Not with that crop, but it’s an easy enough fix when I’m still at the sketch stage.
Give me back that breathing space! (And sorry about the terrible photography.)

It’s Easter Monday, or Dyngus Day, as we observe in Buffalo, NY. The dog is pestering me, and I have things to do and places to go. But for now, I have a pattern of lights and darks upon which I can hang a painting.

Monday Morning Art School: The seven deadly sins of plein air painting.

Here are some easy ways to condemn your outdoor painting. Try to avoid them!
October afternoon at Beauchamp point, by Carol L. Douglas. The weight is off the edge, and the rocks are accurate. Now if I could just remember what I did with this painting.
Weight all to one side. Often, we’re attracted to a scene where a large, dark mass in the foreground breaks to show us a distant, high-key vista, like mountains or the sea. That is very appealing in life, but plopping a large object on the far side of your canvas is simple bad design. Look for ways to balance lights and darks. Breaks in the tree screen, changing the angle, or some value adjustments will make it flow better.
It’s easy to throw all the weight on one side when drawing a shoreline or a mountain vista.
Tchotchkes to try to fix a bad composition. Yes, there are boats, branches and gulls in nature, and they have a place in your painting. They shouldn’t be added at the last minute to fix an unbalanced composition. If you find yourself frequently tempted to add ornaments at the last minute, you’re probably not spending enough time on your drawing.
Tossing a gull, a branch, or a boat in there at the last minute is just going to look goofy.
Going straight to canvas. A good drawing—in a sketchbook, not on your canvas—sometimes seems like a waste of time, but it serves three important purposes. It’s how you sort out good vs. bad compositions. It gives you a chance to explore the subject without making a muddy mess with paint. And it gives you reference that can outlast changes in the weather, the light, or even your subject leaving. 
Marking outlines on a viewfinder is no substitute for a good sketch, which is why I don’t permit them in my classes. The primary point of a sketch is to think.
No focal point(s). A painting is read by its viewers, and part of your job is to control how they do that. You may have only one focus, or you may have several that are noticed in order of importance. Your preparatory drawing should have helped you narrow this down. Now it’s your job to make those points draw your viewer. How do you do this? You have color, line and detail to drive the viewer’s eyes.
Shorelines are not perfect ellipses.

Too much detail too soon. Detail is the last thing you should worry about when painting. Your masses should be blocked in, shadows laid down, and colors organized before you worry about the texture of trees, rocks and grass. 

Think for a moment what it would be like if you could see every leaf and blade of grass simultaneously. Our eyes protect the brain from snapping with overstimulation by only focusing on one thing at a time. Do your viewers a favor and make those choices when you’re painting. Apply detail sparingly.

Not seeing past the shore ellipse. Perfect ellipses are lovely in painting, but they’re not great for shorelines. Most shorelines don’t curve perfectly, but are broken by irregularities. Even when they’re perfectly smooth, they curve less at the top than at the bottom—that’s perspective. And within the curve of a cove, there are waves and tidal lines that break the regularity. If you’re going to draw the long curve of a shore, take the time to learn its real shape. And you don’t need to include the whole, long edge for the viewer to get the point.
A trifecta of bad design: a goofy ellipse, all the trees on one side, and a gull added to try to balance the composition.
Rocks are not potatoes, and trees are not popsicles. When I painted in Scotland last month, the first thing I noticed is that the granite rising out of the North Atlantic wasn’t exactly the same as the granite on the American side. The Iona stone is pinker and studded with greenstone. 
Different minerals cleave and erode differently. How they break and tumble gives rock faces their character. Rocks are almost never brown or simple grey. They’re an amalgam of beautiful colors ranging from blue-green to burnt orange. Likewise, trees branch very differently depending on their species. Foliage colors vary, as does the density of the canopy.

You don’t need to be a geologist or botanist to notice and appreciate these differences, and getting them right is what gives a painting authenticity.

Monday Morning Art School: seeing abstract shapes

If you start with a shed, you can ramp yourself up to Windsor Castle in no time.

It all comes down to abstract shapes.
This week I gave my painting class the assignment of doing three thumbnail sketches of their own home or the view from it. This is an assignment with two goals:
  1. To see beauty in the everyday;
  2. To learn how to draw better thumbnails.

Most of us, including me, think we live in uninspiring houses. My first reaction when I started these drawings was that the shrubberies at the front of my house really need attention. I also realized that I have only a vague sense of what my house looks like from the outside. And it’s nothing special, just an old house that also needs its shutters painted.

My house, shivering in the first frost of the season.
Ultimately, though, everything comes down to a pattern of light and shadow. Will my viewers know I have vinyl siding and replacement windows, and that my house is located on busy Route 1? Or will they see it in its bones, as an old Maine farmhouse at the top of a hill? Unless I’m remarkably picayune with the details, it’s the essence that shows.
I think I like this view better. It’s what I used for the drawing at top.
A big part of learning to paint is learning to see. In my class we don’t use viewfinders. I also discourage doing thumbnails in pre-drawn boxes. That means creating a bounding box in the same aspect ratio as the final painting, and then drawing your thumbnail inside it. (If you don’t know what aspect ratio is, see here.)
Those devices defeat the purpose of the thumbnail, which is exploration.  A good thumbnail sprawls without boundaries, even though it’s quite small. When it’s finished, you can figure out how you want to crop it. Or, as in my example below, you may find that you need to crop it more than once to get it right.
First, figure out which border is critical. In my example, it’s the top; I don’t want that much tree. What’s the next most-important border? Since I want a little light sneaking into the background, it’s the right side. The bottom crop is at a natural point, below (but not too close to) the shed. After that, I approximated where the left line went to make the drawing fit a 12X16 canvas.
You may take a ruler to my drawing and determine that it’s not exactly the right aspect ratio. That doesn’t matter; it’s easy enough to make fix that on the fly. 
That wasn’t too hard, was it?
Let’s build on this exercise and do marker sketches of the same three views. By doing so, we start to see them as abstract shapes. That’s actually tricky to do, but it’s the key to all good drawing.
You must force yourself to stop thinking of the object you’re looking at as “my shed” and start to see it as a series of shapes. First, draw a series of pencil lines to indicate the overall shape. Then, using a pen or marker, doodle in the dark values. If you catch yourself thinking “window,” or “door,” stop and force yourself to relabel your object as merely a light or dark shape. Your brain will catch on, I promise.
If I painted my house from this angle, it would be about the shadows of the tree, which I didn’t even notice when I was drawing the thumbnail.
All objects can be reduced to a certain, limited number of shapes, which build on each other to make a whole. When you see things as abstract shapes, you expand your possible subject matter. A plastic pencil case is not inherently much different from a shed, which in turn has the same, simplified, forms as a house. If you start with a shed, you can ramp yourself up to Windsor Castle in no time.

Like this post? Monday Morning Art School is a weekly feature. Subscribe at right!

Monday Morning Art School: don’t chase the light

Nice advice. How exactly do you avoid making mush as the light changes?

The Thimble, Carol L. Douglas, oil on gessoboard, sold.

I’m painting bigger this season, with the goal of doing some very large landscapes during my Joseph A. Fiore Art Center residency. Down the Reach from last week, is 24X20; The Thimble, above, is 20X16. Big paintings outlast the light. Having a protocol to deal with shifting light is essential.

One technique is to go back to the same location over many days. In the Northeast, weather is capricious. You’re as likely to come back to a sea fog as to the limpid light of the prior day. The tide doesn’t move in sync with daylight, meaning the light may be the same but the scene will change.
In many cases, it’s impossible to come back and set up at the same spot over and over. A little preparatory work will save you hours of frustration later in your painting.
Value sketch of the Monument.
Make a value sketch.
This is the most important step in painting. I don’t care whether you do this in watercolor, with charcoal, a gel pen, as a notan, or in mixed media. Make a study, or multiple studies. 
In my classes I strongly discourage the use of viewfinders. The value study is where one explores relationships and determines the ‘final cut.’
Don’t make a bounding box and fill it in; instead, do a drawing and then crop it to the shape of your board. It’s in the value sketch that you can make subtle adjustments to the elements of the scene. You can’t do that when you’re slavishly transcribing a scene from a viewfinder.
Value underpainting for The Monument. This early in the morning, the light was warm.
Choose a color scheme.
I’ve written about the color of light many times. One of three situations must prevail:
  • Shadows are warm and the light is cool. This is what happens at midday.
  • Shadows are cool and the light is warm. This is the golden light of early morning and late afternoon.
  • Shadows and light are neutral. This happens mostly on grey days.

Choose one of these and stick with it.
Do a fast underpainting that’s a direct transcription of your value sketch.
I don’t look at the landscape very much at this stage. I have my sketch in my right hand and my brush in my left. I paint in the big dark shapes in an already-mixed shadow color and the big light shapes in an already-mixed highlight color. At this phase, my paint is lightly thinned with odorless mineral spirits or turpentine. Knowing how much thinner to use is a matter of practice. The paint layer should be thin, but there shouldn’t be so much turpentine that everything applied over it turns to mush.
The Monument, by Carol L. Douglas.
Paint the details on top of that underpainting, making sure to retain your original values.
Go ahead and paint in details now, matching values to what’s on your canvas rather than what you see. During the great flat light of midday, you will have a good opportunity to paint into your already-defined shadows and highlights. However, at some point after the sun swings completely over the yardarm, you’re going to have to stop. Your light source will be inverted. 
Make a drawn reference to any spectacular lighting effects that whiz by.

Atmospheric effects like crepuscular rays, breaking clouds and rainbows are transient. Before you add them, be certain they support your composition. If so, and you’re in a position to do so, paint them right in. If you’re not at that point of development, sketch what’s happening so you can refer back to your notes.
They may be beautiful but clash with your existing composition. If that’s the case, just sit back and enjoy them, or record them in your sketchbook for another painting.
Sea Fog on Main Street, by Carol L. Douglas. By the time I finished this, the fog had completely evaporated. My sketch and underpainting saved this painting.
Notice there is nothing in here about capturing effects on your camera.

You should be able to develop a plein air painting without any relying on photo reference at all.
I’ve got one more workshop available this summer. Join me for Sea and Sky at Schoodic, August 5-10. We’re strictly limited to twelve, but there are still seats open.