Plein air painting on the cheap

If you’re trying painting for the first time, it makes sense to use less-expensive equipment and supplies. Here are corners you can cut.

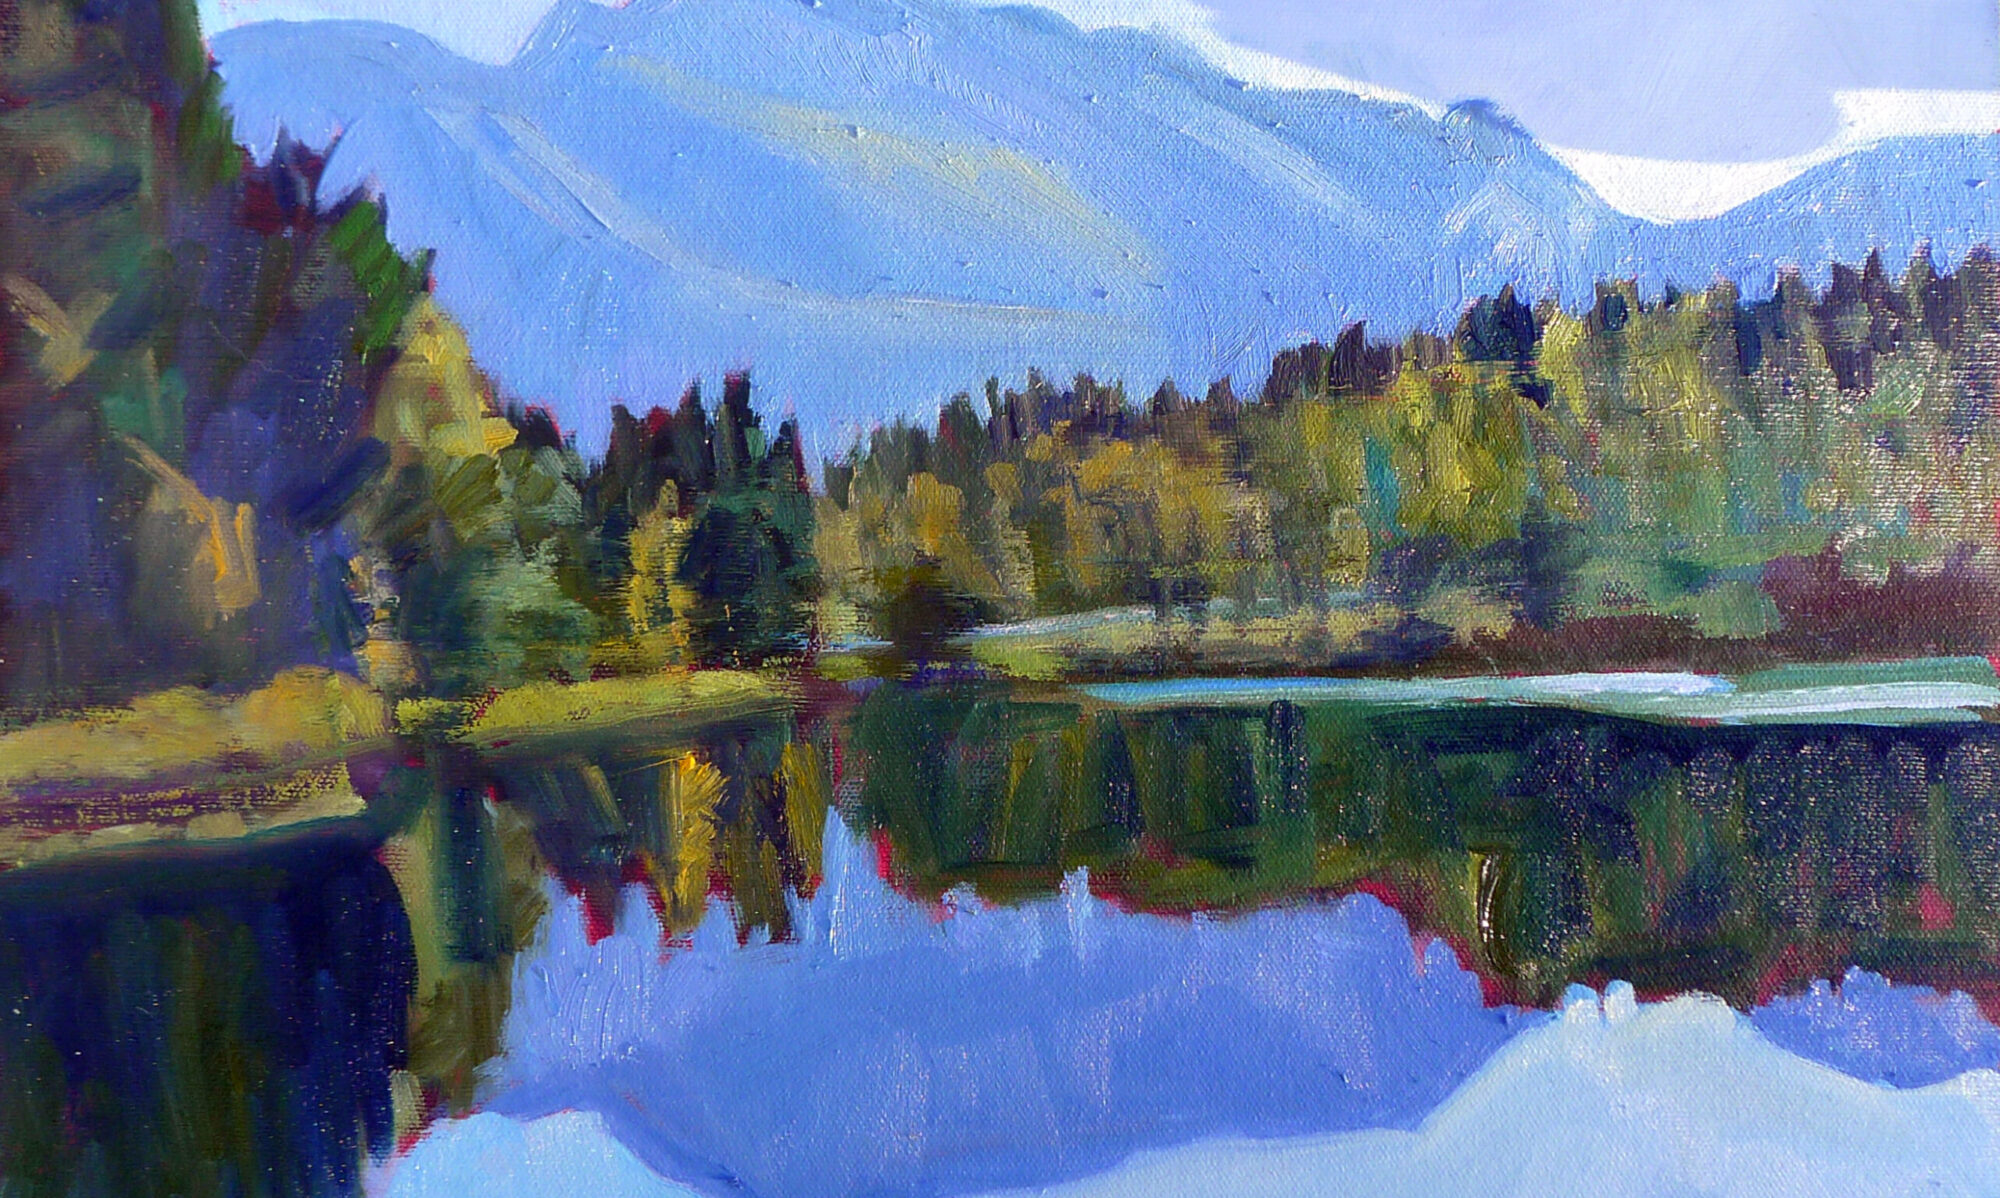
Early Spring on Beech Hill, 12X16, oil on canvas, $1449 framed includes shipping to continental US.

In 2018, when I first wrote about plein air painting on the cheap, this pine tripod easel cost $7.99. It’s ‘on sale’ for $14.99 now, a whopping 53% price increase in four years. That’s precisely why, if you’re interested in trying plein air painting for the first time, you should probably think about ways to do so on the cheap.

That’s the same easel I learned on in high school. I still have it today, tucked into the corner of my studio. It’s rickety, awkward—and it works. It was a standard style field easel until the invention of pochade boxes that screw onto tripods. My father painted his whole life with a similar, home-made model.

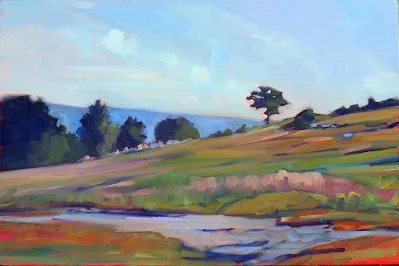
Bridle path, 11X14, $1087 framed includes shipping to continental US.

This easel, however, requires some sort of table. My thrifty friend Catherine uses an old TV table, but there are lighter versions now available.

I wrote recently about pochade boxes for every budget. Dollar Tree’s 9X13 baking pan has only gone up to $1.25, so you can still make the cheapest possible palette for $2.50, plus duct tape. What I neglected to mention in that post was the possibility of buying a used pochade box. Some of my best art tools were purchased second-hand. But you must have the time to be patient.

If you’re handy, you can make one like I did. Or, there’s the classic cigar-box pochade.

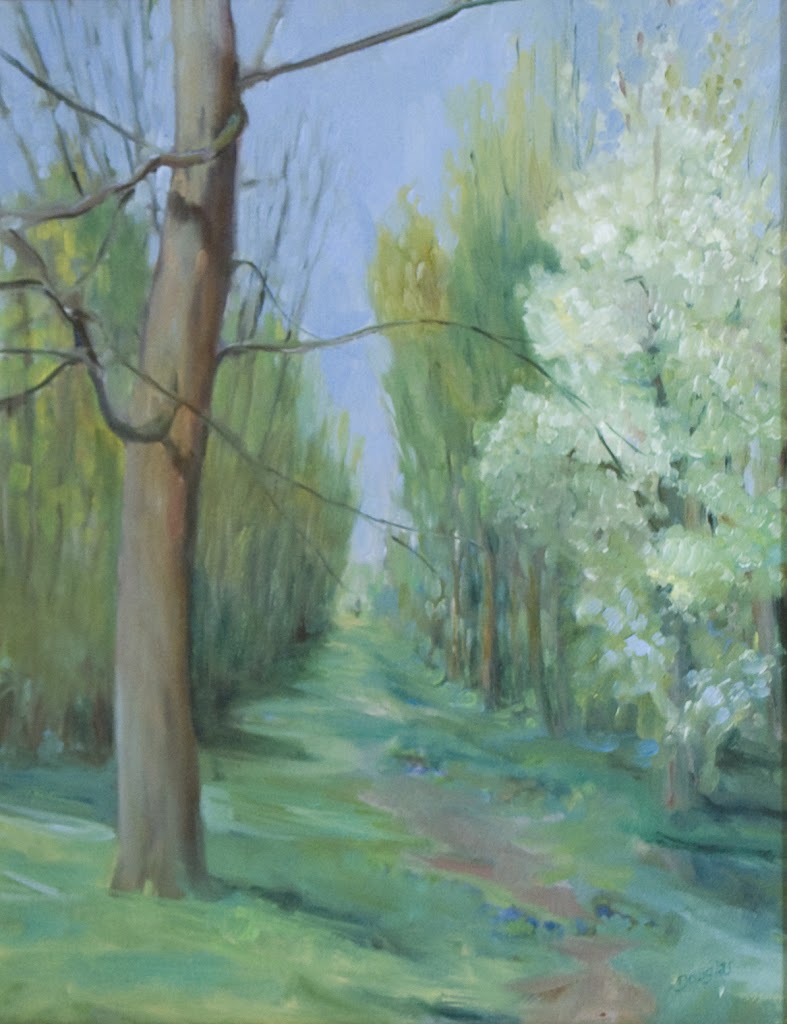
Best Buds, 11X14, $1087 framed, includes shipping to continental US.

One of the great advantages of watercolor is that it doesn’t require any easel. Many studio oil painters sketch in watercolor in the field. A Winsor & Newton Cotman field set and a watercolor journal are a cheap, lightweight introduction to wilderness painting. That’s essentially what Thomas Moran carried on the Hayden Expedition to Yellowstone in 1871. He’s known as an oil painter, but his watercolors have an important place in art history.

In every media, the difference between professional and student grade paints and pastels is the amount of pigment and the quality of the binders. In some cases, more expensive pigments will be copied with hues. A hue mimics the color of a single-pigment paint with less-expensive materials. For example, “cerulean blue hue” is often a combination of zinc white and phthalo blue.

A better solution is to avoid pricier pigments in the first place. In earth colors, there’s almost no difference between the student brand and the professional brand. The difference shows up in paints like the cadmiums, where the pigment itself is expensive. There are modern substitutes that do the job equally well at a lower cost.

Blueberry Barrens, 24X36, $3985 includes shipping in continental US.

There are decent student-grade brands out there in all media:

Oils: Gamblin 1980 and Winsor & Newton Winton.

Acrylics: Winsor & Newton Galeria and Liquitex.

Watercolors: Winsor & Newton Cotman or Grumbacher Academy.

Pastel: Alphacolor Soft Pastels

If you decide you love plein air painting, you can replace these student-grade colors with professional-grade paints over time.

Brushes don’t have to break the bank either. Even though I have a slew of fine watercolor brushes, I still reach for my Princeton Neptunes. Oil and acrylic are trickier since cheap brushes sometimes drop bristles in your work. Princeton also makes good, inexpensive oil/acrylic brushes, especially their 5200 and 5400 series. If you want a synthetic brush, make sure it imitates hog bristles, not sable. A softer brush isn’t meant for alla prima painting.

It’s plein air season again. Check out my workshops, here.

Monday Morning Art School: different strokes

The best way to learn about your brushes is to experiment.Your brushwork contributes immeasurably to the quality of your painting. Don’t dab or be diffident; plan your strategy and then execute it with boldness.

A spalter or mottler is a most useful watercolor brush.

On Friday, I gave you a guide to buying brushes. What are you going to do with these brushes now?

OIL and ACRYLIC

In the following illustrations, I’ve tried to keep the amount of solvent the same (except with the fan brush).

Above is a sable flat brush by Rosemary & Company. It can put down a very smooth surface and offers a lot of control, but it doesn’t carry the quantity of paint that an equivalent bristle brush will. I save sable for glazing or blending.

This is a hog bristle flat brush. The paint it lays down is both rougher and more impasto than the sable.

Flat brushes make an immediate, energetic mark. They’re excellent for fast, powerful surface work, long sweeping strokes, and blocking in shapes.

Used on their sides, they also make great lines, far more evenly than a small round can do.

Two rounds of very different sizes. A round is a more lyrical brush than a flat, and is a classic tool for painterly surface marks. It can be used to make lines that vary from thin to thick. A pointed round is used for fine detail. Bristle rounds tend to lose their points very quickly, however.

The great advantage of a filbert is the variety of brushstrokes you can get from one brush. This is great for single strokes that taper, such as in water reflections. Its rounded edges are good for blending. Set on its side, it makes nearly as good a line as a flat.

A bright is a less-flexible version of a flat. It’s great for short, powerful strokes or situations where you want a lot of control.

A fan brush probably has no place in a plein air kit, but I carry one anyway. I use it for blending, as on the left, although some people like using it to make whacked out marks as on the right. The problem is, it can carry very little paint, so its marks tend to be either gooey, as above, or very abrupt.

In my studio, I just use a clapped out soft-haired brush to blend.

Many plein air painters also carry liners and riggers, which are useful in paintings that are built up smoothly. I don’t paint that way, so I seldom use them. Another brush that is good for detailed work is an angled brush. I don’t have one of them, either. You can do almost any work you can envision with just the brushes I’ve shown you above.

WATERCOLOR

Watercolor brushes are softer than oil-painting brushes. The most expensive are natural bristles, and the difference is usually worth paying for. Natural bristles combine strength with suppleness and hold more paint than synthetics. Unlike oil-painting brushes, your watercolor brushes should last a lifetime, so buy the best you can afford.

In general, watercolor brushes drop more pigment the more vertically they’re held. You can use this to move from a filled area to a broken one in one brush stroke. In all the following examples except for the mop, I’ve held the brush both ways. A good general rule is to carry the vertical brush slowly and in a controlled manner; pull a horizontal brush more rapidly to get the least amount of paint contact with the paper.

Made with the spalter brush at the very top of the page.

The brush I used for the photo montage at the top of the page is a 2″ flat synthetic mottler or spalter brush. I like this shape for both oils and watercolor. It’s a relatively inexpensive brush that gives a beautiful wash. It’s useful for covering large areas quickly, but with precise edges.

A flat gives you good even washes. Used on its side, it can give you a controlled line.
A bright is a shorter version of a flat. More punch with less pigment.

Flats and brights give you nice flat washes, but can be used to make expressive lines as well. Brights have more control and carry less paint, just as they do in oil painting. Turn them on their sides to make a controlled line. Twisting the brush while painting gives an infinite variety of shapes. So too does varying the ratio of paint and water.

You can’t do either of these things in any other medium.

Because of the way watercolor bleeds, its brushes can be used in ways not possible in any other medium–a long blend of different pigments, or by painting a shape in clear water and then dropping pigment into it.

Round brushes give more lyrical lines than flats do.

I don’t normally carry riggers with me in either watercolor or oils. (They’re meant to paint perfect lines, and my world-view apparently doesn’t have many perfect lines in it.) Most of my line work is done with rounds. They do not give as much control on long lines, but they are very expressive.

A mop brush gives a perfect wash, but it does so much more as well.

Squirrel mops are the most uniform wash brush you can use. It’s virtually impossible to make them skip, so use them where a lovely flat wash is a goal. But a good mop can also point, hold vast amounts of paint and sweep across the paper in style.

I think Guillo the dog ate my sea sponge.

Natural sea sponges are multi-purpose painting brushes. Use them to apply or remove paint. They can be as subtle or bold as you wish.

The brushes you really need

You don’t need to spend a fortune to paint.

Channel Marker, 9X12, oil on canvas, available.

OILS and ACRYLICS

Expensive brushes are not the place to throw money for the beginning oil or acrylic painter—good quality paints are far more important. Still, brushes do change how the paint sits, and you need proper tools.

For alla prima painting in oils, you want long-handled hog-bristle brushes. They are less expensive than softer hairs like sable. I like Princeton 9700 series and Robert Simmons Signet hog bristle brushes.

Princeton also makes synthetic brushes that are good value for money—the 6300 series. Anything softer really isn’t appropriate for alla primapainting in oils. Acrylic paints will tolerate a little more flexibility, but avoid anything labeled for both watercolor and acrylic—they’re too soft. Princeton has a good chart of fiber stiffness, here.

Home Port, oil on canvas, available.

An assortment of rounds and filberts, a few large flats and an optional fan brush should suffice. More than a handful is overkill. Most workhorse alla prima painting happens between sizes #6 and #12, with a few smaller brushes for detail work, and larger brushes for bigger canvases.

If you like painting itsy-bitsy lines, invest in a rigger and a #1 round. I get more mileage out of spalter brushes, which are large, inexpensive flats for covering lots of area fast. I also keep a few soft sable brushes for glazing and blending.

Parrsboro Sunrise, 11X14, oil on canvasboard, available.

Bristle brushes tend to form a flag (a v-shaped split) at the end over time. If the brush is made properly, with good interlocking bristles, it will have a natural resistance to fraying. However, oil and acrylic brushes can’t tolerate letting paint dry into them, or being left standing on their bristles in solvent. You can wash brushes with Murphy’s Oil Soap, saddle soap (nice), specialty brush soaps, Fels Naptha, or even shampoo or detergent in a crunch. The important thing is that you do it promptly, before your paint has a chance to set up.

First, remove the solids by swishing them around in solvent. Then, put soap on a rag and work it into the bristles from the ferrule down to the bristles’ end. Be sure you’re washing the inside bristles, not just the surface. Repeat until the suds run clean. Shake excess water out, shape the brush slightly with your hand, and let it air dry.

Sometimes it rains, oil on canvasboard, available.

WATERCOLOR

Brushes are far more important in watercolor. I like Rosemary & Co. but they are very expensive. I recommend Princeton Neptune brushes for new painters. A ½” flat, a 1” wash brush, a #6 quill and a #8 round will get you started. If you’re going to invest in a mop, squirrel is better than synthetic. A set of short synthetic flats (or mottlers, as they’re sometimes called) in ¾”, 1” and 1½” will round out your collection.

Riggers and liners are tiny brushes for making very fine lines. They’re more useful in watercolor than they are in oils, in my experience. I buy the cheapest ones I can find because I’m always wrecking their points.

Lastly, you should have a scrubberto take out mistakes. You can buy them purpose-built, or you can just use an old hog-bristle brush.

Never leave your brushes standing in water, even as you work. Cleaning watercolor brushes is far easier than cleaning oil brushes. Hold them under the tap and let the pigment wash off with the flow of the water. I have never washed my brushes with soap, but if you find your synthetic brushes have stained, you can use a small amount of bar soap on them. Squeeze the water out and reshape the heads. That’s all there is to it.

It’s not the brushes, kiddo

Brushes are ordinary; it’s what you can do with them that is extraordinary.

Home Port, by Carol L. Douglas, 18X24, oil on linen.
At Castine Plein Air, Ken DeWaard did a small boat painting that I thought was darn near perfect. (I don’t have an image of it, but you can see it at Camden Falls Gallery.) One of the things that struck me was the fluid brushwork. My brushes are getting frayed, so none of my flats are still flat, and many of my rounds are splayed. And, frankly, I abuse them, tossing them in my hot car and forgetting to clean them. I’ve had trouble with my last batch of Robert Simmons signets—the ferrules are loose—so I’m interested in experimenting with something else.
I asked Ken what brushes he’s using. “Some Rosemarys, and some cheap synthetics,” he answered. That made sense. In oils, the trade off with synthetic or soft animal hair is that you get better control, but they carry less paint. You can’t be rudely aggressive with them. But if you want lyrical linework or detail, or want to glaze, they’re unbeatable. I’ve been messing with a Princeton Snap! brush this month. Synthetics have come a long way.
What I was working on while painting with Ken DeWaard on Monday. Another day and I think I’ll be well on the way to finishing.
Monday, Ken and I painted together in Rockport. I took the opportunity to look at his brushes. They’re a saturated, half-hardened mess—even worse than mine. If he can paint that beautifully with those cudgels, I need to stop grumbling about my brushes.
Albrecht Dürer was arguably the most facile brush-wrangler who ever lived. Whether it was in watercolor, as in the Young Hare, or in oils, as in his many self-portraits, he could seemingly lay down every single hair on man or beast’s head. He was famous for this skill all over Europe.
He was in communication with the major Italian artists of his time, including RaphaelLeonardo da Vinci, and Giovanni Bellini. His relationship with Bellini was more than merely professional. DĂźrer visited Venice twice and developed a friendship with the older man. Bellini was the most famous member of a prestigious family of artists and very influential. He was no slouch with the fine brush himself.
Self-Portrait at Twenty-Eight, 1500, Albrecht DĂźrer, courtesy Alte Pinakothek, Munich
By Dürer’s second visit, Bellini was at the end of his long life. He extended many professional courtesies to Dürer, not the least of which was introducing the younger man to his own noble Venetian clients.
One day, after carefully examining the head of one of Dürer’s saints, Bellini asked to use the brush that had creating such lifelike hair. Dürer handed the old man the brush in question. Bellini tried it and failed to produce anything fine. Dürer took the brush back, still loaded with Bellini’s paint, and painted a lock of hair so marvelous that the older man said he wouldn’t have believed it had he not seen it with his own eyes.
Doge Leonardo Loredan, after 1501, Giovanni Bellini, National Gallery, London
This story is apocryphal, but makes a true point. Dürer’s brush was ordinary; his abilities were extraordinary. Brushes influence our mark-making, but they don’t control it. Strength, age, experience, personality and patience all play roles in how we lay down paint.
Dürer, by the way, was inordinately proud of his own hair, painting his ringlets in several wonderful self-portraits. I have the same ringlets as that cocky young man had five hundred years ago, and I’m almost as vain about them as he was. But I’ve never painted a self-portrait. Perhaps this winter I should rectify that.

Monday Morning Art School: what do different brushes do? (Part 2, watercolor)

Brushes are much more important in watercolor than in oil painting. Here’s what each brush is for.
The more vertical the brush, the more flow.
Recently a student asked me why he was carrying so many different brushes. What were their uses? This is the second part of the answer; I addressed oil painting brushes last week.

Watercolor brushes are softer than oil-painting brushes. The most expensive are sable brushes, and unlike oil-painting brushes, the difference is worth paying for. Natural bristles combine strength with suppleness and hold more paint than synthetics. However, there are some fine synthetic brushes out there. Several of my go-to brushes are Princeton Neptunes. 

Unlike oil-painting brushes, your watercolor brushes should last a lifetime, so buy the best you can afford. The only absolute rule is to never leave them standing in water. Set them down flat between brushstrokes and rinse them thoroughly when you’re done.
Made with the synthetic spalter brush, above.

Except for squirrel mops, watercolor brushes drop more pigment the more vertically they’re held. You can use this to move from a filled area to a broken one in one brush stroke. In all the following examples except for the mop, I’ve held the brush both ways. A good general rule is to carry the vertical brush slowly and in a controlled manner; pull a horizontal brush more rapidly to get the least amount of paint contact with the paper.

The brush I used for the photo montage above is a 2″ flat synthetic mottler or spalter brush. I like this shape for both oils and watercolor. It’s a relatively inexpensive brush that gives a beautiful wash. It’s useful for covering large areas quickly, but with precise edges.

A flat gives you a good even wash. Used on its side, it can give you a controlled line.
And that would be the bright. More punch, less pigment.
Flats and brights give you nice flat washes, but can be used to make expressive lines as well. Brights have more control and carry less paint, just as they do in oil painting. Turn them on their sides to make a controlled line. Twisting the brush while painting gives an infinite variety of shapes. So too does varying the ratio of paint and water.
You can’t do either of these things in any other medium.

Because of the way watercolor bleeds, its brushes can be used in ways not possible in any other medium–a long blend of different pigments, or by painting a shape in clear water and then dropping pigment into it.

Round brushes are just more lyrical than flats.
I don’t normally carry riggers with me in either watercolor or oils. (They’re meant to paint perfect lines, and my world-view apparently doesn’t have many perfect lines in it.) Most of my line work is done with rounds. They do not give as much control on long lines, but they are very expressive.
A mop brush makes a perfect wash, but it does so much more as well.

Squirrel mops are the most uniform wash brush you can use. It’s virtually impossible to make them skip, so use them where a lovely flat wash is a goal.

Mop brush on very textured paper.
But a good mop can also point, hold vast amounts of paint and sweep across the paper in style.
One of my favorite tools, a natural sponge.

Natural sea sponges are multi-purpose painting brushes. Use them to apply or remove paint. They can be as subtle or bold as you wish.

Paint lifted (left) and applied (right) with a sponge.

Your brushwork contributes immeasurably to the quality of your painting. Don’t dab or be diffident; plan your strategy and then execute it with boldness. To do this, of course, you have to practice.


Monday Morning Art School: what do different brushes do? (Part 1)

The best way to learn about your brushes is to experiment, but meanwhile, here’s a handy guide to oil painting brushes.

Plein air painters usually favor hog’s bristle brushes. These are far less expensive than softer hairs like sable. They are the only brushes that spread thick paint smoothly and evenly, making for the freshest technique.
Bristle brushes tend to form a flag (a v-shaped split) at the end over time. However, if the brush is made properly, with good interlocking bristles, it will have a natural resistance to fraying. Because field painters often go long periods without being able to clean their brushes, this durability is important.
There are some good synthetic brushes on the market, but none of them are quite as stiff as a good natural bristle brush. 
In the following exercises, I’ve tried to keep the amount of solvent the same (except with the fan brush).

Above is a sable flat brush by Rosemary & Company. It can put down a very smooth surface and offers a lot of control, but it doesn’t carry the quantity of paint that an equivalent bristle brush will. I do have many sable brushes, but I save them for thin work in the studio.

This is a Robert Simmons Signet flat brush. The paint it lays down is both rougher and more impasto than the sable.

Flat brushes make an immediate, energetic mark. They’re excellent for fast, powerful surface work, long sweeping strokes, and blocking in shapes.

Used on their sides, they also make great lines, far more evenly than a small round can do.

Two rounds of very different sizes. A round is a more lyrical brush than a flat, and is a classic tool for painterly surface marks. It can be used to make lines that vary from thin to thick. A pointed round is used for fine detail. Bristle rounds tend to lose their points very quickly, however.

The great advantage of a filbert is the variety of brushstrokes you can get from one brush. This is great for single strokes that taper, such as in water reflections. Its rounded edges are good for blending. Set on its side, it makes nearly as good a line as a flat does.

A bright is a less-flexible version of a flat. It’s great for short, powerful strokes or situations where you want a lot of control.

A fan brush probably has no place in a plein air kit, but I carry one anyway. I use it for blending, as on the left, although some people like using it to make whacked out marks as on the right. The problem is, it can carry very little paint, so its marks tend to be either gooey, as above, or very abrupt.

In my studio, I just use a clapped out soft-haired brush to blend.

The only ‘novelty’ brush I carry is a double filbert, or Egbert, above. It’s a lyrical brush that has a lot of expressive quality.
Many plein air painters also carry liners and riggers, which are useful in paintings that are built up smoothly. I don’t paint that way, so I seldom use them. Another brush that is good for detailed work is an angled brush. However, you can do almost any work you can envision with just the brushes I’ve shown you above.
Next week, I’ll talk about watercolor brushes.

Holiday gift guide #1—brushes for oils, acrylics, and watercolor

That Holiday is coming up. I am often asked for gift ideas. Brushes are expensive, and most students limp by with rotten ones rather than spend the money on good brushes. A gift certificate to an art supply store would give the most flexibility, but some people don’t want that.

The brush department is where most painters stand and drool in an art store

Oil and acrylic plein air painters should limit themselves—in general—to long-handled hog bristle brushes. These carry paint most effectively. Shape is a personal preference, but a decent mixture of sizes and shapes gives the greatest flexibility.
Oils and Acrylics
In general, painters are better off with fewer good brushes than a lot of mediocre ones. Sizing is not standard across manufacturers, but a variety between #2 and #12 should suffice for most field work.
Here are the fundamentals:
Brights are stubby flat brushes, useful for short, aggressive strokes and heavy paint application.
Filberts are oval brushes. They carry more paint than a round but the pointed end allows for greater paint-carrying capacity. People who like to blend their edges often like filberts best.
Flats have been my go-to brush for many years. They can be used on edge for fine work, but used on the flat they carry lots of paint and create a bold style.
Rounds are good for details, lines, and fills. I generally carry a few smaller rounds in my kit, but many painters swear by them in all sizes. 
Here are specialty brushes, for the painter who already has a basic kit:
Riggers: These are short-handled, pointed, long round brushes made of sable, and their main mission in life is painting boat rigging and other fine lines.
Fans: While you could use these to daub happy trees, they are really intended for blending. I have a couple in my studio kit, but I don’t carry them in the field.
The basic shapes
Egbert or Double filberts are long, squishy brushes. I have three of these. They are easily damaged and shouldn’t be left to stand in a can of turpentine. They are especially good for figure work, and give a dancing, prancing line.
Spalters are big flat brushes with either long or short handles. I use them to underpaint my studio canvases and as dry blending brushes.
Watercolors
Watercolor painters have the choice between Taklon, squirrel and sable. The latter costs the earth but has the finest paint-carrying capacity.
The three basic shapes are:
Round: this is more pointed than an oil-color round and is suitable for most detail work. Sable takes a point better than synthetics, and this is a place where spending the money would be appropriate. A #10 for regular painters, and a #16 for big painters is a good place to start.
Flat wash: Most painters carry a few of these. I have a .5” and 1”, both of Taklon. These often have an angled end for scraping and burnishing.
Mop/oval wash:This is a big floppy brush useful for laying in large areas. It is usually made of squirrel hair, and is very absorbent.
Hake: Also a wash brush, but of Asian extraction. I find a mop more versatile, but it wouldn’t hurt to have one to play with.
Riggers: These are short-handled, pointed, long round brushes made of sable, and their main mission in life is painting boat rigging and other fine lines.
Script/Liner: A detail brush for outlining and long continuous strokes.


I will be teaching in Acadia National Park next August. Message me if you want information about the coming year’s 
classes or this workshop.

It’s not gonna snow forever

Spring really is just around the corner, I swear.

I think the dead of winter is God’s way of telling me it’s time to paint the figure, so I generally lay off plein air in the coldest months. The last day I painted out-of-doors was the day before Thanksgiving. But watching spring snow falling outside my studio window is a reminder that in a week or so, we can be outdoors, so it’s time to get my pack in order.
Is this the year I buy a new brush holder? Nah…
I use the same palette indoors and out, but my umbrella, my backpack, and my field easel get stashed in a corner, from whence they silently reproach me for not going outside to play. The first order of business is to pull them out and inspect them for cracks, tears and other damage, and to thoroughly vacuum out my pack.
If brush cleaner/conditioner doesn’t
salvage them, replace them.
Then it’s time to consider what condition my brushes are in. A few need replacement every year, particularly the flats and long filberts. Some need reshaping, and a few need to be rescued, but mostly I have to track down the ones that have wandered out of my brush holder into a coffee can in my studio.

 I don’t use tubes, but buy my paints in cans (from RGH Paints in Albany). I keep my paints in this segmented vitamin box, given me by my pal Jamie Williams Grossman. Generally this box of paints will get me through a week of travel without reloading, and it weighs a fraction of what the same paints in tubes do. Having used this box without cleaning it since last May, this seems like a good time to clean out any residual old paint and wipe out the reservoirs. But it’s also a sensible time to check my supplies and order new paint.
Ditching tubes cuts down on weight. Cheap, efficient, and faster.
More drawing means less struggling, so I carry them all: charcoal, watercolor pencil, graphite, greyscale markers for fast value studies, and a viewfinder/dry erase marker. I often use watercolor pencils and a straight edge when architecture is involved, and I particularly like that one can erase errors with a damp paper towel. I definitely need some new watercolor pencils this year.
Draw slow, paint fast. From left, charcoal, watercolor pencils and sharpener, grey-scale markers, graphite sticks and sketchbook, viewfinder and dry-erase marker.
Another group of supplies that’s frequently looted over the winter is personal care supplies. I note that I need replacement suntan lotion and I need to track down my lucky painting cap, apron, and water bottle. The latex gloves are primarily for warmth, not cleanliness, so I’d better order liquid gloves. (You Southerners will be surprised to learn that the hand warmers can be dropped out again after, say, July.) I always carry two ponchos—one for me, and one for my painting, because when it rains in the spring, it really rains. I put my IPod and my camera in this category, but they don’t need to be checked; they’re used every day.
Never discount the value of being comfortable. From left, insect repellent, baby wipes, poncho for my easel, hand-warmers, my poncho, latex gloves.
I have two sets of tools, so my field ones generally don’t go walkies, but they still need to be checked, because they’re the most important tools I own: my compass (because I want to know where the sun is heading), palette knifes and a scraper, bungee cords, a level, S-hooks, clips, an all-purpose tool, a straight edge/angle finder, double pots, soap.
The most important part of my kit after paints and brushes. From top left: compass, two palette knives, scraper, bungee cords, level, soap, palette cups, angle finder/straight edge, all-purpose tool, clips, S-hooks.
It’s time to order new fast-dry medium, and check my supplies of mineral spirits. Because I want to travel light, I’ll repurpose the medium container to hold mineral spirits, and carry my medium in the tiny pot in the foreground (bought as part of a cosmetic travel set from my local dollar store). A hotel shampoo bottle serves equally well for this. I always carry a few plastic grocery bags for trash, and I stash the larger containers and a funnel in my car. I’ll go out in my shop and run a few rolls of paper towel through my chop saw so they’re half size, and I’ll be good to go.
You need a big bottle of mineral spirits in your car and a little one to carry, a big bottle of medium and a little one to carry, a brush-washing tank, some boards to paint on, and a way to move the finished paintings.
I’ve been using thumbtacks, a strap and waxed paper to move wet paintings, but this year I think I’ll go all-out on a new carrier system made from cheap frames and big rubber bands, as suggested by my pal Marilyn Fairman. And it’s definitely time to check my inventory of painting boards. I like Ray-Mar boards and they always have a Memorial Day sale, so I always try to arrange my inventory to limp along until then. But this week I’ll sort my remaining inventory and count them so I know what I need to order.
That’s my routine for checking my oils. You can extrapolate the same checklist for watercolors and pastels—check your pigments, check your tools, check the stuff you need to be comfortable, reorder what’s gone, repair what’s broken. For a complete list of my recommended oil painting supplies, check here. For watercolor supplies, check here. For pastel supplies, check here.

A paean to painting with a 2” sash brush

As in all painting, the quality
of the brush matters. And, no,
this isn’t a 2″ sash brush.

Our Christmastide project was to rebuild and refinish our kitchen cabinets and rehang the doors, a task that has stubbornly remained undone for nine years. As with all such tasks, it’s taken longer than I budgeted, the unconscious expectation of which is why I let it ride that long in the first place.
My studio, overrun (these are the insides of the doors).
I like applying finishes, whether it’s on woodwork or painting on a canvas. The actual process is the same—you start with a sticky, gelatinous fluid, and your object is to overcome its innate desire to drip, to puddle, to build up in ridges, to wick where it isn’t wanted, to separate into its constituent parts—in short, you lay it down as elegantly and economically as is possible, in the places you planned for it to go.
Painting on a canvas and painting in a room are both essays in trompe-l’œil, whether it’s a question of creating a face or a forest on linen, or fooling the eye with putty and painter’s caulk.
And, regardless, you still have to clean the brush.
Top cabinets, sans doors. Still more
to do on the window frame.
It’s no accident that one of the most skilled landscape painters I know—Brad Marshall—earns his daily crust as a sign-painter (featured here, in the New York Times). It’s no surprise that the best painters in my household are Sandy, Mary and me, because we’re the three most likely to be found painting on canvases. You develop a steady hand from using it.
This kitchen has the original cabinets from 1928, and a soda-fountain-style banquette, and the game is to update them wittily without overriding them stylistically. That means respecting their weird little corners and worn hardware. Of course this has been far more work than tearing them out and replacing them would ever have been, but that wouldn’t have been very respectful of the house. They were never intended to be unpainted, but after 90 years of repainting, they required stripping, and the birch-and-poplar cabinetry is finish-grade by modern standards, so I decided to stain the upper cabinets and all the doors and paint the bottom ones, which were originally built from a lower grade of pine (and have been substantially rebuilt by my engineer spouse).

Meanwhile, my current landscape languishes on its easel. I can’t get to it past all these doors.

Bottom cabinet, with a drawer inserted
(sans hardware) for illustration purposes.
The dog food is real.