Monday Morning Art School: losing your edge

There are many ways to soften an edge; the important thing is recognizing where you should do it.

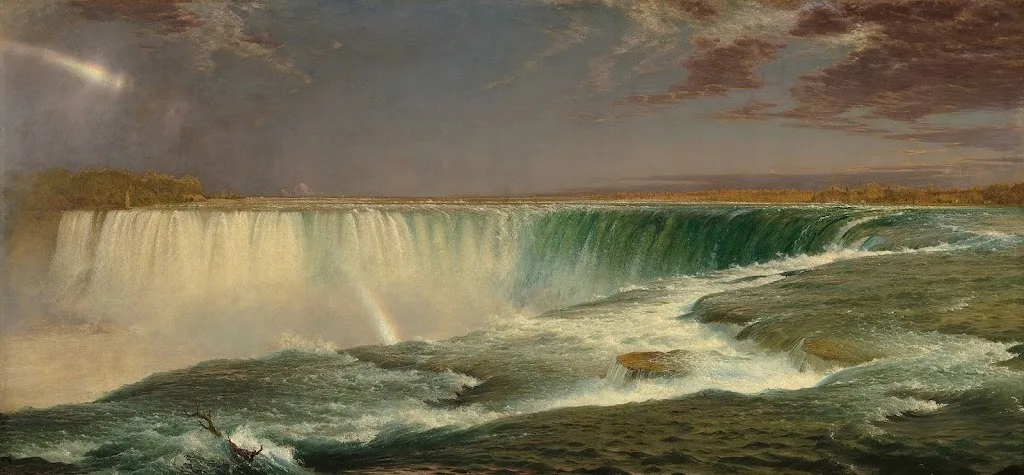
Niagara, 1857, Frederic Edwin Church, courtesy Corcoran Gallery

Almost every good painting is a combination of hard and soft edges. Edges may be lost through brushwork or they can be muted using contrast or color. A variety of edges not only adds interest to a painting, they support its composition and thus how the painting is ‘read’.

Broken brushwork, or broken color, means that the artist applies paint in small or skipping strokes but does not blend them. Colors blend optically rather than literally. Broken brushwork can take the form of small, intentional marks, scumbling, or palette-knife painting. The goal is to create tension, a vibration of color. Broken brushwork is an excellent way to lose the edge in painting.

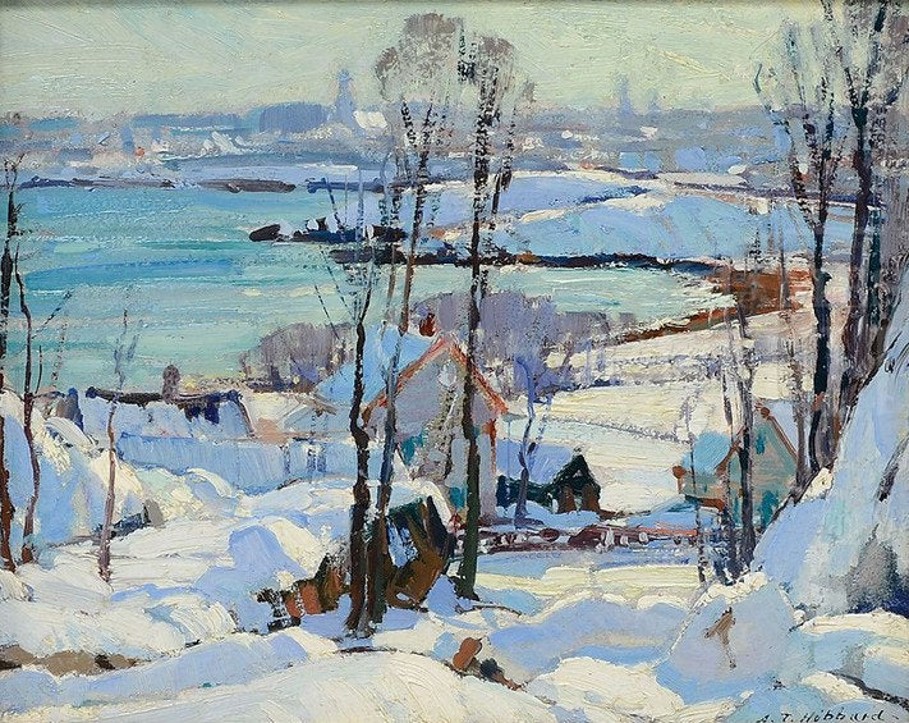
Winter Harbor Scene with City Views Beyond,Aldro T. Hibbard

Chauncey Foster Rider was admired in his day for both his vigorous, adventurous brushwork and the degree to which he pushed his landscape paintings toward abstraction. He had a particular gift for painting the feathery bare branches at the top of winter trees in both watercolor and oils. He had several ways of doing this: wet on wet, broken color created by pushing paint with a palette knife, dragging his brush through wet paint, and by making low-contrast shifts within value masses. At times he painted the middle distance in thin paint, or dry-brushed thin paint over an already-textured sky. But perhaps the most effective of his techniques was creating masses that are barely darker than the winter sky. From a distance, they read as a mass of bare branches.

Another fine painter of New England winter was Aldro T. Hibbard. He too had a variety of tricks for painting the filigree of bare branches, including dry-brush scumbling, as shown in the example above. He played these soft shapes against the hard lines of positively-painted tree trunks to great effect.

Before there was broken brushwork, there was blending and softening. In Frederic Edwin Church’s Niagara, at top, the rim of the cataract veers between sharp and blurred edges. A long bright triangle, stabbing to the right, is accentuated by the soft colors of the mist. The far shore shimmers in the spray. It’s a tour de force of a type of painting we don’t see enough of these days.

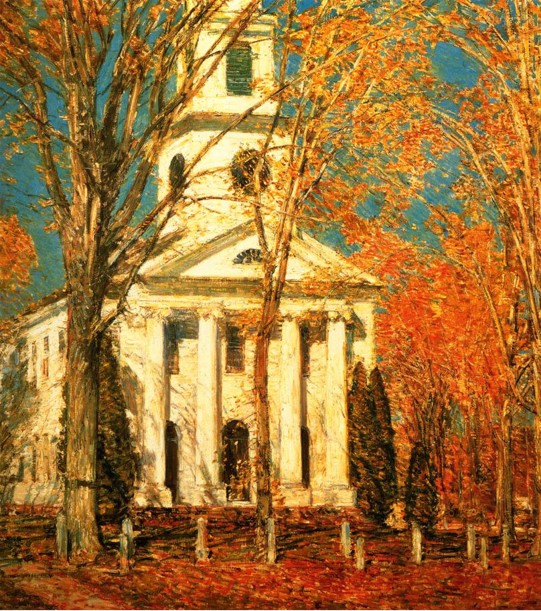
Church at Old Lyme, 1905, Childe Hassam, courtesy Albright-Knox Art Gallery 

There are indirect ways to make edges recede, too. In Church at Old Lyme, above, Childe Hassam makes the leaves and sky the exact same value. Even though their edges are sharp and the colors complements, they flow into each other, leaving no doubt that the subject of the painting is the white church.

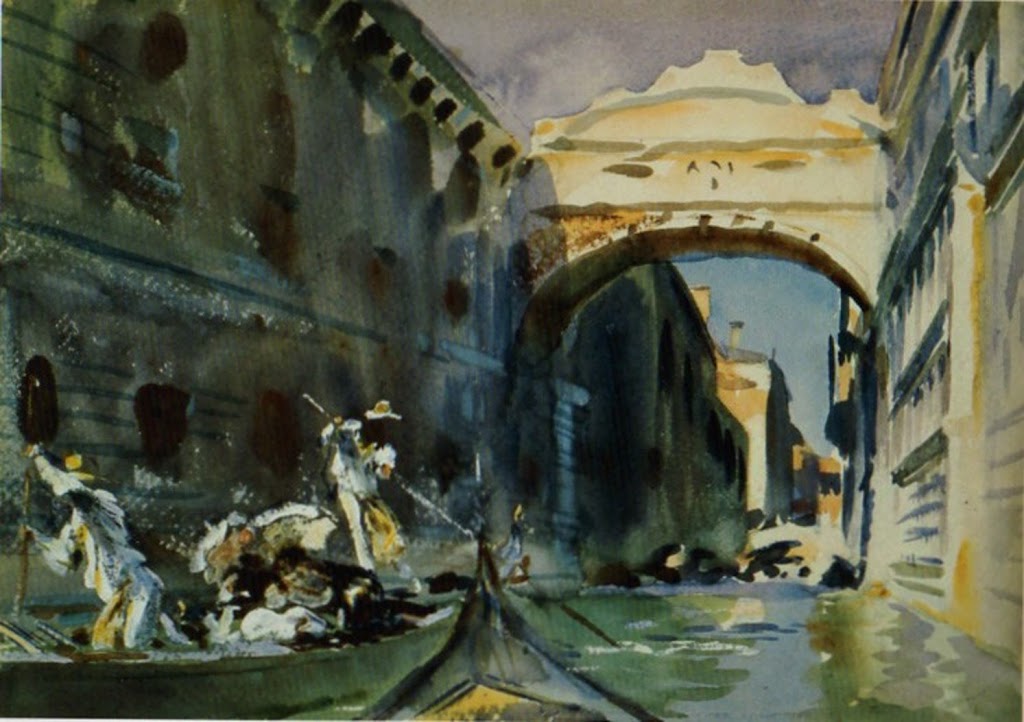
The Bridge of Sighs, c. 1903-04, John Singer Sargent

John Singer Sargent’s watercolors of the Bridge of Sighs balance the hard edge where the sky meets the stone against the soft shadows. These are allowed to bleed into the muck of darkness, a great way to deemphasize too many hard edges. By the way, for those purists who hate white paint in watercolor, Sargent used it quite cheerfully.

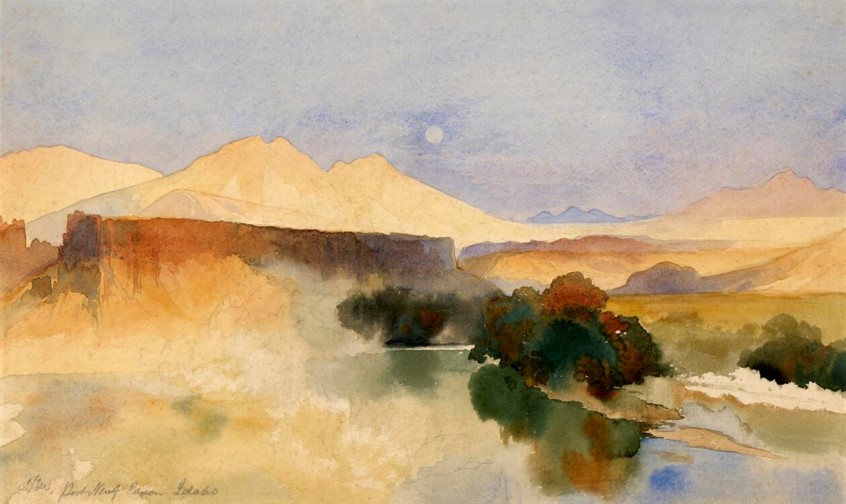
Portneuf Canyon, Idaho,1879, Thomas Moran

Reducing contrast reduces the perceived hardness of the edges, as Thomas Moran’s Portneuf Canyon, Idaho, above, demonstrates. That’s how we instinctively read the far distance as receding. And, of course, watercolorists can always wet an edge to soften it, or paint into wet paper.

Two Women on a Hillside, 1906, Franz Marc, courtesy Franz Marc Museum

We know that value contrast can support or diminish a hard edge, but so also can hue. In Two Women on a HillsideFranz Marc tied the women to their setting by reflecting the greens of the grass in their skin and garb.

The important thing isn’t necessarily the way you lose your edges, it’s knowing where and when it should be done. That’s best learned by looking at great paintings and analyzing the pas de deux between hard and soft edges.

Monday Morning Art School: the silhouette

Want to paint like John Singer Sargent? Start by learning to draw like him.

Singer with a Glove, 1878, pastel, Edgar Degas, courtesy Fogg Museum

In Edgar Degas’ Singer with a Glove, above, the model’s hand has no volumetric form. There is almost no shading in that hand, merely a silhouette. Yet our minds can immediately decode the image. We understand it because of its context and the accuracy of its drafting. It’s a silhouette of a hand, and it illustrates an important point in painting. The accuracy of drawing matters.

In this painting—so remarkable in many ways—there is, in fact, a carefully-plotted harmony of silhouettes. There are the dark outlines of her cuff and bodice, the inverted triangle of her torso, and the long stripes of color in the background. In fact, very little of this painting relies on modeling; most of it is a series of shapes. Volume is secondary to that dazzling array of shapes and color.

The Valpinçon Bather, 1808, Jean-Auguste-Dominique Ingres, courtesy the Louvre

I used this painting as an example because it’s overwhelmingly obvious. However, in the context of painting, silhouette does not mean a solid shape of black. It means the major shape(s) within a painting. In Ingres’ The Valpinçon Bather, above, the body is the silhouette—solid and tangible. You could almost cut it out with scissors and paste it in a book.

To lead with silhouette, the artist must get the line as perfect as possible from the beginning. That means drawing a proper line, with all its jots and tittles. Want to paint like John Singer Sargent? Start by learning to draw like him.

W. B. Yeats, charcoal on paper, 1908, John Singer Sargent, Private collection.

The two ideas—volume and silhouette—are the fundamental elements of painting. The silhouette is simply the outer contour of the modeled shape. If you draw it perfectly, you can suggest the form with minimal modelling. But it’s through modeling that the form becomes expressive and we have a sense of reality.

In general, artists choose to emphasize either volume or silhouette, but they both exist in most paintings. You can see that co-existence quite clearly in Bruegel’s Peasant Wedding, below. It’s a positive cornucopia of dazzling shapes. Still, the faces are fully formed and evocative, and the figures have volume.

The Peasant Wedding, 1566-69, Pieter Bruegel the Elder, courtesy Kunsthistorisches Museum

It’s tempting to think of silhouette as intellectual and volume as intuitive, because in practical painting, that’s often how they progress. We work from big shapes down to little shapes (‘modeling’) and as we progress, we’re drawing more and more from our non-intellectual reserves.

This post was drawn from a long Facebook discussion between artist Tom Root and his friends. Thanks, Tom!

Monday Morning Art School: controlling edges

Creating hard and soft edges is largely a matter of practice.

In Breaking Storm, the soft edges in the clouds were done by overbrushing with a dry brush. The hard edges in the sails and rigging were done with a flat brush on its side.

The lost-and-found edge is an important design principle, one that every painter should be familiar with. To do it successfully, one must feel confident painting not just shapes but lines. That requires understanding how your brush lays down paint. Edges are one area in which watercolors and oils behave very differently.

A softened edge creates a natural blurring, and it happens often in human perception. We just ignore the edges we’re not interested in. In painting, a soft edge can be achieved by keeping value, hue and saturation close between two shapes, but it’s most often achieved through brushwork.

A hard edge is an area that demands our attention. It should be related to the focal point of a painting. It can be achieved by separating hue, saturation and value, but it’s also a place where effective brushwork is important.

In oil painting, you can lay down a line and fiddle endlessly with its edge, but in watercolor you get only one shot at it (although you can tidy things up a bit after the fact). This is not permission to overpaint endlessly in oils. In either medium, constant tinkering is a sure-fire way to deaden your work.

In either medium, the smaller the brush, the harder the edge. That’s one reason your teachers harp on you to use a bigger brush.

The angle at which you hold your watercolor brush will determine how broken the line is.

In watercolor, the hardness of the edge must be considered in advance.

A truly hard edge is made by working an upright brush slowly across the work, allowing the pigment to flow onto the paper. The more slanted the brush and the less pigment and water, the more broken scumbling will result. This is a beautiful effect, worth practicing.

If you want to soften or blend an edge, you can’t wait until later. Your options are to:

  1. Lay down a line and immediately run clean water along the edge you want to soften;
  2. Work into a prewetted area, letting the paint bleed down along the edge you want to soften;
  3. Create the illusion of softness by unifying passages with an underwash.
Top sample, painted into damp paper with a dry edge at the top. Middle, painted into wet paper with a dry edge at the top. Bottom, edge wetted after painted onto dry paper. 

In the first two techniques, working too slowly will give you bloom (caused by rewetting a partially-dry area) or a hard edge where you don’t want it. A line or shape can have both a hard and a soft edge—just don’t soften the edge on that side of the paper.

A simple exercise in hard and soft edges in watercolor. Yes, kids, try this at home!

In alla prima oil painting, edges need to be married. That means making a shape or silhouette, and then pushing the background color against it. Not doing this will result in anemic shapes. After this is done, the edge can be softened by:

Using a dry brush to manually blur edges;

Introducing the background color into the foreground and vice-versa.

Three Machines, 1963, Wayne Thiebaud, courtesy De Young Museum. Note that he leaves the edges in the background as part of the design.

At times this will produce a halo around the object. I was taught to eliminate that halo. Recently in class, we were looking at paintings by Wayne Thiebaud, and I noticed how often he left that halo as part of his design. Whether or not you elect to brush the halo out, Thiebaud’s paintings vividly demonstrate how to marry the background to the foreground in oil paints.

The hardest, most precise line in alla prima oil painting can be made by using a flat brush on its side. If you’re painting onto a dry surface, you can get a hard, tight line with a rigger or fine brush as well.