Reading (and writing) a painting

A good artist, like a good writer, controls how his painting is read.

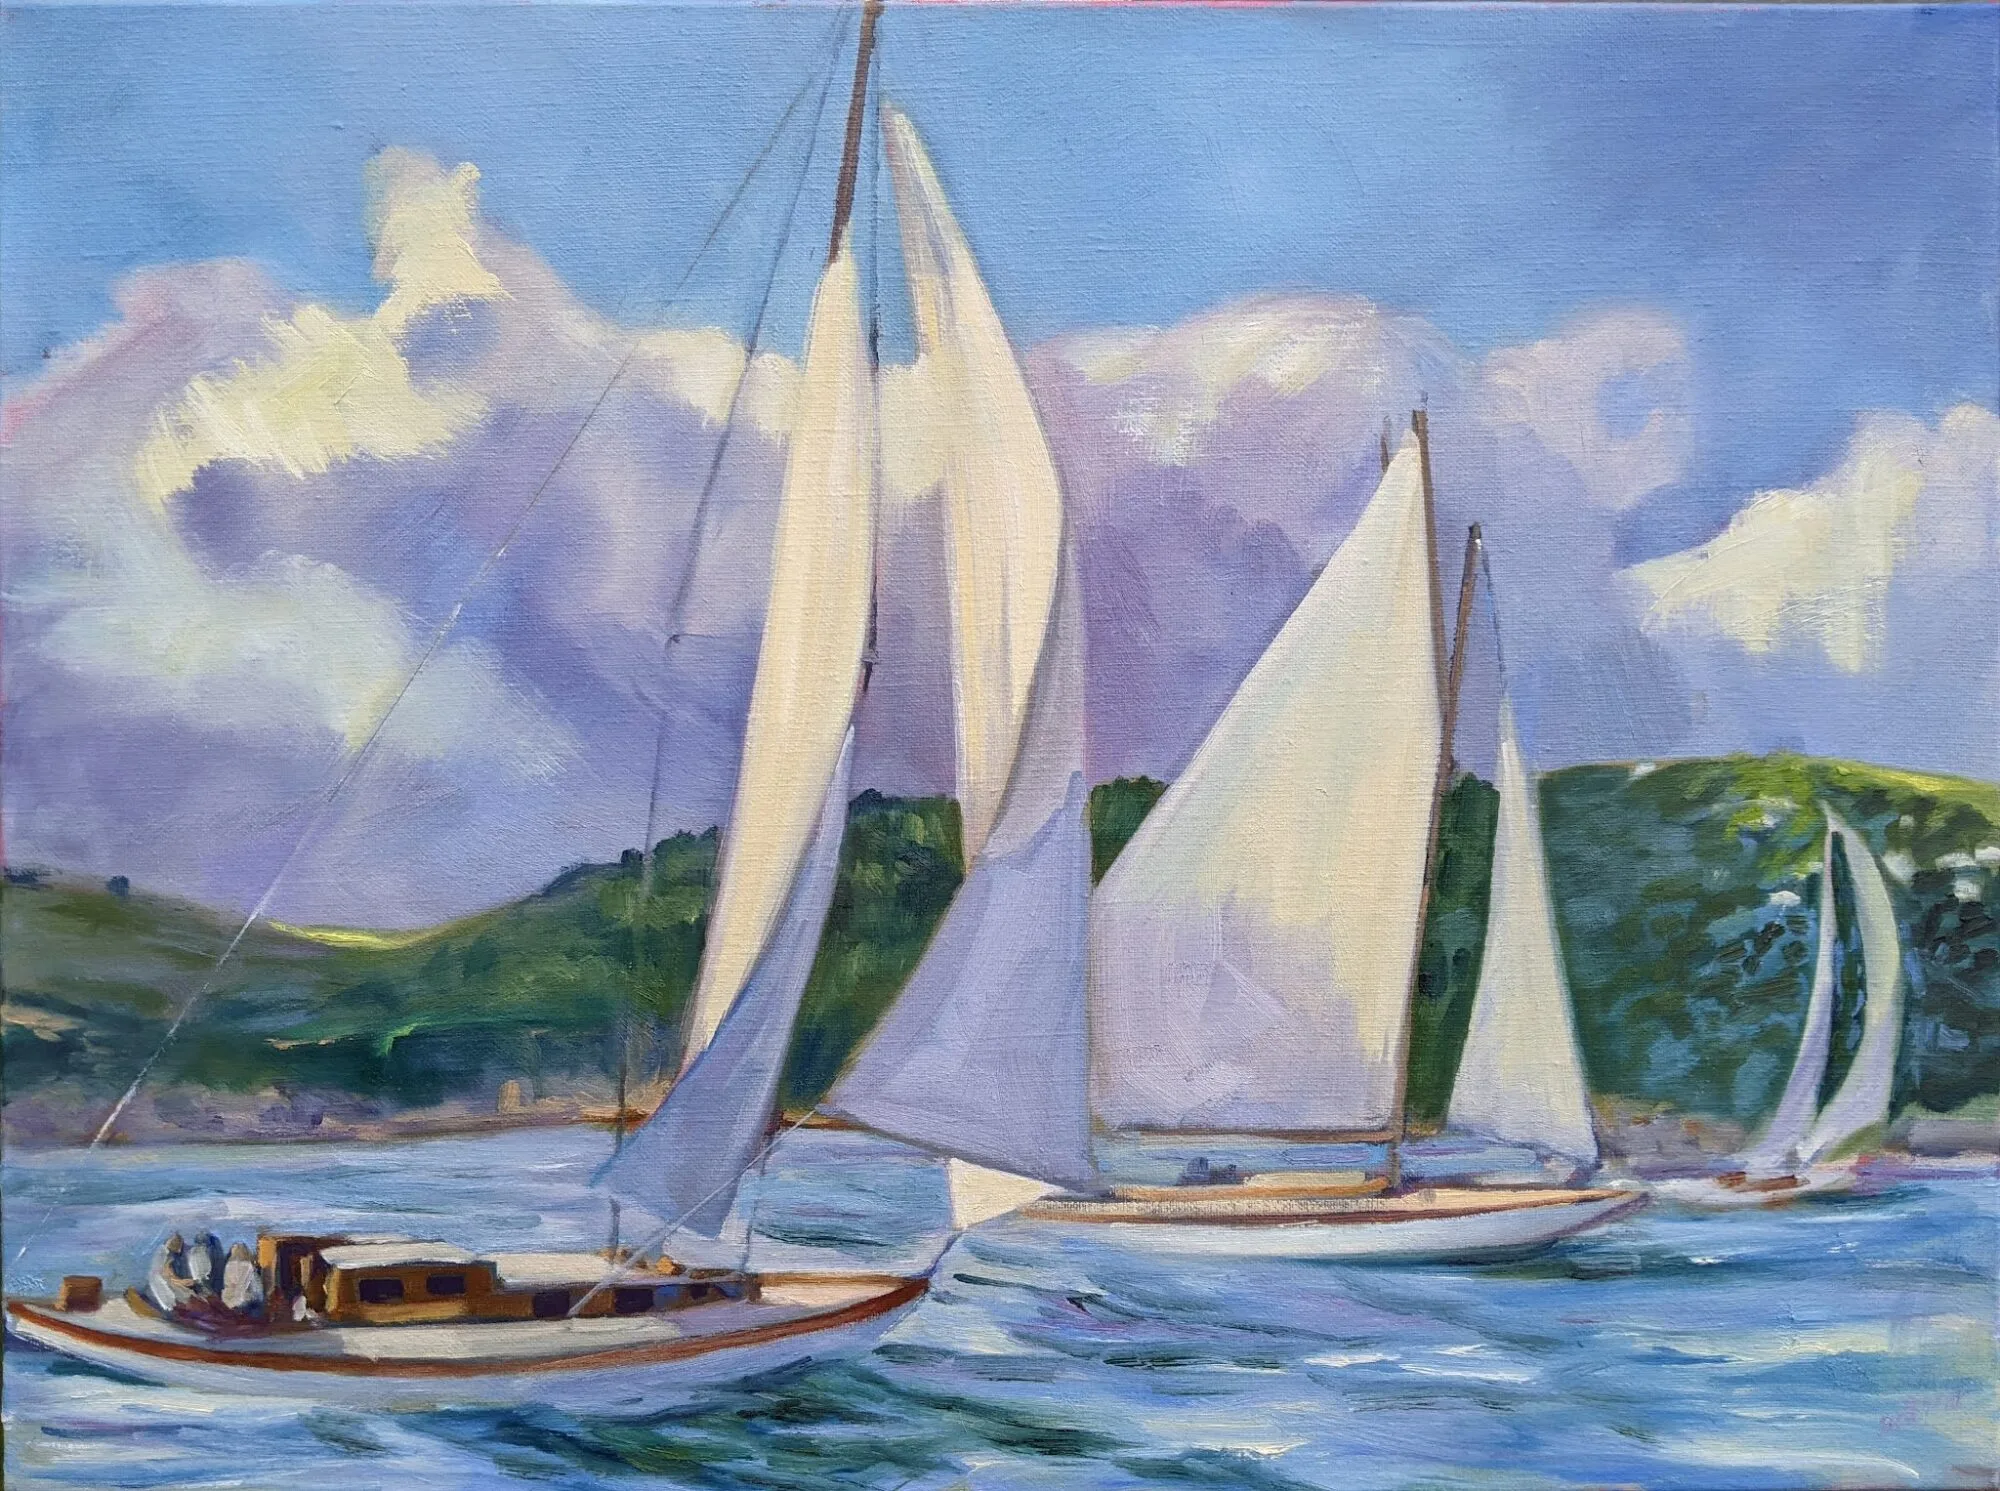
Early November: North Greenland, 1932, oil on canvas, Rockwell Kent, courtesy the Hermitage

People are sometimes under the mistaken notion that I’m intellectual. In fact, my taste in books is decidedly low-brow. Luckily, there are as many different books out there as there are readers. The same is true of paintings.

Reading a painting is similar to reading a book. First, there’s an introduction. We enter every painting at some point, although the artist need not create a literal visual path in for us. It’s just as likely that there are a series of focal points that the reader notices and absorbs in order. These are supported by incidental matter that contributes tone and information. A good artist, like a good writer, doesn’t leave this to chance. It’s organized in the composition phase and then supported in the painting phase.
Whalers, c. 1845, oil on canvas, JMW Turner, courtesy Metropolitan Museum of Art. There are only three intelligible passages in this painting—the whale, the whalers in their dories, and the ship. The water might as well be a wheatfield for all the information we’re given.
That requires that you, the artist, understands the basics of composition. You control the motive line of your painting. You know how to use contrast and color to encourage the viewer to read your work in a specific order. You know how to make some passages subservient to these main themes.
You must understand the focal points of your painting, either overtly or subconsciously. These are not necessarily the subject. In Rockwell Kent’s Early November: North Greenland, 1932, our eyes go first to the iceberg in the foreground. Kent has made it the most luminous, warmest part of the scene, and set it off against the briny depths. Next we look at the hillside behind, which is almost as bright as the iceberg. Only after that does our eye travel to the human activity at the bottom. Here we’re arrested by an ageless story: man wrestling against the vast power of nature for his very survival. We spend a long time looking at these tiny fishermen, which we wouldn’t have done had they been what we noticed first.
The Census at Bethlehem, 1566, oil on wood panel, Pieter Bruegel the Elder, courtesy Royal Museums of Fine Arts. As with the gospels, all the action is in the most inconspicuous corner.
Kent has borrowed a technique first used by Pieter Bruegel the Elder four hundred years earlier. In his Census at Bethlehem, all the bustle and contrast of the midfield drive our eyes down to the least important part of the painting, the corner. There the scene is laid for the birth of Christ. Just as in the Bible story, this great event happens in an unimportant place.
We know that because we’re bringing our own understanding to the painting. In both literature and painting, prior knowledge plays a profound role in how we read the work. There are symbols we must decode, and experiences we relate to. The thematic thread tying together the three paintings above is the insignificance of man. Every one of us has felt that some time. That feeling transcends the specific narrative.
The Charioteer of Delphi, 478 or 474 BC, courtesy Delphi Museum. We may know nothing of this young man, but his beauty and concentration speak through the ages.
Some of the great art of the past has lost its narrative power today. We don’t know enough Greek mythology or Bible to fully decode them. But the greatest still have the power to transport us. They touch a common chord of experience and emotion.
In our digital culture, we don’t often take time to read artwork quietly. But that’s in the shopping phase. In the end, paintings will go home with someone, to be seen over long periods of time. To survive, they must have some story to tell, some depth of meaning, or they will be relegated to the attic. The work that compels the most on Instagram may be, sadly, the least successful in real life.

Monday Morning Art School: The color of light

The season of mist and mellow fruitfulness is upon us. Let’s talk about the color of light.
Boys on the Beach, JoaquĂ­n Sorolla, 1908. There is warm light with cool shadows, but there’s also a strong warm reflection from the sand on which the figures are resting. 
What we call “light” is really the narrow band of electromagnetic waves that our retinas can perceive. This narrow band is comprised of the colors of the rainbow, or what we sometimes call ROY G BIV. (There really isn’t an indigo; it’s there so that Roy has a pronounceable surname.) Each of Roy’s color names corresponds to a specific wavelength. For example, blue is about 475 nm; red is about 650 nm.
Valencian Fishwives, JoaquĂ­n Sorolla, 1903. Here the light is cool and the shadows are warmer.
When the whole visible light spectrum strikes your eye at the same time, you perceive white. This is not a color in itself, but the admixture of a bunch of colors. In the real world, this is never a pure mix. The atmosphere bends light just like a prism does, so what you see is always tinted. The light might be gold and peach at sunset and blue at midday. Impurities in the atmosphere also give us the energetic indigo-violet of the far distant hills—the farther away something is, the more likely dust has filtered out the higher wavelengths (the warm colors).
Return from Fishing, JoaquĂ­n Sorolla, 1894. The light is warm, the shadows are cool, and the places where the light is going through the sails are warmer still, since they’re filtered by the off-white fabric.
Just as all the colors together form white light, the absence of light is total blackness. But unless you’re in a cave or darkroom, that’s a theoretical construct. There’s always reflected light bouncing around in the shadows, and that light gives the shadows its color. It’s never black and it’s unlikely to be grey, either.
Looking for Shellfish, JoaquĂ­n Sorolla, 1905. A warm light comes from our side of the figure, but there are warm shadows—the result of local color reflection from the rock. Likewise the bottom half of the torso reflects strong cool tones from the water and anchors the boy into the sea.
If the color of the light is essentially warm, the color of the shadows is almost always going to be cool, and vice-versa. Knowing this and identifying the color of the light and shadow is the first step to a good landscape painting.
Catalonia: the Tuna Catch, from Visions of Spain, JoaquĂ­n Sorolla, 1919. In this case, most of the painting is in shadow, and what light there is, is filtered through the yellow awning. It is the distortion of the light-dark color scheme that tells us viewers that we are in an enclosed space.
The exception to this is an object in filtered light. Its shadows and lighter passages will be variations of the same color temperature. This is how we instinctively know that something we’re seeing is under an awning, for example.
Study the Spanish painter JoaquĂ­n Sorollato understand the color of light. He was a master at painting white fabric in a variety of circumstances, and comparing the light passages to the shadow passages will tell you much about managing the color of light in your painting.
This post was originally published in 2015. Let me know if you’re interested in painting with me aboard the schooner American Eagle in late September.

Monday Morning Art School: what do different brushes do? (Part 1)

The best way to learn about your brushes is to experiment, but meanwhile, here’s a handy guide to oil painting brushes.

Plein air painters usually favor hog’s bristle brushes. These are far less expensive than softer hairs like sable. They are the only brushes that spread thick paint smoothly and evenly, making for the freshest technique.
Bristle brushes tend to form a flag (a v-shaped split) at the end over time. However, if the brush is made properly, with good interlocking bristles, it will have a natural resistance to fraying. Because field painters often go long periods without being able to clean their brushes, this durability is important.
There are some good synthetic brushes on the market, but none of them are quite as stiff as a good natural bristle brush. 
In the following exercises, I’ve tried to keep the amount of solvent the same (except with the fan brush).

Above is a sable flat brush by Rosemary & Company. It can put down a very smooth surface and offers a lot of control, but it doesn’t carry the quantity of paint that an equivalent bristle brush will. I do have many sable brushes, but I save them for thin work in the studio.

This is a Robert Simmons Signet flat brush. The paint it lays down is both rougher and more impasto than the sable.

Flat brushes make an immediate, energetic mark. They’re excellent for fast, powerful surface work, long sweeping strokes, and blocking in shapes.

Used on their sides, they also make great lines, far more evenly than a small round can do.

Two rounds of very different sizes. A round is a more lyrical brush than a flat, and is a classic tool for painterly surface marks. It can be used to make lines that vary from thin to thick. A pointed round is used for fine detail. Bristle rounds tend to lose their points very quickly, however.

The great advantage of a filbert is the variety of brushstrokes you can get from one brush. This is great for single strokes that taper, such as in water reflections. Its rounded edges are good for blending. Set on its side, it makes nearly as good a line as a flat does.

A bright is a less-flexible version of a flat. It’s great for short, powerful strokes or situations where you want a lot of control.

A fan brush probably has no place in a plein air kit, but I carry one anyway. I use it for blending, as on the left, although some people like using it to make whacked out marks as on the right. The problem is, it can carry very little paint, so its marks tend to be either gooey, as above, or very abrupt.

In my studio, I just use a clapped out soft-haired brush to blend.

The only ‘novelty’ brush I carry is a double filbert, or Egbert, above. It’s a lyrical brush that has a lot of expressive quality.
Many plein air painters also carry liners and riggers, which are useful in paintings that are built up smoothly. I don’t paint that way, so I seldom use them. Another brush that is good for detailed work is an angled brush. However, you can do almost any work you can envision with just the brushes I’ve shown you above.
Next week, I’ll talk about watercolor brushes.

Monday Morning Art School: How to use medium

The actual process is simple, but it has to be done right to prevent chalkiness or cracking.
The Farm at Olana, by Carol L. Douglas
“How should I treat older, unvarnished paintings that have become chalky?” a reader asked me. “And for that matter, what kind of varnish do you recommend?”
Chalky paintings are best revived with varnish. My personal preference is Winsor and Newton Artist’s Matt Varnish. It’s easily removable by a conservator, provides UV protection, and it doesn’t shine. (If you want more reflection, they make both gloss and satin finishes.) As with all varnishes, it shouldn’t be applied for a year after the painting has been finished, and it should never be used as a painting medium.
But learning to use medium properly is a better protection against chalkiness. (If you’re new to oil painting, consult my basic rules of oil painting.)
Mamaroneck River, by Carol L. Douglas, in its finished form right before it went on the auction block.
There are several families of oil painting mediums out there:
  • Traditional mediumsare made from a slow-drying oil (poppy, linseed, etc.) a resin, and a solvent, sometimes with a siccative like Cobalt Drier added to improve the drying time.
  • Alkyd mediums are made with a slow-drying oil reacted with an alcohol and an acid. They dry faster, making them suitable for multiple glaze layers, but they carry less pigment. They should never be used on top of traditional oil mediums.
  • Solvent-free mediumsdo not include any petroleum distillates. All unmixed slow-drying painting oils are inherently solvent-free, being plant-based.
  • Wax based mediums include cold wax and encaustic.

Mamaroneck River, when the second layer was done but the top layer hadn’t been started.
For field painting, I prefer a traditional medium: Grumbacher’s Oil Painting Medium II. It retards the drying time and allows me to work wet-on-wet longer. In particularly dreary conditions, I’ll use their Medium III, which has a drier. For studio work, I sometimes use their Medium II, because it dries to a matte finish. I buy this brand because I prefer a very thin medium. There are many good brands out there, and I would trust any medium made by a reputable paint house.
Grain elevators, Buffalo, by Carol L. Douglas is an example of a cold-wax medium painting. It gives tremendous latitude in effects.
Back in the last millennium, there was a popular recipe of linseed oil, turpentine, Damar varnish and a few drops of Cobalt drier. I stopped making it when I realized that so many 20th century masterpieces were degrading terribly. Chemists understand chemistry better than painters do.
The drawing layer is always done with solvent, whether in the studio or in the field. That’s Sandy Quang, back when she was my studio assistant.
Neither medium nor solvent is a substitute for good, open paint. If you’re poking a skin off your paint and extending it with solvent, it’s time to clean your palette and get new paints out.
The actual process for using medium in alla prima painting is simple: fat over lean. Your first layer—where you’re drawing the picture on the canvas, called the underpainting—is cut with a small amount of solvent only. Use too much and you’ll have muck above. Your middle layer should be as close to pure paint as you can get, applied thinly. Your top layer should be paint with a small amount of medium, and here’s where you can get as impasto as you want.
Clip this and paste it in your pochade box until it’s a habit.
Medium doesn’t belong in the bottom layers of a painting. The more oil in a layer, the longer the binder takes to oxidize. This keeps paints brighter and more flexible. However, oil also retards drying. Using too much in underpainting will result in a cracked and crazed surface over time.
Use too much medium and you’ll have a soup that dries to a plasticky finish. Use too little, and the paint will drag as you paint and cloud as it dries. I generally just touch the tip of my brush to the medium before mixing it into a brushstroke’s worth of paint.
This traditional method is tremendously variable and gives great control. Practice it.

Monday Morning Art School: a simple exercise in composition

Diagonals keep us interested because they’re harder for us to “solve”.
The Artist’s Studio in an Afternoon Fog, 1894, Winslow Homer. Courtesy of Memorial Art Gallery.
Winslow Homer’s most successful compositional motif was the long diagonal. He used it with great success from the beginning of his career right through to his mature Maine seascapes. Diagonals are particularly important in the latter, since they tie rock and sea together in a monolithic whole.
But diagonals are tricky, as I found last week. The Brandywine hillsides are lovely, but they’re not what I’m used to. They kept turning out stumpier than I wanted. Today’s exercise is designed to help us see the subtlety of the diagonal line.
The basic structure of The Artist’s Studio in an Afternoon Fog, above. Use tracing paper to do this step.
Diagonals are more dramatic than vertical or horizontal lines. They draw us through the picture, tie disparate elements together, and create depth and perspective. They don’t need to be articulated; this is a good place for the lost and found edge. A diagonal can be implied by a value shift within a larger object.
Our minds like diagonals for the same reason we like space divisions like the Golden Ratio: they keep our interest because they’re harder for us to “solve”.
Experiment with different values within the painting’s structure.

Today’s exercise is one you can do with a printer and tracing paper. Unfortunately, I have neither, being still on the road, so I’ve approximated it in Photoshop. First, find a suitable Homer painting, one where the diagonal drives the composition. I’ve used an old friend: The Artist’s Studio in an Afternoon Fog, 1894. This painting is at home at the Memorial Art Gallery in Rochester, where I’ve studied it many times.
Sunlight on the Coast, 1890, Winslow Homer. Courtesy Toledo Museum of Art.
You can use this painting or another. All I require is that the broad sweep of motion be on the diagonal. I’ve included a few other possibilities as well.
Next, I want you to print a copy of the painting and trace its major shapes. When you’re done, you should have something that looks approximately like the outline above.
The Fox Hunt, 1893, Winslow Homer. Courtesy Pennsylvania Academy of the Fine Arts.
The last step is to experiment with different value systems inside Homer’s basic structure. He was working from reality, but you have no such limit. When you’re finished with this, what do you observe about the values he used versus the ones you’ve tried?
  
If you sketched in the smaller dashes with high contrast, those passages should drive your eye as much as the big shapes do.

Changing my support

If you don’t like how you’re painting, knock the struts from under yourself and see what happens.
Damariscotta Lake overlook, watercolor on Yupo, by Carol L. Douglas
I’ve been mulling over the color-shift I see between my oil paintings and my watercolors. My pigments are essentially the same. (Here are my supply lists for watercolorand for oil painting.) But my oil paintings of the same scenes always seem cooler. Is that because I’m toning in red? Or is something else at play?
David Dewey suggested the problem was, in a sense, all in my head. I’m so rooted in oils, he thought, that I’m more observational, and feel less free to depart from reality. My watercolors are a lark to me, so I give myself permission to experiment.
Since then I’ve been trying to be less bound to observed color. It’s too soon to say what the outcome will be, but I did look at a small painting in my studio yesterday—one that I thought was garish and overshot when I did it earlier this month—and thought, “That’s really not half bad.” There’s a lesson there, and it’s to not be too quick to judge your own work.
Damariscotta Lake overlook, oil on canvas, by Carol L. Douglas
Perhaps the problem is also the substrate. After all, my excitement about watercolor exploded when I discovered Yupo.
Because my residency oils were quite large, they were done on stretched canvases. For work under 24X20, I like RayMar panels. They’re solid, stable, archival—and pricey for beginning students. For them, I suggest a decent panel over a cardboard or MDF backing. As they grow more confident, they can move to a better-quality panel.
In May, I bought a bunch of different boards by different makers to test. Then I got busy with my season and forgot them. RayMar’s medium landscape cotton panel is a toothy board even after heavy toning. That makes for great control, and it’s a high mark for competitors to match.
Linen’s advantages over canvas mainly show on stretcher frames. Linen is highly reactive to the moisture in sizing and primer, and it’s very strong for its weight. It dries tight and it stays taut. Nothing is more satisfying to paint on than hand-stretched Belgian linen.
But those qualities are irrelevant in a glued linen panel. There isn’t much sense in paying a premium for linen to be glued down.
Still I’d bought a few linen panels from different makers in my assortment. I was pleasantly surprised by how much I liked the surface: it’s less toothy, which made it fun to slosh the paint around.
The problem with less-expensive boards is always their backing (although the gesso can be pretty thin, too). MDF and cardboard are perfectly fine in smaller sizes or for student work. But they aren’t as rigid as wood. Cardboard, particularly, bows and curls with time.
Poppy’s handmade birch panel.
On Sunday, as we were setting up for our last, quick,painting, Poppy Balser handed me a panel she’d made herself. It was clear birch, finished with two coats of Golden GAC 400 and clear gesso. She’d left the board unsanded, which gave it a better tooth than the manufactured versions of the same thing. And it was uncradled, which made it frameable for plein airevents.
I made a poor painting on it, but that was my doing, not the board’s. It’s the best new product I’ve painted on all year—of course, because it’s the most work. Still, I plan to make a few and keep playing.
Note: I’ve decided to teach one more plein airsession in Rockport. No, I’m not nuts. If it’s miserable, we’ll meet in my studio. But the light has been so fantastic in midcoast Maine, we might as well do another session before winter closes in for real.
Yesterday in Rockport.
I’ll be teaching a six-week plein air class on Tuesday mornings from 10-1. It runs from November 13 to December 18.

When weather permits, we paint at fantastic locations around the Rockport-Rockland-Camden area; rain dates are in my studio at 394 Commercial Street. Watercolor, oils, pastels and acrylics; all levels of painters are encouraged to join us. The fee is $200.

Monday Morning Art School: How to paint a really bad watercolor

Painting horrible watercolors isn’t just my special skill; it’s something anyone can do!

A lot of artists don’t like Winsor & Newton field kits, but they’re still my go-to for extreme backwoods drawing and painting.
Don’t test your colors
Beginning watercolorists usually put down washed-out, delicate colors. These have too much water in the mix. Or, they’ll use too little water, and their unloaded brush will scumble instead of flow. Sometimes they’ll miss the proper color entirely and spend the rest of the painting trying to fix their bad mix.
The answer is to make informal swatches on a scrap piece of paper. Just make sure you use the same paper and brush you plan to use for the final assault.
Pay attention to where excess water might be entering your process. Are you unconsciously washing your brush after every stroke, or not mixing enough paint and trying to stretch it out?
Fiddling
Putting layers and layers of light color down makes great mud. So does putting paint down and then endlessly fussing with it. See above, make the proper color, and lay it down in a few strong strokes.
Do a value study, unless your watercolor is a value study. Then do it anyway.
Too small a brush

Small brushes give you less control, not more. They’re harder to hold still and they run out of paint just when you need it most. Worse, artists get diddly with them. Practice with larger brushes and a lighter hand.
Bloom is almost unavoidable when painting off the deck of an ocean-going boat, but it’s still annoying.
Bloom

More properly known as backflow, this happens because the paper is still wet, even though the surface looks dry. Bloom can be used as a watercolor effect, but it more typically happens because the artist isn’t patient, or because environmental conditions are such that your paper will never dry. Or, in my case, because I’ve spattered water all over everything.
Use bad materials
Good watercolor paper contains sizing to keep paint from sinking into the paper. That allows colors to sparkle, and stops the paper from buckling. Cheap papers aren’t properly sized.
Brushes are more important in watercolor than they are in oils. It’s not necessary to have only expensive brushes, however; my go-to rounds are Princeton Neptunes.
As in all painting, cheap paints are a false economy. Better paints contain more pigment.
Watercolor can capture the passing scene better than any other medium. This was painted off the deck of American Eagle. The speckling in the sky was caused by salt spray. What a life!
Don’t bother with a preparatory value sketch
Value sketches are critically important in all media, but especially in watercolor. You should start with a plan, and your plain is laid out in lights and darks.
Unlike oils and pastels, you have few options to correct a bad drawing once you start it. It behooves you to work out all the kinks before you lift a brush.
Don’t mix your colors in advance
Time is a critical factor in watercolor, and if you have to stop and mix in the middle of a passage, you’re going to make a muddy, blotchy mess. Instead, mix the colors you think you need for that step and test them on your scrap paper.
Let your paper breathe!
Don’t leave white space
Watercolor is all about paper showing through, so why not let that happen?
Use all the colors
Watercolorists tend to carry far more pigments than oil painters. Want to keep it fresh? Pare down your palette and keep mixes down to three or fewer pigments per pass. And avoid hues and convenience mixes; they’re already mixtures and will further muddy the waters.
Get fussy, fast
Start by thinking out the big shapes first. Too much detail too fast throws the volume relationships off in a painting or drawing.
Watercolorists who fixate on detail at the beginning tend to delineate everything, everywhere. They haven’t given their minds time to sort out what’s important. Detail belongs in the focal point(s) of a painting.

Monday Morning Art School: painting when the sun don’t shine

Changing light, comfort and safety, and keeping your materials workable are big challenges for bad weather
Rocky, by Carol L. Douglas, Cape Elizabeth Paint for Preservation

I’ve had great luck with weather this year, but that isn’t always the case. Last year I did an event in a cold rain that lasted from the opening bell until the jurying was complete, at which time the sun came back out. Mother Nature may forego the rain and sulk instead. Fog is beautiful but the flat dull light of an overcast sky is a challenge to love. Organizers may sympathize, but they can’t magically change the parameters of a plein air event. The show must go on.

Outside of events, painters have the luxury of staying home when they aren’t inspired. I don’t recommend it. There are exciting atmospheric effects that take place in bad weather, and if you aren’t there, you won’t see them. Nor will you know how to cope if you suddenly find yourself in a downpour when it really matters.
Storm Clouds (pastel), by Carol L. Douglas
There are three issues involved in painting in lousy weather.
  • Changing lighting conditions.
  • Your material’s stability;
  • Your personal comfort and safety;

Changing and imperfect light is one of the principle arguments for doing preparatory sketches. This weekend, I painted a dramatically back-lit rock for Cape Elizabeth Land Trust’s Paint for Preservation. I only had about four hours a day when these lighting conditions were true, and they weren’t true on the second day at all, because it was overcast. At the same time, I needed to include the tide, which advances almost an hour a day.
I’d done a fairly careful sketch in advance and was able to refer to it when in doubt. I repeated that process on the canvas when I started painting. Some people think underpainting is a substitute for an initial value sketch on paper. The problem, however, is that you cover up the evidence when you paint. Without my sketch as my guide, I doubt I would have retained the rigor of my initial idea.
Painting in the residue of a hurricane with Brad Marshall. (Courtesy Rye Art Center)
Watercolors and pastel are very difficult to manage in a downpour, even when they’re out of the direct rain. Paper and chalk both become saturated with moisture, making control impossible. The only solution I know is to work from inside your car. Acrylics actually benefit from higher humidity, but sideways mist and rain will make them run off the canvas too.
Remember learning that oil and water don’t mix? Instead, they form a sludgy emulsion that’s impossible to paint with. Oil paint won’t stick on a damp surface. Since the pigment is in suspension in the linseed oil, it can bleed off with water droplets. Shake loose water off and pour off any that ends up on your palette. Don’t blot.
Oil paint doesn’t freeze, however, making it great for winter painting.
Storm Clouds over Lake Huron was painted in the direct rain in a terrific downpour. The paint emulsified, but sometimes you just have to capture the scene.
With any media, you should avoid letting your canvas get wet from the back. Gesso expands and contracts with moisture changes. Copious rain will destabilize canvas and warp boards.
This spring, Ellen Joyce Trayer brought a bag full of knitted cowls along to my Age of Sailworkshop. She handed them out to anyone on the boat who wanted one. I was an immediate convert. They warm your neck without adding bulk. A general rule of dress: you are coldest when standing or sitting still, so bring more clothes.
Massed thunderheads are beautiful and transient but put away your lightning rod (easel) and get off your mountain long before the storm hits. Lightning strikes on both the leading and trailing edges of thunderstorms. Even if the sky directly over your head is clear, you’re at risk of a strike when you can hear thunder. Far better to get inside your car and record the pyrotechnics with gouache.
I’ve got one more workshop available this summer. Join me for Sea and Sky at Schoodic, August 5-10. We’re strictly limited to twelve, but there are still seats open.

Monday Morning Art School: taking a reference photo

On vacation? Here are some tips for taking reference photos you can work from later.

Winter Lambing, 48X36, oil on linen, Carol L. Douglas.

My workshop aboard American Eagle included a professional filmmaker who once studied with Ansel Adams. She was taking pictures with her iPhone, a tool Adams could never have dreamed of. She used it like a ‘real’ camera, cropping, composing and controlling exposure on the fly. She wasn’t waiting for a scene to pass by her; she was making something magic happen. “You don’t take a photograph, you make it,” Adams is famous for saying, and that’s exactly what she was doing.

A great photograph does not necessarily translate into a great painting; in fact, in my experience, it’s very rare that it does. The photographer seeks to move us emotionally; the artist wants a picture that preserves information. The same spatial relationships that make a great photograph can appear contrived in a painting. High contrast blows out the details that the painter needs.

And here is the reference photo. It was a snowdrift, nothing more.
Photograph what really interests you. It’s so easy to get sucked into what we ‘should’ take pictures of that we sometimes miss the essential object that we will need later. Go ahead and take fifty photos of the jack pine on the cove, and then put them in a folder labeled “jack pine cove.” On the day that you need a lonely tree for a composition, you’ll have it on hand. After all, film is cheap these days.
Don’t over-crop your photos. Often, I’ve found that the information I needed to finish something was just to the left of the edge of my frame. “You need a camera with a zoom,” one of my students told me. Actually, I don’t. Most modern digital cameras take such high-resolution photos that a small fraction of the frame can be blown up and used for painting.
All Flesh is as Grass, 48X36, oil on linen, Carol L. Douglas.
I have a Panasonic Lumix camera with a Leica lens. It wasn’t terribly expensive. It’s excellent in low-light situations, which means I can take even interior reference shots without a flash. That’s far more important than getting the details of the main topmast right from a quarter of a mile away. I can look those up; I can’t replace the details that get lost in bad light or by using a flash.
Of course, if I were a wildlife painter, I’d need a totally different outfit. Then a massive zoom lens would be important.
Bracket your exposures. This means you should take one photo at a higher value and one at a lower value than what your camera chooses automatically. Even if you have the most basic point-and-shoot camera, you can do this by hovering on lighter and darker parts of the picture. If you’re unsure about how this works, consult your instruction manual!
The above painting relied heavily on photos I took of an apple tree being cut down across the street from me. They were wonderful pie apples, too, but the new owners wanted more conventional landscaping.
Understand the limitations of reference photos. The camera is as subjective as the human eye. It misrepresents color relationships, depth-of-field, and size relationships. It obliterates subtle differences in color temperature. Reference photos are invaluable, but they should be the slave to your sketches and field notes, not the other way around. You’re under no obligation to represent every detail.
Which comes to my last and most important point: you shouldn’t be painting from other people’s photographs. This is more than just a question of legality (although that’s a real consideration). This is a question of ideas. A well-realized photograph is a complete artistic statement in itself. You have nothing to add. Anyone who has painted a commission from someone else’s snapshot knows just how much emotional information is missing when you weren’t there at the beginning.

Monday Morning Art School: the basic rules of oil painting

This weekend’s workshop was all oil painters. This gave me the opportunity to review some fundamentals.
Nicole Reddington’s painting ruthlessly subjugated detail for design, and was tremendously powerful for that. I wish I had more student work to show you, but I can’t find my camera!

Use enough paint

Using too little paint is a rookie error. Too little paint on your palette means you’ll try to stretch it with solvent on the bottom layers or medium on the top layers, and before you know it, you’re going to have a mushy, monochromatic mess on your hand. In the northeast, that soup usually assumes an unpleasant green tone.
Modern paints are formulated to use almost straight out of the tube. They may need a small amount of solvent for underpainting, or a dab of medium to create a juicy top layer, but too much of either ruins paintings.
In my weekly classes, I don’t let students touch painting medium until they have the steps of constructing a painting firmly in hand. That’s hard to do in a workshop, but remember that painting medium is a boost, not a crutch.
Sandy Quang’s painting of a downed tree.
Big shapes to little shapes
Stop thinking of your value sketches as something you must get through before you get to the fun of painting. They’re the most important part of the process, and they’re also a lot of fun.
I like to do lots of preparatory sketches before I start to paint, either in marker or in monochromatic watercolor. The abstract pattern is far more important than the details. In the early phases of a painting, you must relentlessly sacrifice detail to the good of the whole.  This is true whether the results you want are hyper-realistic or impressionistic.
The untrained eye looks at a scene and thinks about it piecemeal and in terms of objects: there’s a flower, there’s a path, there’s a tree. The trained eye sees patterns and considers the objects afterward.
Is there an interesting, coherent pattern of darks and lights? This pattern is the primary issue in composition.

Stop thinking of drawing as something you have to get through, and start doing your dreaming in a sketchbook.
Darks to light
In oils, it’s easy to paint into dark passages with a lighter color; the reverse isn’t true. Put down white paint too quickly, and you’re going to fight all afternoon to avoid fifty shades of meh.
This doesn’t mean oil painters don’t jump around after we set the darks; we can and do. But that dark pattern controls your paintings.
Don’t choose slow-drying or high-stain pigment to make your darks. The umbers are great because the manganese in them speeds drying. However, I don’t want to carry an extra tube just for this. I use a combination of burnt sienna and ultramarine.
A student’s palette… This is the color space in which the modern painter can work. It sizzles.
Fat over lean

Odorless mineral spirits (OMS) replaces turpentine as the modern solvent. This is different from medium, which is some combination of oil, drying agent, solvent and varnish. Paint with solvent in the bottom layers. Paint with medium in the top layers. As noted above, use both sparingly.
The more oil in a layer, the longer the binder takes to oxidize. This keeps paints brighter and more flexible. However, oil also retards drying. Using too much in underpainting will result in a cracked and crazed surface over time.
The makers of Galkyd and Liquin say their products are designed to circumvent this rule. However, we have no track record for these alkyd-based synthetic mediums, whereas we have centuries of experience layering the traditional way.
Even if we could change it, why would we want to? Underpainting with soft, sloppy medium gives soft, sloppy results. The coverage is spotty and thin. The traditional method is tremendously variable and gives great control. It just takes a little while to learn it properly.
Next up, a watercolor workshop aboard American Eagle, June 10-14, and my annual Sea & Sky workshop at Acadia National Park, August 5-10. Email me if you have any questions.