Monday Morning Art School: how to paint a quickie

Only got an hour? If you’re set up right, you can still do a credible field painting.
The bones of a painting.
I mentioned last week that I didn’t have time to get back to paint the apple tree at the abuelitos’ house in the tiny pueblo above Pecos, NM. That tree is what initially drew me to the place, and I didn’t want to leave without painting it. On Friday morning I went back to the little village to make a quick sketch. I was carrying only 12X16 canvases, so I had to work very fast.
I had two hours before I needed to get back to the ranch and pack for my flight. It turns out I had less time than that, because it spattered rain. But I was still able to get a field sketch done.
You’d hardly want to paint from this photograph, unless you knew what a magical place it was in real life.
I seldom paint from photos without a good field sketch alongside. One glance at my photograph will tell you why. Camera lenses distort shapes and flatten color and light. I know how to use my camera to make more interesting photos, but I eschew that artistry in reference pictures. Photographic artistry comes at the expense of details and architecture I want to preserve for the expression of the painting.
A good photograph is not necessarily a good reference photograph for painting. For example, too tight a crop often leaves out details you need later. Artists constantly move things around when painting, and you can’t do that if you’ve cut those items out.
The paint array never changes, no matter how fast I’m painting. (The bottle cap is there for medium.)
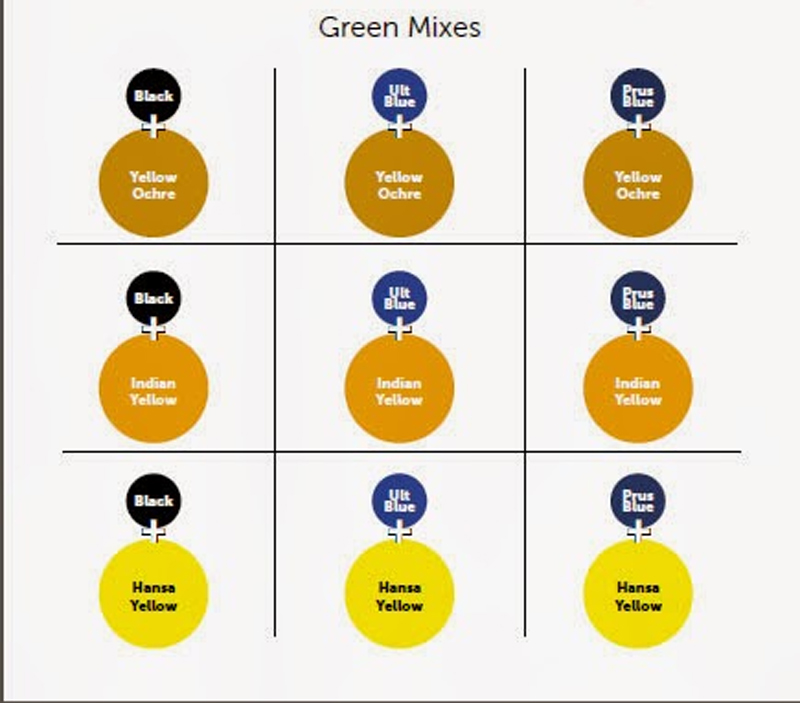
Start by putting out your typical array of colors, including a dark mix with which you will draw. In the northeast, I typically use a dark mix of ultramarine and burnt sienna. In New Mexico, I made a mix of ultramarine and quinacridone red. I thought I was pushing the purples excessively, but in comparison with other paintings at the opening, my work felt low-key. That’s less a question of the light than of regional tastes.
Note the line of white just below my pure pigments. I always make tints of my colors when I start. That too speeds up my painting.
I do not clean my palette except for before a flight or at the end of the season. It goes in the freezer in a waterproof stuff-sack. That means I don’t have to mess around putting out paints at the start of each painting session. That’s important, since setting them out and cleaning them up can use up a half hour of precious time.
A very sophisticated drawing, the work of about two minutes.
Fast painting is where the habit of always setting out your paint in the same order helps. It would be disconcerting for a musician to find the keys of the piano in different places each time he played, or for a surgeon to have to hunt for the proper scalpel. The same is true in paints. You can read about my color organization here, but the important thing is consistency. 
I did not do a value study for this super-fast painting. I simply outlined my drawing with large strokes. Then I filled in the drawing with blotches of color. Mix and splat, with a fairly heavy dilution with mineral spirits.
From there, it was just a question of revising and dividing shapes. I was starting to break the apple tree into a pattern when the rain kicked up.
Right before scraping back and packing up.
My last step, which I forgot to photograph, was to scrape back slightly—not to bare canvas, but so I have a level surface on which to proceed. It’s important to not leave impasto in a half-finished alla prima painting, especially when you don’t know when you’ll get back to it. Scraping back often reveals the true lines, since it creates a shadow average of all your guesses in different layers.
And then I ran for the car. No, I didn’t win any prizes, but I don’t think my choices of paintings had anything to do with that. There was some terrifically strong work in this show. Onwards and upwards!

Monday Morning Art School: How to develop an oil field sketch

A fast, simple way to do a quick, finished field study.

Megunticook River, Camden, by Carol L. Douglas

 A few weeks ago I mentioned that I use Inktense pencils to mark out my paintings on canvas. This is a technique borrowed from my pal Kristin Zimmermann.

Value study in charcoal.

My first step is always a value study. Whether I do this with charcoal, greyscale markers, or pencil is immaterial—if the value structure doesn’t work, the painting won’t work. After writing my post about value studies with Inktense pencils, I realized I could just as easily use the Inktense pencils and water to do my value study on paper as well as the transfer. That removes one more extraneous item from my backpack.

Inktense pencil transfer.

Next, I draw the picture on my canvas with the watercolor pencil. This is never simply a question of transferring my rough value sketch, nor is it a finished drawing into which I paint. What I do is a carefully-measured map of the future painting. I find this particularly useful when painting architecture, where measurement matters a great deal.

Using a watercolor pencil allows me to erase to my heart’s content with water, but when I finally start painting in oil the drawing is locked into the bottom layer.
Big shapes, blocked in.
From this point, I block in the big shapes, paying attention to preserving the values of my sketch, and working (generally) from dark to light. This is especially important if you plan to take more than a few hours to do a painting, because it allows you to paint through significant changes in lighting.
I say “big shapes,” but while I focus on these, I do not obliterate all the drawing I did earlier.
I’d originally set this painting up without the framing walls on either side of the river. It was on reaching this degree of blocking that I realized that I wanted the wall on the left back in. Putting it in over wet paint (without a drawing) resulted in it being somewhat vague compared to the rest of the painting, but I don’t think that’s necessarily a bad thing.
Ironically, looking back at it five years later, I think the composition was better without the tight framing. That just points to how subjective these decisions are.
It’s about time for you to consider your summer workshop plans. Join me on the American Eagle, at Acadia National Park, at Rye Art Center, or at Genesee Valley this summer.

Monday Morning Art School: Mixing color

Mixing paint colors is easy, but practice makes perfect.

Balmoral Castle from the Approach (Abergeldie Side), 1852, Watercolor, by Queen Victoria.
If you think you’re too busy to paint, consider the above watercolor. It was painted by a mother of nine with a demanding full-time job: Queen Victoria. Note the fine, restrained greens in it and the cool autumn sky. If a queen can do it, so can you.
Green is a so-called secondary color, meaning it is made from a combination of two primary colors (yellow and blue). A secondary color is always across the color wheel from a primary color. It’s handy to remember that. If you want to neutralize a color in a hurry, a fast way to do it is to mix it with whatever’s across the color wheel. That’s its complement.
The conventional color wheel.
There are no pure paint pigments. They all have overtones that muddy them up in certain mixes. That’s why your local paint dealer uses many, many more pigments than just red, blue, and yellow. Most artist palettes also have duplicates. I use paired primaries, meaning I have a warm and cool blue, warm and cool red, and warm and cool yellow. (Here are my supply lists for oilsacrylics, and watercolors.)
The distinction between warm and cool colors has been important since the Impressionists, who emphasized the color of light in their paintings. Warm colors are said to be hues from red through yellow and cool colors are said to be the hues from green through violet. There is no ‘right’ answer to which colors are the anchors, but convention says the peaks are red-orange and blue-green.
Paired primaries.
I should stress that this is a convention, not a fact. In reality, the hottest stars radiate blue light, and cooler ones are red. Much of what we believe about the psychology of color is hocus pocus.
The only part of this that concerns the painter are the attributes of each individual pigment. We say that Hansa yellow is cooler than cadmium yellow deep, even though they’re both ‘warm’ colors. We mean that if you are trying to mix a greenish yellow, you’ll get a clearer shade with the Hansa than you will with the cadmium. If you’re trying to go more orange, start with the cadmium. The warm-cool language is just a convenient way of saying that.
I lay my paints out in hue-order, and encourage my students to do so, too. Not only does this eliminate the “hunt and peck” method of mixing, it makes it easier for you to compare pigments.
The business of mixing color is simple, but it needs to be practiced. First, find the pigment that’s closest to where you want to end up. Then, determine if it needs to be warmer or cooler and modulate it with the appropriate neighbor. If it’s too intense (too high in chroma), you can cut that by adding some of its complement. That’s the color across the color wheel from the original. In oils and acrylics, you lighten the color with white; in watercolor, you dilute it.
In some cases, you might start with a color that’s too dull. For example, chromium oxide green (PG17) is a good, opaque, solid, non-fading green, but it’s relatively low in chroma (intensity). It can only be made even more dull, not tarted up to greater brilliance. If you use that green on your palette, you may need to back up and mix a green with blue (or black) and yellow to get to the appropriate starting point.
A good way to look at this is to imagine the neutral colors as occupying the middle space of the color wheel. You can easily get to neutral by mixing paints across the wheel, but you can never get more intense than your starting point.
Today’s exercise involves stopping at your local hardware store for a few paint swatches. These are Benjamin Moore brand, but you should be able to find similar ones anywhere. There are two off-whites: one cool and one warm. There’s yellow, green, and two soft blues. Your assignment is to mix until you think you’ve hit the exact color. Then put a dot of it on the card to see how close you got. (If you’re working in watercolor, the dot goes on paper instead.)
I also ask my students to make neutrals using combinations of ultramarine blue with burnt sienna and raw sienna. I use the combination of ultramarine blue and burnt sienna as my standard dark neutral, because it can go to the warm or cool side depending on how it is mixed.
These combinations are my starting point for rocks and sands. They’re a variation on the complement set of blue-orange. But you can make good neutrals with other complement sets. Try purple and yellow or red and green. Each has its own character. 

Learning to draw without a teacher

Can you learn to draw from a book? Absolutely! Here are some suggestions, and I’d love to hear about your favorites.


Occasionally, I’ll send a student home from a workshop with the advice that he or she should take a basic drawing class. I’ll see that person the following summer only to learn that there wasn’t a drawing class in his town.
Drawing is, to the outsider, the most mundane of the arts. It’s not splashy and it can seem mechanical. To the insider, it’s the guts on which everything else rests. It’s a great shortcut to work out problems of design. To paint without knowing how to draw is to practice surgery without ever having anatomized. You could have all the skill in the world in your hands, and you’d still be clueless about what you’re doing.
No pianist ever got anywhere without first playing études and scales. Think of drawing like that, and practice a little every day. It’s the single best thing you can do to improve your painting.
Drawing is easy; it can be learned from books. Realizing this, I asked Bobbi Heath, Poppy Balser and Mary Byrom for recommendations. Their ideas, along with mine, follow.
The Practice and Science of Drawing is a classic text from the early twentieth-century. Harold Speed was an English painter and renowned teacher. His book includes both practical instruction and intelligent commentary on the nature of art. It’s available on Project Gutenberg here, if you want a preview.
How to Draw What You See is the granddaddy of self-help drawing books. It is based on the premise that all objects are basic shapes, stacked and refined. It is very good, but you’ll have to substitute 21st century examples—the plates haven’t been updated since I used it in the early 1970s.
Betty Edwards’ classic Drawing on the Right Side of the Brain is a book about which I’m conflicted. I’ve had it since the first edition was published in 1979. The exercises are fine, and it’s a great starting point for the timid. However, it spends too much time on her brain theories and not enough on measuring. Still, it’s one of the top-selling how-to-draw books of all time.

Poppy recommends Andrew Loomis, author of Successful Drawing and Figure Drawing for All It’s Worth. “I haven’t ‘read’ them as they aren’t instructive texts in the true sense,” she told me. “But I do pore over them when I’m looking for help with figures or division of space.”
Drawing for the Absolute Beginner is a good basic primer on how to handle a pencil. As with all good how-to books, it includes basic exercises.
Sketching from Square One to Trafalgar Square was recommended by Bobbi, and I’m adding it to my own library. It takes you through both the mechanics and the visualization necessary for field drawing. Both are important.
Perspective Made Easy, also recommended by Bobbi, outlines the rules of perspective drawing. This is a purely mechanical subject, so it’s easily learned from a book. Perspective is deceptively simple, and it trips up more artists than any other aspect of drawing.
Art of Sketching was recommended by Mary. It is out of print now but available on the used-book market. It emphasizes dry-media mark-making, something most painters could use to focus on. It’s another book I am adding to my own library, since I’ve seen how Mary’s sketches powerfully inform her finished work.
Is there a drawing book you love? I’d like to hear about it! Please comment.

How to choose a view

Writers are told to write about what they know. What should artists depict?
The Red Truck, by Carol L. Douglas
Yesterday I stopped to sit for a few minutes on a stone wall in Rockport. In my solitude, I noticed the beautiful asymmetry of the house across the street. Its white clapboard and modest door were framed by dark spruces and a dandelion-studded lawn.
Most people zip down this street with no more than a passing glance at the historic homes and the harbor below. Yet there are many quietly memorable moments: a brook burbling over granite, ancient gnarled beeches, sunlight glancing off cedar shakes. The only way to see them is to get out of the car and walk.

“Yes, well, views are very nice, Hastings. But they should be painted for us so that we can study them in the warmth and comfort of our own homes. That is why we pay the artist for exposing himself to these conditions on our behalf.” (Poirot: The Adventure Of The Clapham Cook)

Drying Sails, by Carol L. Douglas.

 â€œHow and why do you choose the views you paint?” a reader asked. The answer depends, in part, on why I’m painting. If I’m in a plein air event or on the road, the views I choose will tend to be more iconic. Here in mid-coast Maine, I have the luxury of intimacy.

Anything can be the subject of a painting. That doesn’t mean content is unimportant. I paint what matters to me: boats, rocks, water, skies, earth and trees. This was never a conscious choice, but the impulse is so strong that it drove me from Western New York to Maine.
Keuka Lake, by Carol L. Douglas
I don’t think you can force this choice. Most artists experiment with subject matter before finding their métier. Piet Mondrian’s windmills and Vincent Van Gogh’s dark peasant studies are two examples.
Composition must drive any painting. In Rochester last week, a student showed me her first design, of a row of peonies marching at a diagonal across her page. I suggested she move 90° to catch the slight S-curve in the row. The difference was staggering.
Castine Lunch Break, by Carol L. Douglas
Closely tied to this is the question of light. Sunlight is the major organizing principle in landscape painting, but we can’t always order it up. In today’s drear, I’m going to suggest to my plein air class that we concentrate on close-ups rather than vistas. The architecture of objects can partly cover for the absence of light.
“There are no lines in nature, only areas of colour, one against another,” Edouard Manet said. The northeast is overwhelmingly cool in color: blue or grey skies against similar seas and green foliage. I look for color patterns within that, particularly those with a flash of warmth: the orange line in the seaweed, the pink of granite, a yellow glint in the sky. After light, color patterns are paramount.
Dinghy, Camden Harbor, by Carol L. Douglas
I also think about meaning. This is old-fashioned, but I don’t see the point of painting if my work says nothing. I hope that my paintings speak about the relationship of man to his environment, about the enduring qualities of the earth, and about simple joy.
Rocks at the American Yacht Club,by Carol L. Douglas.
Addendum: if you’re a landscape photographer, you might be interested in this contest sponsored by Machias Savings Bank.

Hydrate or die

Plein air painters may not often break a sweat, but we’re exposed to the same environmental stresses as athletes.
Niagara Falls, pastel, Carol L. Douglas.
Yesterday, I wrote that when my painting goes south, I ask myself basic questions about my process and the ergonomics of painting. Then I proceeded to ignore my own advice. I felt terrible all day, fighting a headache and fatigue. At 2 PM I took aspirin with a cup of coffee and tucked myself in my bed for a few moments to wait for them to work. At dinnertime, I awoke with a start when my friend Barb hallooed from my kitchen.  I’d missed an appointment and wasted an afternoon.
I wasn’t particularly overtired; I was thirsty. Proper hydration is as much a priority for plein airpainters and long-distance travelers as it is for athletes. Although the results of drinking insufficient water are less spectacular for us, they’re no less real.

Headwaters of the Hudson, oil on canvas, Carol L. Douglas.
I often bring my water bottle with me, only to use it as a wind-weight on my easel or for wetting paints. Why am I so resistant to drinking in the field?
The problem isn’t the opportunity to drink fluids; it’s the opportunity to expel them. Even if you’re accustomed to peeing in the woods, it isn’t always possible. Le pipi rustique is simply more difficult for women than it is for men, and I subconsciously avoid it.
As a teacher, I’m mindful about not putting my students in situations where there aren’t bathrooms. As a painter, I’m more willing to go off the beaten path.
Curve on Goosefare Brook, 8X6, Carol L. Douglas.
The same is true with being on the road. Beverage options are limited to coffee, water, or sodas. Rest stops are few and far between, and stopping takes time. Fast food, should you be unlucky enough to have to eat it, is loaded with sodium. While one could prepare food and beverages at home, it’s a third level of packing, on top of equipment and clothing. I never seem to have the time to do it.
It’s true that the benefits of water have been oversoldin recent years. Still, water is important, and we suffer when we don’t drink it. Our bodies are about 60% water. It plays a role in every major system. Cells that don’t maintain the proper electrolyte balance shrivel, resulting in muscle fatigue. Water helps our kidneys excrete toxins and keeps our bowels happy. It lubricates our joints and regulates our body temperature. It helps transport nutrients.
Kaaterskill Falls, by Carol L. Douglas.
Plein air painters may not often break a sweat, but we’re exposed to the same environmental stresses as athletes: heat, cold, and wind. Hiking with our kits, setting up, and tearing down are physically demanding. If we’re not hydrated, we can’t perform at our highest level.
So I’m resolved—once again—to drink more fluids, even when it’s difficult. Now, if anyone has suggestions on how to succeed at that, I’d love to hear them.

An addendum: I had an eye exam this afternoon, and I suffer from a common ailment called epithelial basement membrane dystrophy. That’s a fancy way of saying “dry eyes,” and it just underscores the need to drink more water.

Soggy spring

What should you think about when setting up to paint? Tide, time of day, and the light are key, but there are other factors as well.

Ladona, (unfinished) by Carol L. Douglas

We’ve had so many dark, gloomy days recently that I was startled awake at the first gloaming. By 6 AM the sun was streaming through my bedroom windows, warming the air, promising great things.

My plan was to paint Ladona in drydock. She is the former Nathaniel Bowditch, completely rebuilt for the 2016 season. Her owners also operate the Stephen Taber, which I painted in Pulpit Harbor last summer.
Stephen Taber raising her sails, by Carol L. Douglas
Unlike most of the schooners in mid-coast Maine, Ladona was built as a private yacht, in Boothbay Harbor in 1922. She has the sleek, lean lines of a pleasure boat. After a brief stint as a patrol boat in New York Harbor during World War II, she was used for commercial fishing. In 1971, she was rebuilt as a commercial schooner.
Power-washing made a world of difference.
I know the North End Shipyard well. Yesterday, I thought, would be an excellent opportunity to make a short video talking about where to set up for a plein air painting. On the coast of Maine, we have to consider:
  • ¡         Tide
  • ¡         Time of day
  • ¡         Angle of sun
  • ¡         Ergonomics
  • ¡         Courtesy
  • ¡         Transience.

The Gulf of Maine has the largest tidal range on the planet. In the Bay of Fundy the tidal range is a staggering 50 feet. Here in Maine, the difference is only about half that, but that’s still imposing, considering that the average tide in most places is just a few feet.
I wasn’t the only person painting in the rain.
The best solution is to work from a floating dock, which keeps you on the same plane as your subject. When that’s not possible, you can break up your picture over several days.
If you don’t own a compass, invest in one (or an app on your phone).  You need to know where the sun is headed. That changes with the seasons. In the winter, the sun never makes it to the top of the sky, which means the light stays golden. In the summer, the light is clearer and cooler.
Many of the places we find quaint and picturesque are actually people’s workshops. As a matter of courtesy, never go on private property without asking. Stay out of the way of heavy equipment and trucks. For your own comfort, bring earplugs if there are air compressors or other equipment nearby. And avoid traps for yourself, like a painting location exposed to a brutal wind or the harsh sun.
A smarter person would have gotten this canvas under cover before it got wet. Once this happens, you have to let the painting dry naturally.
A deep understanding of the subject doesn’t just inform your paintings; it sets your schedule. I am concentrating on the boats in the cradle right now, because they’re transient. I can paint the sheds, the lobster boats, or the boats at anchor all summer.
Wooden boats require a lot of wood to keep them healthy, and that material is always stacked around the boatyard in interesting ways. (It’s also heavy, as Captain Noah Barnes noted as he dropped a timber onto a workbench with a resounding clatter.)
I wanted to focus on the foreground detritus of lumber, tools, and equipment. I experimented with a number of cute compositions, but Ladona resolutely refused to be cropped.
The sky grew steadily cloudier as the afternoon progressed. “It’s not going to rain until after 5,” Captain Doug Lee told me. That may be what the National Weather Service said, but the Maine coast is unpredictable. A quick shower around 3 PM washed me out.
Once the canvas has water droplets on it, your best bet is to let the surface dry naturally. Luckily, I live just down the road, so it’s no big deal. I’ll go back this morning and put the rigging in.

Painting the coming storm

When you start to feel the patterns of nature in your bones, painting becomes less like science and more like dancing.
The colors in a good rain cloud are close in value. It’s mostly color temperature that will create shape.
Last week we did “suffer a sea-change/into something rich and strange.” This was Spring, which was ushered in on great banks of fog and rain. Coincidentally, I have been painting a moody, changeable sky in my studio, since it’s been too wet to paint out-of-doors.
I’ve written about painting clouds here, and about great painters of clouds here. Right now, I am painting a great pile of dark cumulonimbusclouds. This is part of a larger canvas of the schooner American Eagle rounding Owl’s Head.
No, I’m not ready to unveil the finished work. Captain says I need more air in the sails.
It makes sense to test color modulations before you commit to them. I’m not trying to match here, but to see how the two colors interact.
Since there is no sun in my painting, the clouds are very low in tonal contrast.  This means there is little difference in value between the lightest tones and the darkest tones. That suits my purpose artistically, because the heaving sea is already busy enough.
Even on sunny days the tonal contrast in clouds is less than you might think. A brightly lit cumulus cloud contrasts starkly against a deep blue sky. Within itself, however, it doesn’t have particularly big jumps in value. Instead of relying on tonal contrast, use color temperature.
Readers will send me photos to disprove this, but there are differences between photos and what the naked eye sees. This is especially true for photos taken with devices designed to optimize digital images. In general, polarizing lenses increase contrast in clouds and skies.
Clouds usually have extremely soft edges. I’ve added a short video showing the use of a flat badger brush to make those soft edges. I’m generally a pretty direct painter. Blending clouds is almost the only time I apply a soft brush to canvas.
Last week, one of my students asked me why the band of ocean at the horizon was darker than the water closer to us. “If you can figure out a consistent pattern to the light in the sea, you’re doing better than me,” I told him. The sea is infinitely changeable. So too is the sky.
Fresh brushwork is the final step, over blended surfaces.
You learn about different skies by being out in them and drawing and painting them. At some point, you internalize your understanding. After that, you can start playing lyrically with their structure.
There is no one form that clouds must take, any more than there are specific forms that waves take, or uniformly matching snowflakes, or patterns in which petals will cascade down in an orchard on a spring breeze. Nature reveals herself in infinitely varied, controlled chaos. You must watch and learn, but when you start to feel those patterns in your bones, painting becomes more akin to dancing than to science.

Mixing greens

There are many paths to the final destination, grasshopper. This is just one fast, easy route to mixing summer greens.
Mixed greens, in oils.
Here in mid-coast Maine, the fog and rain are finally releasing the leaves from their winter sheathes. Hints of green show in my lawn, and the hardiest perennials poke their noses through last year’s leaf litter. We are very close to painting greens again, in all their light, airy delicacy.
By June, we will be wrapped in a blanket of immature, emerald foliage. By August, the color will have settled into a deeper, more uniform tone. The only way to navigate this is to avoid greens out of a tube. A system of paired primaries gives you more options, avoiding the acidity of phthalo green, the weight of chromium oxide green, or the soul-sucking darkness of sap green.
Jennifer’s exercise in mixing and modulating greens.
Michael Wilcox published a watercolor pigment guide called Blue and Yellow Don’t Make Green. Well, of course they do, but his point was that there are many routes to the same destination. One of the most useful landscape greens is black and cadmium lemon or Hansa yellow. Of all the greens I mix, this and ultramarine with yellow ochre are the two I use the most.
In my experience, bad paint mixing causes paintings to go wrong faster than anything else. Constantly over-daubing to modulate the paint color distorts the original drawing and makes a grey mush. If you’re confident of the color, you can apply it fast and accurately.
Loren’s exercise in mixing and modulating greens.
For the past two weeks, I’ve drilled my students on mixing color. These are simple exercises you can do at home.
I make my greens on a matrix, which I’ve shown you both mixed (at top) and on a chart (below). The two swatch charts were done in acrylics by students. I asked them to first mix greens according to the chart, and then mix the resulting greens with tints (meaning a mix of white and a color) of ultramarine, raw sienna, and quinacridone violet. What the specific tints were was unimportant; what mattered was how differently tints mix from white out of a tube.
Cadmium lemon can be substituted for Hansa yellow
The range of results is infinite. It depends on both the proportions you choose and the brand of paint you use. However, note that blue/black pigments are much stronger than the yellows. You need about half the amount of blue or black as you do yellow.
These are Benjamin Moore swatches but you can find similar colors in other brands.
The second exercise involves stopping at your local hardware store for a few paint swatches. These are Benjamin Moore brand, but you should be able to find similar ones elsewhere. There are two off-whites: one cool and one warm. There’s yellow, green, and two soft blues. Your assignment is to mix until you think you’ve hit the exact color. Then put a dot of it on the card to see how close you got. (If you’re working in watercolor, the dot goes on paper instead.)
Jennifer’s neutral swatches.
I also had my students make neutrals using combinations of ultramarine blue with burnt sienna and raw sienna. I use ultramarine blue and burnt sienna as my standard dark neutral, because it can go to the warm or cool side depending on how it is mixed. These are also my go-to mixes for rocks and sands.

It’s all about the traps, man

The Blue Umbrella, by Carol L. Douglas. Even without detail, you should be able to see that there are three different species of palm in this painting.
There are 629 living species of conifer in the world. In contrast, there are 2600 known species of palm trees, with the greatest diversity being on islands. They range in shape from draping to spiky to fan-shaped to pom-pom.
Studying the differences between trees helps me get the structure right in my paintings. In Karl’s Garden, yesterday, there were three different species shading the table. It’s a challenge to paint them accurately without being pedantic.
I vary my compositional technique depending on the subject. When I’m unsure about positioning, I sketch on paper, crop my sketch, and transfer the result to my canvas. For boats and buildings, I use a watercolor pencil and a straight edge. I draw directly on the canvas, using water for erasure. 
In my studio, I often start with an abstracted grisaille. This can be risky in the field, since those sloppy wet darks can migrate up into the painting, creating mud. Being rigorous about the fat-over-lean rule helps prevent this. So does marrying the underpainting color to the final shadow color. For this reason, I often end up using a violet-blue rather than the more conventional desaturated reddish-brown.
The rare and elusive pom-pom palm, at Coral Beach in Freeport.
We couldn’t get odorless mineral spirits in the Bahamas. Our choices for solvent were conventional white spirit or turpentine. We chose turpentine. It dries very fast, making the bottom layer less squishy than it would be at home. Going directly to paint meant I could develop paintings that relied on patterning, rather than modeling.
I like complicated images (even though I usually regret them halfway through the painting). I look for angles, light, and, most importantly, the negative space created by the objects. Then I determine where on the canvas the most important elements should fall. Quite literally, I paint quick circles in those spots and then stretch and bend the other objects to fit into the space.
The branching structure varies widely, as do the evergreen, pinnate leaves.
There’s a limit to what a grisaille can tell you about composition. In addition to value structure, paintings have chromatic structure. That was where I went wrong with the painting I wiped out this week. I didn’t take into consideration the coolness of the sea and sky when I was doing my underpainting. If I had, I could have swept them through the painting.
I had a painting teacher once who liked to intone “there is no negative space.” She was trying to say that there are no areas of the painting where nothing important is happening. This is true. However, it is useful to have a term to describe the interstices between objects. In painting a complicated image, those negative spaces are critical. For trees, the silhouette is important, but the traps—that negative space where sky shows through the canopy—is paramount.
After we’d downed brushes for the last time, we took a short car ride. There a line of tankers waits to approach Grand Bahama. I didn’t want to paint it, but it was a lovely image.
My week of painting in the Bahamas is now over, and I head back to Boston this afternoon. “The real question,” I told Bobbi Heath this morning, “is, where am I heading next?”