Why grisaille?

Your painting should be a carefully judged pas de deuxbetween reality and your own vision. That’s best worked out before you start adding a million different color variables.

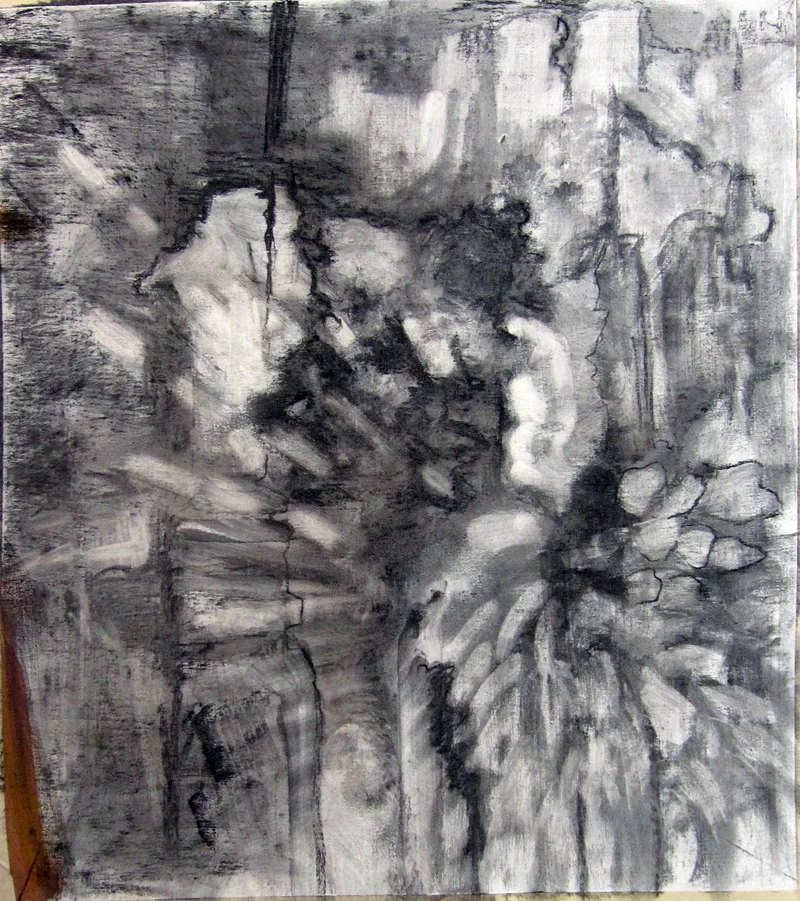
There are days when I just want to think compositionally, without any reality or detail cluttering up my mind. Monochrome is the best way I know to do this.

I have a student who has started painting in monochrome as he learns to master color. It’s a great idea; I might insist on it, except it would result in revolution. People love ‘color’ but fail to see that value is color’s anchor. However one expresses darks, their pattern is what drives a painting. It’s best seen in monochrome, before you add in hues.

By removing the hue question, Mark is doing the equivalent of practicing one hand of his difficult piano sonata at a time. It’s a time-honored technique because it works.

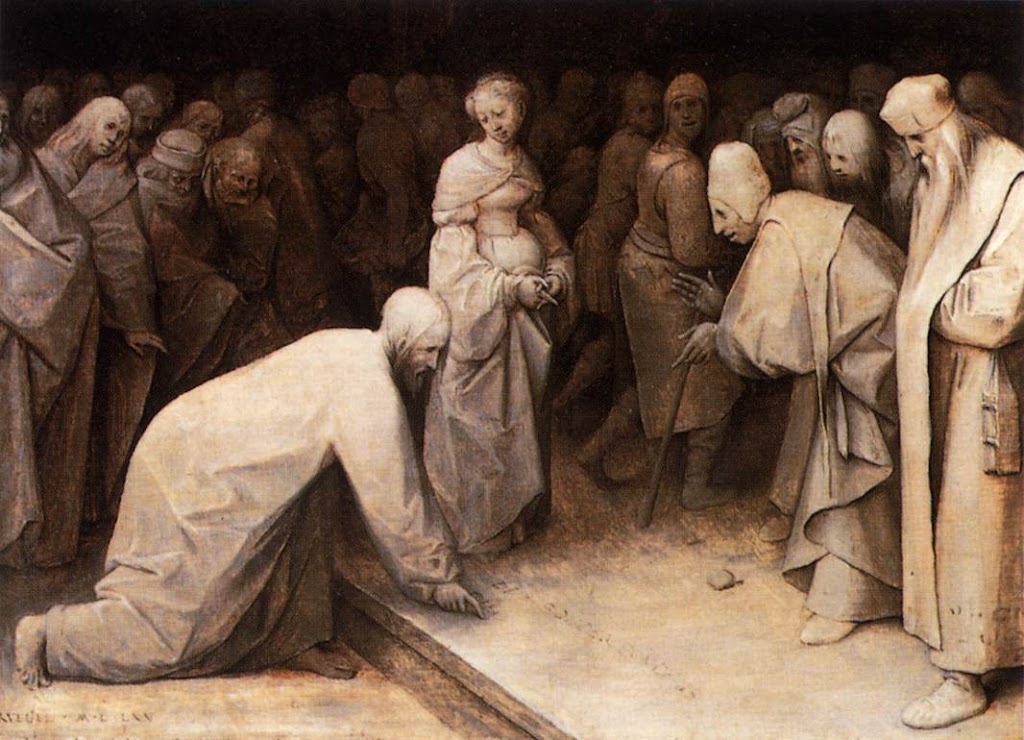
Christ and the Woman Taken in Adultery, 1565, Pieter Bruegel the Elder, courtesy the Courtauld Gallery

A grisaille (pronounced ‘griz-EYE’) is a painting done entirely in shades of grey or another neutral. It can take the form of an underpainting or can be a finished painting in itself. It’s not generally done in lieu of a pencil sketch or notan, but rather as a discrete step in the process of planning a painting.

It is possible to start a painting with just hash-marks on the canvas. Some excellent painters do this; however, for the beginner, that’s the circus trapeze without a net.

Historically, grisaille has been used for finished works of art. This was particularly true in decorative painting, where grisaille might serve as a sort of trompe l’oeilfor sculptural relief. Paint, even in the hands of a master, is cheaper than marble.

Christ and the Woman Taken in Adultery, above, was a personal painting owned by Pieter Bruegel the Elder and his descendants. It’s tiny, roughly 9X12. Its character and intimacy are enhanced by being in monochrome. In that way, it has the feel of a fine drawing.

Odalisque in Grisaille, Jean-Auguste-Dominique Ingres and his workshop, 1823-24, courtesy Metropolitan Museum of Art

Sometimes popular paintings were copied in monochrome to simplify life for engravers. Jean-Auguste-Dominique Ingres’ copy of his La Grande Odalisque, above, is one such example. There lies a lesson for students: if engravers, who are skilled artisans in their own right, find it difficult to track value, how much harder is it for new painters?

Mostly, grisaille has been done as underpainting. Until the Impressionists, with a few exceptions, painting was done in what is called ‘indirect painting.’ Paint was applied in thin layers, or glazes. The underpainting was laid down in a thinned form, usually (but not always) in monochrome. This layer also served to tone the canvas. After it dried, subsequent thin washes of color were worked over the top. The underpainting was allowed to mingle with the glaze colors. It’s a powerful technique, but not as lyrical or free as alla prima painting.

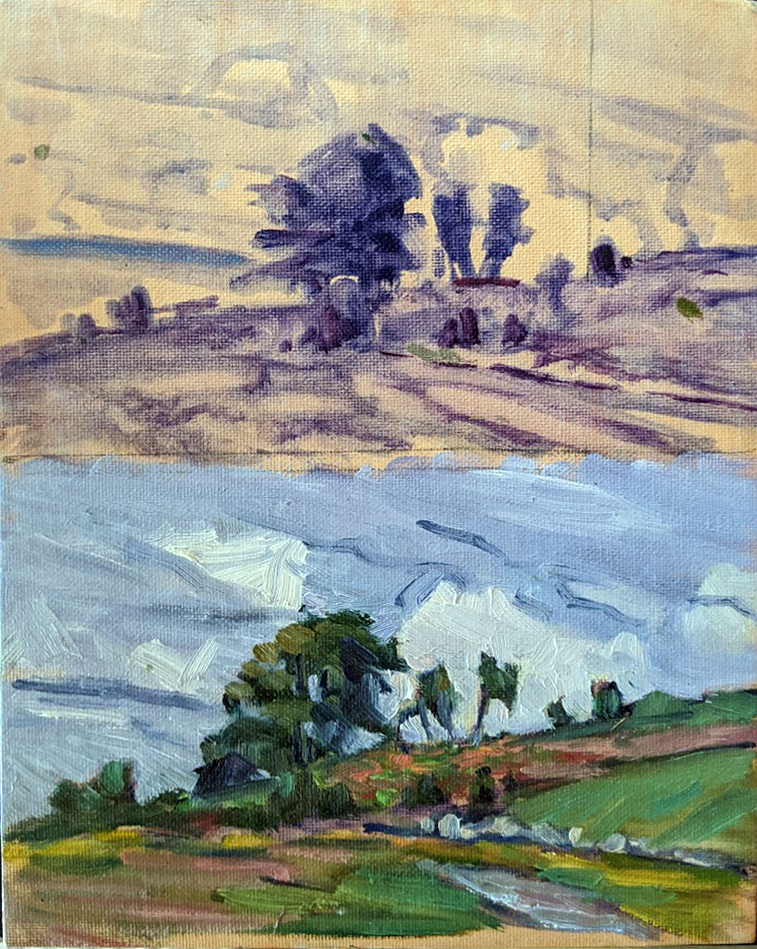
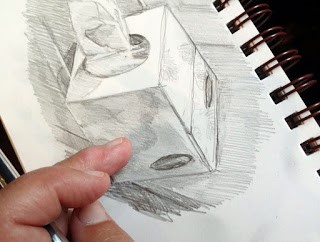
A small underpainting grisaille example I made for my students.

Alla prima doesn’t really require any underpainting, but it’s an act of incredible courage to just start daubing on a blank canvas. Few artists are that brave—or foolhardy, depending on how you look at it. So, we tend to do exactly the same thing as our predecessors—a thin wash of paint, usually in grisaille, that tells us where stuff is supposed to go. Of course, we must learn to judge that first wash to a nicety. Too stiff, and the underpainting is too thick. Too goopy, and everything above it turns to soup.

If the composition reads well at this value-study phase, the painting is almost always going to work, providing you stick with your plan. If it doesn’t, you’re unlikely to salvage it.

All value judgments are subjective. There’s no reliable way to measure the value of a color. The camera is as subjective as the human eye. Your painting should be a carefully judged pas de deux between reality and your own vision. That’s best worked out before you start adding a million different variables in the form of hues.

Monday Morning Art School: the value of value

Why do teachers harp on value? Because it drives everything else in the painting.

Belfast harbor, 11X14, oil on canvas, Carol L. Douglas. Available framed $1087.

You cannot overstate the importance of value in visual art. It drives our perception and guides us through the painting. There are various ways to focus on value: notans, value sketches, and grisailleunderpaintings being the most popular. However we get there, the first step of a good painting is to see each composition in terms of its value structure.

Claude Monet was the greatest optics experimenter of Impressionism (and probably of art history in general). He visited the question of value over and over—in his haystacks, his waterlilies, his series in the Gare Saint-Lazare. We have been happily exploiting his discoveries ever since. We’ve learned that we can substitute color temperature for value, but the value structure remains the most important part of the painting. Even when the dark shapes are not literally dark, they have a form.

Haystacks, (Midday), 1890–91, Claude Monet, courtesy National Gallery of Australia

Just as the human mind can interpolate blue as dark, it has a great capacity to read red for blue as long as the values are true to the scene. The Fauvesexperimented with this, painting skies pink and faces green. We have no trouble identifying what they’re painting. However, it’s an either-or proposition. We can substitute hue for value, or we keep the values accurate and mess with the hues. Mixing them both up together makes an unintelligible mess.

Alla prima painting requires great skill in color mixing, because the goal is to nail it on the first strike. That goes not just the for darks, but every color in the picture. Even a painting with wonderful shadows and lights will have many middle tones, often closely related in value. These are actually the most difficult colors to mix accurately. If you have a painting that isn’t working, ask yourself if it has a full tonal range, or is it simply hitting the highs and lows. For example, when people get in trouble painting texture, it’s usually because they’re overstating the contrast.

Les toits de Collioure, 1905, Henri Matisse, courtesy The Hermitage

All color is relative, meaning it depends on its neighbors. That’s particularly true when it comes to value. Below see a plate from Joseph Albers’ groundbreaking Interaction of Color. The inner violets are the exact same value. But the framing color influences how we see those values, so one looks much lighter than the other.

To mix paint accurately you must become absolutely conversant with the colors on your own palette. The first step is to identify the natural value of your paint, straight out of the tube. No pigment can go darker than its natural hue without the addition of another color. That’s why it’s so difficult to make shadows on lemons.

Plate IV-4 from Joseph Albers’ Interaction of Color, demonstrating how all color is relative. The inner violet colors are the same exact value, but what surrounds them influences how we perceive them.

For oil painters, figuring out the natural value of a pigment is easy. For watercolorists, it’s a bit of work to figure out what that really darkest point is, because it’s never the same as it appears on your palette. The colors wetted are a better guide, but you’ll need a test paper handy to experiment.

When you figure out the darkest natural position of each pigment, you need to see how it tints. For watercolorists, that means dilution. For oil and acrylic painters, that means mixing with white. Every paint has a natural tinting strength. That’s determined by the type of pigment, the amount of pigment and how fine it’s been ground.

There are three things to remember:

¡        Value judgments are subjective. There’s no reliable way to measure the value of a color. The camera is as subjective as the human eye.  

¡        You can’t get a color to go darker than its ‘natural’ value without distorting the hue or chroma. Thus, there is no natural dark version of cadmium yellow, so the shadows in a yellow object require a workaround.

¡        All pigments can make about the same number of discrete steps. While the yellows have a shorter range, the steps are more noticeable. Blues can mix from almost-white to almost-black, but the middle points are very similar. 

Monday Morning Art School: working in triplicate

A 45-day challenge to make you a better painter.

A quick watercolor sketch by me. You become a better painter through
 consistent everyday practice, not in great fits of genius.

My workshop monitor, Jennifer Johnson, has spent several winters in Australia. There she bought watercolor paper in an A4 size, which is long and narrow. She’s been bringing it to class. One day she decided to do all three phases as thumbnails on the same page. I immediately saw the value in her idea. I’ve been introducing it to my watercolor students at workshops and classes.My students follow a strict protocol. It starts with a pencil sketch. Oil painters then move that to their canvases as a grisaille; watercolor painters have an intermediate step of a greyscale (monochrome) painting. This helps them make stronger compositions, and allows them to experiment early in the process, when bad choices are easy to reverse.

Jennifer’s field notebook that started this all.

One of these is Becky Bense, who’s a crackerjack watercolorist. She’s also a friend, so we made a pact at the end of my annual Sea & Sky workshop. We will each do thirty of these three-part compositions over the next 45 days. It wasn’t 30-in-30 because Becky’s more realistic than me. That’s a good thing, because my surgery last week has set me back rather sharply. I’m going to be lucky to finish the thirty by Thanksgiving.

I frequently recommend the book, Art & Fear: Observations On the Perils (and Rewards) of Artmaking, by David Bayles and Ted Orland. Their takeaway message is that art gets made through consistent everyday practice, not in great fits of genius. Do a little every day, and you’ll get better and better. As a teacher, I see tortoises and hares among my students. The ones who succeed are the persistent ones. Even if you only draw for five minutes a day, you’re advancing your skills.

An example by me. Note that I’m testing the colors on the margins before I lay them down. And I also knocked the garlic bowl over before the last step. Don’t do that.

Less-experienced painters tend to perseverate, “licking the paint,” as my pal Poppy Balser calls it. That’s because they think their errors can somehow be undone at last minute. They bury their own beautiful brushwork in these last-minute corrections. Working fast, with no great investment in time, prevents that.

Facing a blank slate every day can be daunting. Why not dial it back a little by experimenting with this process? So, without consulting Becky, I’m inviting you to join us. Oil painters can play this game too: all they need is an inexpensive gouache kit. Everything else works the same as for watercolor.

You will grasp the process by looking at the pictures, but I’ll spell it out: do a sketch at the top, a greyscale in the middle, and a small, color painting at the bottom. Ignore the idea of cropping; these are by definition thumbnail sketches. Don’t belabor any of it; half an hour is a good amount of time to do the whole thing.

Sadly, we can’t buy watercolor paper in A4 in the US (at least not easily). You can either buy 12X16 sheets and cut them in half, or buy 9X12. Either is close enough.

It’s all about value. Here are some of my students looking at value at Sea & Sky earlier this month.

From beginning to end, you’ll be concentrating on value. The sketch is simple, just a drawing with a #2 pencil, but it still should be a value sketch, not just a line drawing. For the monochrome (greyscale) middle picture, mix two complements. I suggest burnt sienna and ultramarine, but you can experiment. Your goal with the final, color, painting is to lay down the paints as immediately, and freshly, as you can. That means hitting the values right on the first try. To do that, mix and check them against your greyscale painting.

I have one more workshop left this season: Find Your Authentic Voice in Plein Air in Tallahassee, Florida, November 9-13. There are enough students to go, but there are still openings, so I’d be excited if you signed up.

From there on in, it’s all Zoom, Zoom, Zoom until the snow stops flying. My Tuesday morning class is sold out; there are still openings for Monday night Zoom classes.

Monday Morning Art School: mastering value

The essence of alla prima painting is to nail the color on the first pass.

The top of this canvas is a simple grisaille; the bottom is a single layer of paint applied right over that. This is the gist of alla prima painting. 

You cannot overstate the importance of valuein painting. Even when artists represent value with hue(a technique pioneered by the Impressionists) the dark shapes in a painting have a form. That form drives our perception and guides us through the painting. There are various ways to get this right, but the most common is a quick value sketch. I ask watercolor students to then make a value study in paint before they start their finished project. I have oil and acrylic students do their paint study in the form of a rough grisaille on their canvases. It has to be thin, and it has to be worked fairly dry, or you can’t paint over it.

Where early oil painters sometimes trip up is in making that bottom layer too dark, thick, or soupy. Then, they hope they can somehow lighten it up by adding white back in. Indirect painting works almost like this, so they may have seen something similar on a video. In indirect painting, the artist works into this dark layer; in modern direct painting, or alla prima, it’s there as a roadmap, so it’s applied more lightly.

Close-value mixing is the heart of painting, and the hardest mixing to do.

Direct painting requires great skill in color mixing, because the goal is au premier coup, or to nail it on the first strike. That goes not just the for darks, but every color in the picture. Even a painting with wonderful shadows and lights will have many middle tones, often closely related in value. These are actually the most difficult colors to mix accurately. If you have a painting that isn’t working, ask yourself if it has a full tonal range, or is it simply hitting the highs and lows. When people get in trouble painting texture, it’s usually because they’re overstating the contrast.

Plate IV-4 from Joseph Albers’ Interaction of Color, demonstrating how all color is relative. The inner violet colors are the same exact value, but what surrounds them influences how we perceive them.

All color is relative, and that’s particularly true when it comes to value. Above see a plate from Joseph Albers’ groundbreaking Interaction of Color. The inner violets are the exact same value. But the framing color influences how we see those values, so one looks much lighter than the other. This is why oil painters should tone canvases, by the way.

I made the oil-painting sample at the top of this page for my students. The top is the value study; the bottom is a finished painting. I keep it around to demonstrate that when we say “darks to lights” we don’t mean a thick mask of dark paint; we mean that we think through our values in that order. (In watercolor, we do the same thing, but the application is reversed to go from light to dark.)

Copy and print me.

To mix paint accurately you must become absolutely conversant with the colors on your own palette. You can download this pigment test chart and print it on watercolor paper (trimmed to size) on your laser printer. Or, just grid off a canvas or paper to match. (Don’t try doing this in watercolor on plain copy paper. It isn’t sized, and your pigment will just sink.)

Use the pigments you usually have on your palette (if there’s more than eleven, we may need to talk).

What is the natural value of your paint, straight out of the tube? Compare it to that scale above.


The first step is to identify the natural value of your paint, straight out of the tube. For oil painters, this is easy. For watercolorists, it’s a bit of work to figure out what that really darkest point is, because it’s never the same as it appears on your palette. The colors wetted are a better guide, but you’ll need a test paper handy to experiment.
Your finished exercise should look something like this.

When you figure out the darkest natural position of that pigment, paint it in the appropriate position on your scale. Then make lighter steps to match the greyscale strip you’ve printed from the sample above. For watercolorists, that means dilution. For oil and acrylic painters, that means cutting with white.

There are three things to remember:

  1. These judgments are subjective. There’s no reliable way to measure the value of a color. The camera is as subjective as the human eye.  
  2. You can’t get a color to go darker than its ‘natural’ value without distorting the hue or chroma. Thus, there is no natural dark version of cadmium yellow, so the shadows in a yellow object require a workaround.
  3. All pigments can make about the same number of discrete steps. While the yellows have a shorter range, the steps are more noticeable. Blues can mix from almost-white to almost-black, but the middle points are very similar. 

Monday Morning Art School: start with drawing

Before you can paint successfully, you have to learn to draw.
I love drawing in church, especially when there are sleepy teenagers. This drawing started with simple analysis of shape.

One of the problems with writing about ‘how to do art’ is that you’re speaking to all levels of experience. Today we’re going right to the beginning of measurement. Almost everyone can get the details of a drawing right. Where they go wrong is with overall proportion. Drawing is, first and foremost, a technical exercise in seeing size relationships. Get that right, and the details hardly matter.

All objects can be broken down into simple shapes and angles.

You’ve all seen artists holding a pencil up to an object. What they’re doing is rough measuring. It’s simple to do, but tough to photograph. Hold your pencil up like a ruler in front of the object you’re drawing. Move it around to see the relative height and width of the thing. For example, the toy truck below is about 1.5 times as wide as it is tall. Figure that out by holding your pencil first along the vertical access, then along the horizontal access, and comparing where the lengths stop along the pencil.

It’s not just an affectation; it’s really how artists measure.

A common beginner error is thinking that you have to transcribe the lengths exactly to the paper. The drawing can be any size you want. Start by figuring out how big you want the object to be on your paper, and make two hash marks to represent that. Then, if your object is half as wide as it is tall, figure out that relationship and mark it too.

Start by measuring out the simple shapes and angles.

You can also use your pencil to figure out the other important thing in drawing: the angles of lines. Formal perspective is important, but not as important as learning to see angles. If you develop the ability to see angles, you’ll have better natural perspective than if you try to fit up what you see to a theory.

Next, rough in the values. That means the lights and darks.

Do your measuring with one eye closed, especially if you’re working in a tight space. Art books will tell you to measure with your arm straight out. That’s not always practical. Instead, try to have the pencil the same distance away from your eye each time you take a measurement. I do that by noting how my arm is cocked.

Today’s exercise is based on a tissue box I drew in church. It had lovely angles. However, what you see in the photo isn’t what I saw while working. A drawing from life will never match what the camera records. Cameras lie just as much as artists do.

Begin to refine and strengthen the light and dark shapes.

All drawing starts with simple shapes. After laying them down, I check and correct them. I do this by analyzing each large shape. Where does the back of the box intersect the tissue column? Is the curve of the cutout fat enough? I discovered that my cube wasn’t really tall enough, so I added some to the bottom. 

The next step is to establish some overall values.  â€œValue” just means how light or dark something is. This box was sitting on a south-facing windowsill behind a person who was casting another shadow. Thus, the window-frame behind the box was in deep shadow, but not nearly as dark as the photograph. I roughed in those darks first. They helped me know how to shade the box properly.

If you’re using graphite or charcoal, you can blend with your finger. Otherwise, use a stump, a tortillon, or a bit of rag.

Next, I set shadows on the tissue box itself. I am more concerned with the column of tissue, so with each pass, I spend more time on that.

Finally, I did some blending, using the handiest tool I carry: my finger. You should use a stump or tortillon on work you care about, but in a pinch, your finger works great. But don’t blend pigments other than graphite or charcoal with your finger; they may contain toxic metals.

Voila! I have a tissue box drawn and my pastor is just winding down his peroration.
Note that I never bother much about my mark-making. It can take care of itself. I’m mostly interested in applying accurate values. I did this drawing with a mechanical pencil, which will never be as luscious as a good graphite stick, but it survives banging around in my purse week after week.
Some general rules:
  • Draw everyday objects. The better you get with these, the better you’ll be with complex subjects. There’s amazing beauty in everyday things.
  • Draw any time you get the chance. I did this drawing in church, and I didn’t miss a word. Drawing and language don’t use the same channels of your brain.
  • Measuring is the most important part of drawing. Keep checking and correcting sizes.
  • Start with big shapes and break them down into little shapes. If the big shapes are right, the smaller parts will slip into their spots just fine.
  • Value is relative. How dark something is, is only important in terms of how dark its neighbor is.
  • Constantly recheck shapes and values as you go.

Monday Morning Art School: painting fall foliage

Autumn has started its great transition; here are some tips to paint it in a believable way.
Catskill Farm, pastel, by Carol L. Douglas. The light is definitely warm in Autumn, but the predominant landscape color is still green.
In the northeast, soft maples start to turn orange and pink at the end of August. There are similar phase changes happening throughout the north. For example, in the Canadian west the aspens are starting to turn yellow-gold and the larches prepare to shed their needles.
 
The transition from summer green to November’s dun will take roughly ten weeks, but the daily changes are incremental.
 
The Dugs, oil on canvas, by Carol L. Douglas. The earliest foliage change in the northeast is in the soft maples.
Don’t delete the greens
 
Until late fall, the predominant local color remains fairly cool: there is the blue of sky and water, and plenty of green leaves. Trees change at different rates. There are some that never change at all, but simply drop their leaves. Mowed grass remains green all year long. And, of course, there are evergreen spruces and pines.
Adirondack Spring, by Carol L. Douglas. The same colors that appear in early spring return in the fall, but in a brassier way.
There are far more colors than just red and gold
 
The same colors that appear in early spring foliage are repeated in autumn, but in a brassier way—reds, pinks, golds, chartreuse, teals, purples. In early fall, tinge the tops of trees with these hues; as the season progresses, they will become more dominant.
 
Know how trees change color
 
Where I live, the brilliant soft maples and ashes change first. Later, the oaks and beeches rattle mournfully in the wind. Each species has a characteristic color as well as a specific time to turn. Observe these changes, rather than just dashing color around.
 
Glade, watercolor, by Carol L. Douglas. This painting is at the Jackson Memorial Library, Tenants Harbor, ME, through September.
Pay attention to the understory
 
There are wildflowers blooming on the edges of fields—goldenrod, asters, blue chicory, and Queen Anne’s lace. These are less brilliant than their early-season counterparts, but the overall effect is a beautiful spangle against dried grasses. Meanwhile, hayfields are still bright green and there are apples in every hedgerow.
 
Underpaint the sky in last
 
When we put the sky in first, we have a tendency to paint it darker and brighter than it is. (That’s because of how our eyes respond to light.) It’s easy to then make the whole painting too dark.
 
That’s a great argument for the dark-to-light rule of oil painting, but what should watercolorists do? Start with a monochrome value study, so you hit the blues properly the first time out.
 
How dark are the leaves?
 
Trees are often among the darkest features of the landscape, especially when we’re below them. But yellows and golds are naturally light colors. That makes us perceive fall foliage as lighter than it is. We need to take care to check the value of foliage in the design phase.
 
Avoid white in your foliage mixes, except to articulate a sun-struck passage. Darken yellow-gold with yellow ochre rather than with its complement, or you’ll kill the chroma. And check the leaf values against tree trunks; in some cases, they may not be that different.
Keuka Vineyard, Carol L. Douglas, available through the Kelpie Gallery. This shows the earliest autumn changes, which in New York are in late August.
How intense is fall color?
 
It’s easy to overstate the chroma in any season. It’s especially easy in autumn, because we’re responding to unusual brilliance. But Nature has a wide variety of chromatic intensities, from the delicate robin’s egg blue of a winter sky to the dazzling reflections off the ocean. There are plenty of greys in the landscape, especially in autumn.
 
There are other ways to convey the brilliance of autumn than to just use bright colors. Set the subject tree against more neutral tones, or place an intensely warm tone against a cool tone.
 
Autumn has its own color temperature
 
Above, I wrote that autumn colors were still predominantly blue and green. But the overall color temperature is warm, because the sun spends a lot more time on the horizon than it does in midsummer.
 
Autumn is known for its magical lambent light—the “season of mists and mellow fruitfulness/Close bosom friend of the maturing sun,” as John Keats said.
 
Color temperature is a lengthy subject, and I’ve written about it here, here, here, hereand here(that’ll keep you out of the bars). The basic rule is that the color of the shadow is the complement of the color of the light. If light is golden, shadows are cool.
 
This was originally posted in September, 2019. Happy Labor Day, my friends!

My 2024 workshops:

Monday Morning Art School: practice seeing values

Value is the most important dimension of color. Here’s an exercise to help you see it better.
On the left, color strips. On the right, monochrome approximations of those colors. Photo courtesy of Kyle Buckland.

This week’s exercise is brought to you by outstanding painter and teacher Kyle Buckland. He graciously allowed me to share it with my class and you.

A simple value scale.

Value in color theory is how light or dark something is on a scale of white to black (with white being the highest value and black being the lowest value). It’s the hardest dimension of color to match, but it’s also the most important. It’s what we register first when we look at a painting.

“You can never do enough of this type of training the eyes,” wrote Kyle. He’s right.
I made you this approximation of Kyle’s stripes, or you can paint your own.
Kyle ran a series of colors across a sheet of paper, as above. You can either copy his technique and make your own stripes, or you can print the image I made, above. A PDF is here.
I printed this on a color laser printer on card stock. If you have an inkjet printer, you may need to spray it with fixative to prevent the ink from bleeding into your greys.
You’re going to make a series of stripes on the right, matching the value of the color on the left as closely as you can get with grey paint. Use acrylic if you have it; gouache or oils otherwise. If all you have is watercolor, you’re going to have to make a separate card and set it next to this one. 
Kyle converted his photo to black and white to demonstrate his close matches. Photo courtesy of Kyle Buckland.
When you’re done with this exercise, I’d like you to photograph it with your cell phone and camera and delete the color information; i.e. turn it into black-and-white. (On my cell phone, I go to picture editing and a b/w filter pops up automatically.)
Cameras can be wrong in value assignments. Both the yellow and green are way off.
Compare your stripes. If you’re way off, repeat this exercise until you’re more accurate. However, this comes with a caveat. The human eye is subjective and not everyone sees value the same way. Software is also in some ways subjective, since it was programmed by humans. In the sample above, yellow is obviously the highest-value color on the wheel. But Photoshop perceives it as darker than orange. Your camera and your eye may disagree.
Why is value so important? It creates a structure for the painting to flow through. If there are dark values in an organized pattern, synchronized with mid-range and light passages, your finished piece will draw the viewer in.

Monday Morning Art School: an exercise in color

This exercise teaches you to think of the three aspects of color as separate properties.
Water lilies (Yellow Nirwana), 1920, Claude Monet, courtesy the National Gallery, London. Much of Monet’s work was experimenting about the nature of color.

When we ask people, “what’s your favorite color,” we’re using the word color in a simple way, and we expect a simple answer. In fact, color has three basic characteristics:

Value â€“ How light or dark is the color? Blue-indigo is the darkest color, yellow is the lightest. Red and green fall somewhere in the middle.
Hue â€“ Where does it sit on the color wheel? All colors fall into one of the following hue families: red, orange, yellow, green, blue and violet. Within those families, however, are many subdivisions.
Chroma â€“ How much intensity, or “punch” does the color have? Grey is low-chroma; fuchsia is high-chroma.
For more detail, see here.
Complementary colors are opposite positions on the color wheel.
Analogous colorsare a set of colors that sit next to each other on the color wheel.
This exercise teaches you to hold value and chroma steady and manipulate only hue. It’s hard to make these judgments subjectively, so your samples may not look exactly like someone else’s.
Go to the paint store and select paint chips in two different color schemes—complementary and analogous. I want you to choose paints with the same value and chroma but the hue will be different.
Complements where the value and chroma are the same.
They don’t necessarily have to be high-chroma combinations. Here’s a pair of complementary hues which have less saturation (lower chroma):
An example of an analogous color scheme where the value and chroma are the same for all three hues:
Once you’ve selected the three paint samples, chop them up and arrange them on a little card as a design. Glue them down in a pattern that pleases you. Try to leave no space between the different colored tiles so your finished work looks something like this:
Above: my chops. Below: Photoshop’s evaluation of how close I came with the values. (Remember, Photoshop is interpreting as much as I am.)

I don’t care what kind of shapes you make or how complicated your design is. I just don’t want white showing between the sections.

If it proves difficult to get out, and you want to get started, you can always make your own paint swatches. But it’s fun to get them from the hardware store, cut them up and make patterns.

Black and white all over

A class exercise on design, and a chemistry question I can’t answer.
Christ and the Woman Taken in Adultery, 1565, Pieter Bruegel the Elder, image courtesy of the Courtauld Institute of Art but the painting has been stolen.

Yesterday was the kind of day that drives poets mad. Just below freezing, it rained heavily, with gusts of wind. Our plein air painting class was forced into the studio.

grisaille (pronounced griz-eye) is a painting done entirely in shades of grey or another neutral color. Historically, it was used as decorative painting in imitation of sculpture. Some are what we moderns call duotones. They have subtle colors added to extend the value range. But for our class, they would be strictly in black and white.
Abstract design by Christine Covert

Painting runs along two parallel tracks. The first is design. This is why painting teachers relentlessly push students to do thumbnails and other value sketches. Value is our most important tool. Get it right, and you can be wrong about a lot of other things.

(I came to this realization late, by the way. I studied with Cornelia Foss, who tinkers endlessly with the ‘rules’ of painting. From her I got the hairbrained idea of minimizing value as a structural concept. However, this was a misinterpretation on my part. That’s a good lesson in not asking the right questions at the opportune moment.)
Grisaille by Jennifer Johnson.
The second track is color. It’s so much more interesting in some ways that it can be a distraction to the beginning painter. Mixing paints is both difficult and exciting.
Of course, value is part of color. In color space, value is the range from black to white. All successful paintings have some kind of pre-meditated value range in them. A high-key painting is one in which the contrasts are extreme. A low-key painting is one in which the range is narrower. In either case, there must be midtones too. They are also part of the design process.
Grisaille by David Blanchard.
It’s a lot easier to experiment with value when you’re not fussing about color management at the same time. One way to familiarize yourself with this idea is to paint a ten-step scale ranging from black to white. That’s not a bad exercise, but it’s boring. Instead I asked my students to do the monochromatic still life that I assigned in Monday Morning Art School last month.
Grisaille by Chris Covert.
Before that, however, they did an abstraction in charcoal, based loosely on the drawing I included in yesterday’s blog. Charcoal is the most painterly of drawing tools, but this is something you can do in a sketchbook while watching TV. It is a bit intimidating for someone to ask you to do an abstract drawing, but if I call it “doodling,” you can relax and get on with it.
There are only two rules:
  • Have a full range of tones, not just a line drawing.
  • And no realistic objects belong in your drawing at all.

A question: One of my students has had a problem with red pigment from her toned boards bleeding into her final paintings. She prepared a sample board for me to test her M. Graham acrylics vs. a similar red from a very inexpensive craft paint. I tried the squares at 15 minute- and 30 minute-intervals. The M. Graham pigment bled into the white paint, but the craft paint did not. I then tried the same intervals using my own Golden-toned board. Again, there was no bleeding.
Acrylic is pigment suspended in acrylic polymer emulsion. It is supposed to be water-resistant when dried. That doesn’t mean it’s oil-resistant. I’m beyond my chemistry knowledge here, but if any readers can suggest what’s happening, I’d be very grateful.

Devilishly difficult in the details

Color theory is a great place to get caught up in what you know versus what you see.
Schoodic fog-bow.
It was a splendid North Atlantic morning, looking more like November than August. The horizon was obscured in sea smoke. The rocks at Schoodic Point were covered with gulls who either felt a weather event in the offing or were sick of work. There was an onshore breeze and thunderheads building over Cadillac Mountain.
Plein air painting requires, above all, flexibility. I’d had a different plan for Wednesday, but everyone should spend one day painting the sheer magnificence of Schoodic Point, and today’s weather forecast is iffy. I swapped my plans as well as our location. Instead of teaching about believable greens, I concentrated on the color of light.
Visitors to Schoodic inevitably stop and stare. It’s stupefaction in the face of overwhelming power. 
On a day with a sea fog, all color theory goes out the window. What is the color of light when you are enveloped in a blanket of thick, peaceful, fluffy wool? It’s grey, sometimes tempered with pink, sometimes with blue, but ever-changeable. There’s a lot to leave to the imagination in such a setting. I sometimes paint the fog pale violet, because I like that color, but I don’t want it to become a gimmick.
There are three components to color: hue, saturation and value. They’re all the artist has to lead his viewer through his story, develop points of emphasis, and drive the eye.
I demo through the lunch hour at my workshops…
Value â€“ How light or dark is the paint?
Hue â€“ Where does the color sit on the color wheel? All colors fall into one of the following hue families: red, orange, yellow, green, blue and violet. Within those families, however, are many subdivisions.
Chroma â€“ How much intensity, or “punch” does the color have? A red geranium flower is high-chroma, a fog bank is low-chroma.
That sounds so sensible and neat on paper, but it gets messy on the canvas. The same is true of the color of light.
When the whole visible light spectrum strikes your eye at the same time, you perceive white. In the real world, this doesn’t happen. What you see is always filtered by our atmosphere.
Which is why I was so angry at the gull who thumped me in the shoulder and stole my sandwich from my lips. Rude.
It’s easy to see the gold and peach light of sunset, or the cold light of midday, but what is the color of fog? It’s often a cool, desaturated blue-grey, but that isn’t always true. It depends on the direction you’re looking and the time of day.
Color theory is a great place to get caught up in what you know versus what you see. When that happens, try to understand why it’s not working the way you thought it would. Then paint what you see, or, better yet, paint what you feel.