Chromophobia

Until you start playing and experimenting, you won’t really own your own color pathway.

Bobbi Heath once posited to me that painters learn to manage color in three phases:

  • They make everything grey;
  • They vastly overshoot the chroma;
  • They finally learn a pleasing color sensibility.

 â€œIs it even possible to overshoot the chroma?” I riposted, because I’m apparently stuck in the second phase. I was joking, of course. In being a high-chroma painter, I’m operating within my own time and place in history. High chroma is part of our current landscape painting style.

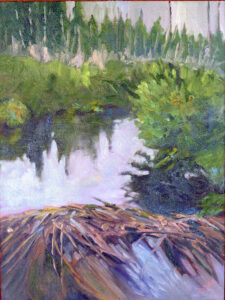
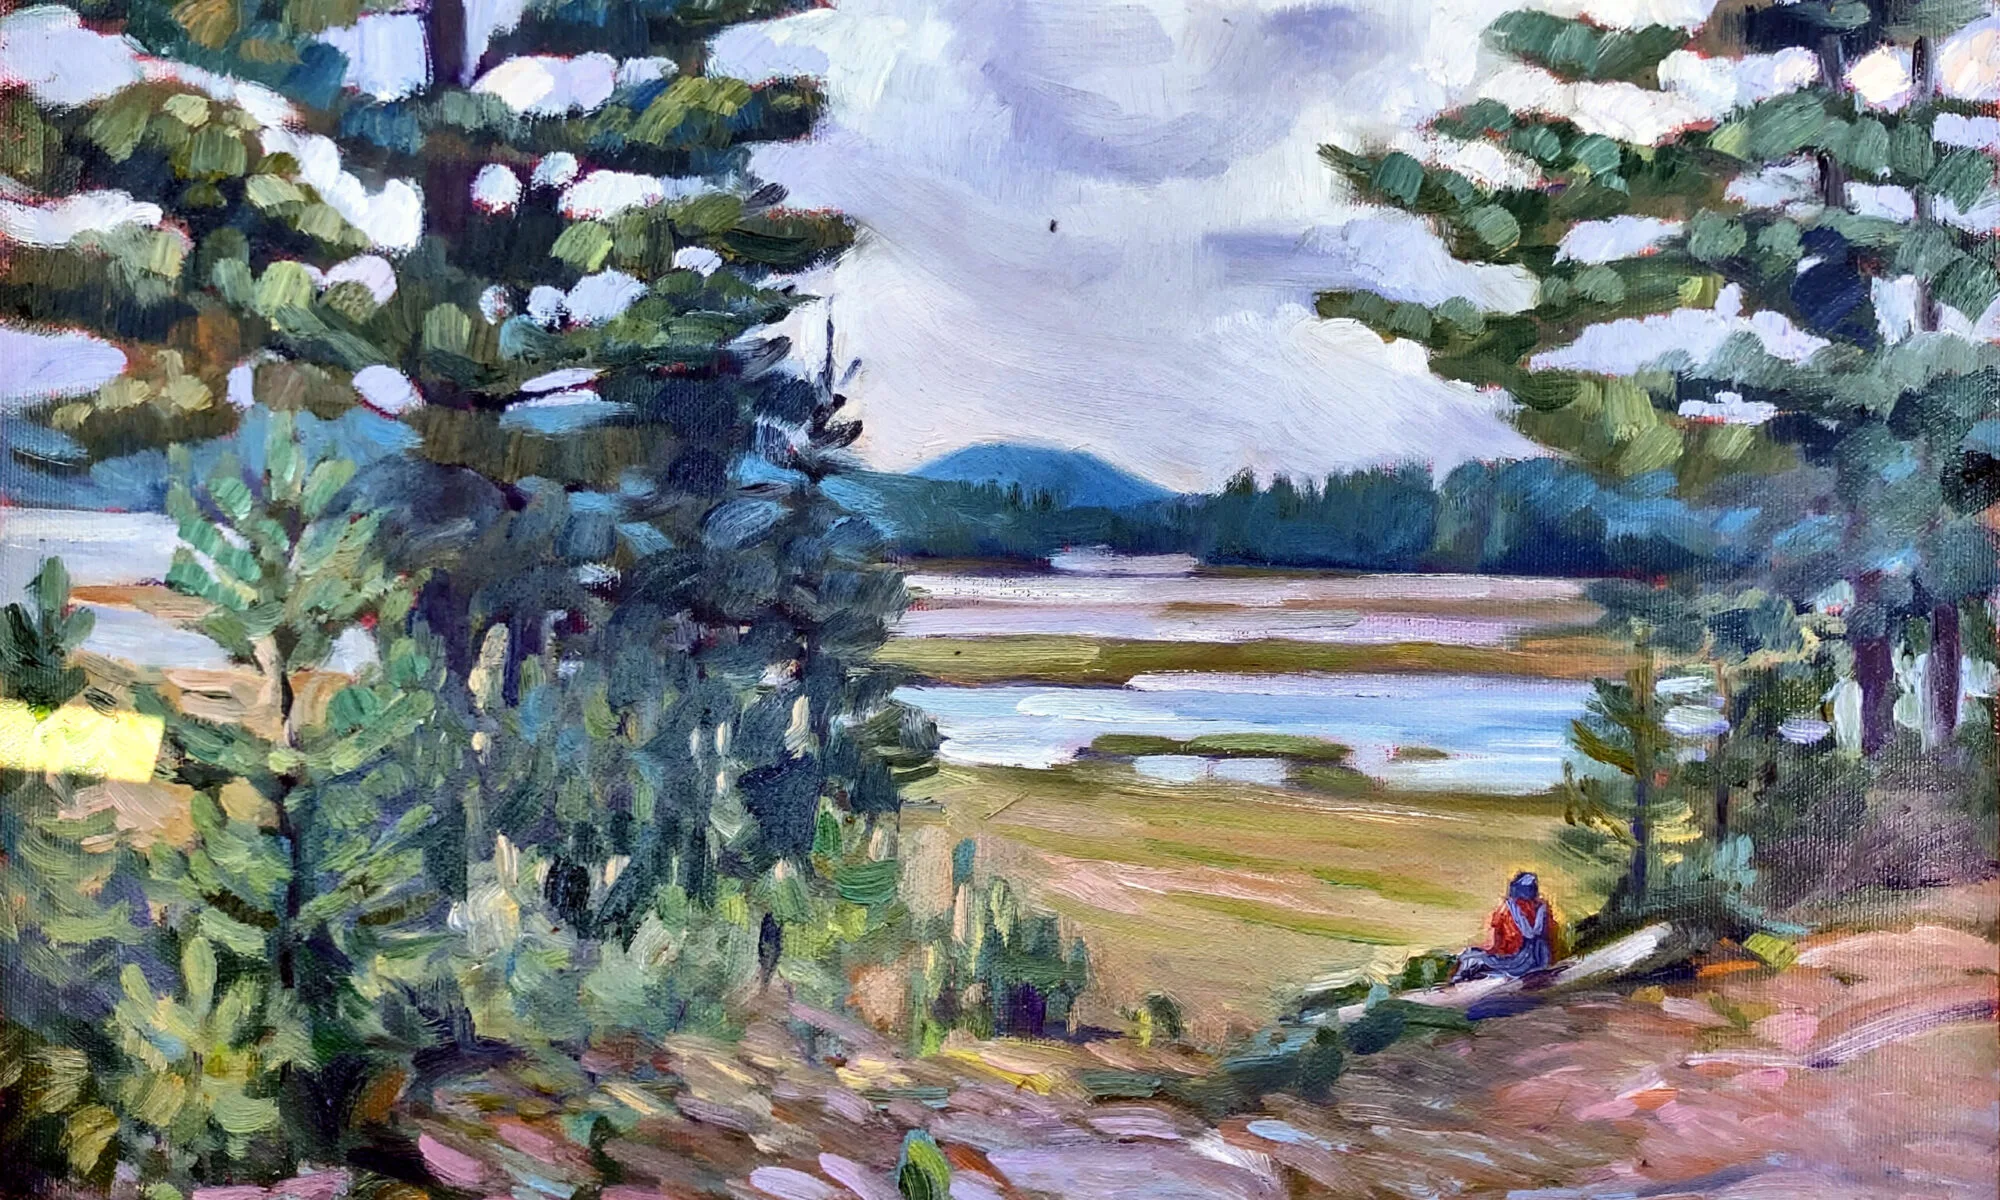
Beautiful Dream, 12X16, oil on archival canvasboard, available.

(For those of you new to the discussion, chroma is one of three aspects of color, which you can read about here. It means how intense the color is. Grey is low-chroma; fuchsia is high-chroma.)

Bobbi had it right, of course. Painters start in a world of soft greys because grey is safe. They need to blow through that safety net to master all aspects of color.

The problem is exacerbated when the painter lives in an area with grey skies. I spent 21 years in Rochester, NY, where the weather is controlled by tempestuous Lake Ontario. Those damp, overcast skies were great for gardening and my skin, but they mean indirect light. That, in turn, can lead to gloomier color and less separation between lights and darks. Beautiful, but dull in a painting—unless you take a page from the Luministplaybook and straight-up lie. Before you can do that, you have to be able to see it.

Giving birth to a brighter color palette can be painful. Brilliant color looks garish at first, often because our first experiments at high-chroma painting are garish. The question of color harmony is more important when our painting isn’t subdued by a leavening wash of grey. With chroma elevated, we can no longer ignore when color combinations don’t work.

Bracken Fern, 9×12, oil on archival canvasboard, available.

You can’t get to that phase of development until you let go of the crutch of neutrality. This is one area where a teacher or mentor can be a great help. “Leave it,” we say. “Set it aside and look at it again in two weeks.” Actually, it would be more helpful to set it aside and paint twenty or thirty paintings in this new high-chroma space until you start to see how it hangs together.

Yes, you’ll make some awful paintings. It’s a necessary phase of growth. “No mistakes, no success. Know mistakes, know success,” my buddy Ivan Ramostold me yesterday. That’s never truer than with color. I can lecture all year about color interaction but there are millions of ways to lay colors down next to each other. Until you start playing and experimenting, you won’t really own your own color pathway.

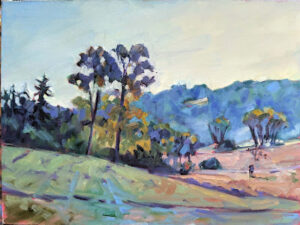
Quebec Brook, 12X16, oil on archival canvasboard, available.

I encourage my students to have tintson their palette because they help keep color clean. These premixes can save a lot of time and prevent a whole lot of dullness.

None of this is to say there isn’t room for neutrals in painting. Of course, there is, and the third phase of color management is to add those neutrals back in. (I’m still waiting.) But let’s not jump the gun here; neutrals are in some ways the apotheosis of color, a counterpoint to chroma. They come last in our color-sensibility development.

Monday Morning Art School: the color of Spring (part 1)

It’s time to assemble the proper pigments to paint beautiful greens this spring.
Fog over Whiteface Mountain, by Carol L. Douglas.
If March didn’t exactly come in like a lamb this year, it at least came in like a sheep. Don’t be fooled. Some of our most brutal winter storms have been known to happen in March. Walking to church, I pondered the depleted state of our woodpile. I wasn’t the only person thinking on these lines. My pal Naomi told me she was going home to move wood “while the ground is still frozen.”
That doesn’t mean that color is not peeping through here and there. The days are growing longer. We may see snowdrops and winter aconite appearing along granite foundations this week. Back in western New York, two witch hazels ought to be blooming, planted by me.
Spring arrives in a host of rich colors, and we’ll discuss that next week. But we must start with the predominant color, which is green. In my own yard, the green moss on the stone wall and my shed roof are the only visible cues that the season is changing. They tell me that growth and warmth are happening under the surface.
Beaver Dam on Quebec Brook, by Carol L. Douglas
Michael Wilcox published a famous watercolor pigment guide called Blue and Yellow Don’t Make Green. Most of what it tells you can now be found on the internet, but it’s where I first got the idea to add back the banned black.
His point was that there are many routes to the same destination, and that to really mix colors, you need to understand what pigments you’re using, not work from trade names for colors. Consider sap green, for example—a staple of many plein air painters’ toolkit. It’s really a convenience mix made of a phthalo blue and some kind of yellow. The same is true of Hooker’s Green.
Mixed greens, in oils.
The single-pigment (‘true’) greens available are chromium oxide green, viridian, and cobalt green. Chromium oxide green is a lovely, heavy, natural green. Unfortunately, it outweighs everything it’s mixed with. Viridian and cobalt green are lovely, but expensive. Beware viridian hue—it’s just another phthalo in disguise. Any other greens you buy in a tube are just variations of those pigments, or convenience mixes.
To make a whole range of beautiful greens, make sure you have the following pigments in your toolkit. Since they’re all-around useful colors, they make a lot more sense than carrying several greens.

  • Black
  • Ultramarine blue
  • Prussian (or phthalo) blue
  • Hansa (or Cadmium lemon) yellow light
  • Diarylide (“Indian”) yellow
  • Yellow ochre

The rookie error of landscape painting is to make all your greens using the same basic color, modulating lighter or darker for highlights and shadows. You’ll have much more life in your trees if you know all the different ways you can get to leafy green. 

Chart courtesy of Victoria Brzustowicz
In fact, the best way to navigate the colors of foliage is to avoid greens out of a tube altogether. A system of paired primaries gives you more options, avoiding the acidity of phthalo, the weight of chromium oxide green, or the soul-sucking darkness of sap green.
In my experience, bad paint mixing causes paintings to go wrong faster than anything else. Constantly over-daubing to modulate the paint color distorts the original drawing and makes a grey mush. If you’re confident of the color, you can apply it fast and accurately.
Green modulation swatches by student Jennifer Johnson.
I make my greens on a matrix, which I’ve shown you both mixed and on a chart. After mixing greens according to the chart, you can then experiment with modulating your resulting greens with tints (meaning a mix of white and a color). The specific tints are unimportant, but the most useful one for landscape is a mix of white, ultramarine and quinacridone violet, making a pale lavender. It is great for atmospheric perspective.
Note that blue/black pigments are much stronger than the yellows. You need about half the amount of blue or black as you do yellow.

Monday Morning Art School: the need for green

A fast, easy route to mixing plausible summer greens.

Overlooking Lake Champlain, by Carol L. Douglas. Every green in this painting came from the matrix below. And, yes, there’s a scrape in it. It tumbled off a bluff.

The need for green came early to class this year, paradoxically because it’s been cold this spring. There’s little green peeping out in nature, even here on the coast.
Last week in class we worked on salvaging failed paintings. That meant pulling out work from summers past. Most of them included some greens, so we had to mix a green chart.
A basic mixing chart for greens, made by my friend and student Victoria Brzustowicz.
We are only weeks away from painting greens again, in all their light, airy delicacy. Even now, the osier and willows have red and yellow in their branches. By June, we will be wrapped in a blanket of immature foliage ranging in color from pale emerald to pink. It’s a good time to brush up on some color theory.
By August, the color will have settled into a deeper, more uniform tone. The only way to navigate this is to avoid greens out of a tube. A system of paired primaries gives you more options, avoiding the acidity of phthalo green, the weight of chromium oxide green, or the soul-sucking darkness of sap green.
If you look carefully at supposedly-uniform foliate, you will see patches where the color leans toward khaki, yellow, teal, violet and orange. They are what gives life to greens, just as accidental tones give life to human skin.
Michael Wilcox published a watercolor pigment guide called Blue and Yellow Don’t Make Green. Of course they do, but his point was that there are many routes to the same destination. One of the most useful landscape greens is black and cadmium lemon or Hansa yellow. Of all the greens I mix, this and ultramarine with yellow ochre are the two I use the most.
The above chart, mixed in oils. It works just as well in water-based media.

In my experience, bad paint mixing causes paintings to go wrong faster than anything else. Constantly over-daubing to modulate the paint color distorts the original drawing and makes a grey mush. If you’re confident of the color, you can apply it fast and accurately.

Above is the matrix of greens I’ve used for almost twenty years. The range of results is infinite. It depends on the proportions you choose and the brand of paint you use. However, blue/black pigments are always much stronger than their yellow mates. In any mixture, you need about half the amount of blue or black as you do yellow. This has nothing to do with color theory. It’s because darker pigments have more staining power than do lighter pigments.
Victoria Brzustowicz made this color chart based on my workshop palette. Here is a printable PDF.I crossed out the red on the chart because, while I do use it in the studio, in most field painting it’s unnecessary.
Once you’ve finished mixing that matrix, it’s time to tie it to the bigger palette. I encourage students to arrange their paints as above because:
  • It’s efficient;
  • It allows you to mix without thinking;
  • It encourages you to use the full color range in every painting;
  • It prevents the beginner’s error of modulating with white or black;

You can modulate your greens using tints of your other colors. For atmospheric greens, modulate with blues and violets. For warm, lighter greens, modulate with warmer tones.
Mount Hope Cemetery in the Spring, by Carol L. Douglas
Above is a photograph I took several summers ago. Your mission is to use the green chart I’ve made and mix tones similar to the different greens in the photo. If you get the mixing right, painting this scene will be a snap.

Changing my support

If you don’t like how you’re painting, knock the struts from under yourself and see what happens.
Damariscotta Lake overlook, watercolor on Yupo, by Carol L. Douglas
I’ve been mulling over the color-shift I see between my oil paintings and my watercolors. My pigments are essentially the same. (Here are my supply lists for watercolorand for oil painting.) But my oil paintings of the same scenes always seem cooler. Is that because I’m toning in red? Or is something else at play?
David Dewey suggested the problem was, in a sense, all in my head. I’m so rooted in oils, he thought, that I’m more observational, and feel less free to depart from reality. My watercolors are a lark to me, so I give myself permission to experiment.
Since then I’ve been trying to be less bound to observed color. It’s too soon to say what the outcome will be, but I did look at a small painting in my studio yesterday—one that I thought was garish and overshot when I did it earlier this month—and thought, “That’s really not half bad.” There’s a lesson there, and it’s to not be too quick to judge your own work.
Damariscotta Lake overlook, oil on canvas, by Carol L. Douglas
Perhaps the problem is also the substrate. After all, my excitement about watercolor exploded when I discovered Yupo.
Because my residency oils were quite large, they were done on stretched canvases. For work under 24X20, I like RayMar panels. They’re solid, stable, archival—and pricey for beginning students. For them, I suggest a decent panel over a cardboard or MDF backing. As they grow more confident, they can move to a better-quality panel.
In May, I bought a bunch of different boards by different makers to test. Then I got busy with my season and forgot them. RayMar’s medium landscape cotton panel is a toothy board even after heavy toning. That makes for great control, and it’s a high mark for competitors to match.
Linen’s advantages over canvas mainly show on stretcher frames. Linen is highly reactive to the moisture in sizing and primer, and it’s very strong for its weight. It dries tight and it stays taut. Nothing is more satisfying to paint on than hand-stretched Belgian linen.
But those qualities are irrelevant in a glued linen panel. There isn’t much sense in paying a premium for linen to be glued down.
Still I’d bought a few linen panels from different makers in my assortment. I was pleasantly surprised by how much I liked the surface: it’s less toothy, which made it fun to slosh the paint around.
The problem with less-expensive boards is always their backing (although the gesso can be pretty thin, too). MDF and cardboard are perfectly fine in smaller sizes or for student work. But they aren’t as rigid as wood. Cardboard, particularly, bows and curls with time.
Poppy’s handmade birch panel.
On Sunday, as we were setting up for our last, quick,painting, Poppy Balser handed me a panel she’d made herself. It was clear birch, finished with two coats of Golden GAC 400 and clear gesso. She’d left the board unsanded, which gave it a better tooth than the manufactured versions of the same thing. And it was uncradled, which made it frameable for plein airevents.
I made a poor painting on it, but that was my doing, not the board’s. It’s the best new product I’ve painted on all year—of course, because it’s the most work. Still, I plan to make a few and keep playing.
Note: I’ve decided to teach one more plein airsession in Rockport. No, I’m not nuts. If it’s miserable, we’ll meet in my studio. But the light has been so fantastic in midcoast Maine, we might as well do another session before winter closes in for real.
Yesterday in Rockport.
I’ll be teaching a six-week plein air class on Tuesday mornings from 10-1. It runs from November 13 to December 18.

When weather permits, we paint at fantastic locations around the Rockport-Rockland-Camden area; rain dates are in my studio at 394 Commercial Street. Watercolor, oils, pastels and acrylics; all levels of painters are encouraged to join us. The fee is $200.