I had just one job…

COVID kicks like a mule, which is why I failed at my goal, and why I’m just getting this information out about my next session of classes.

Oops.

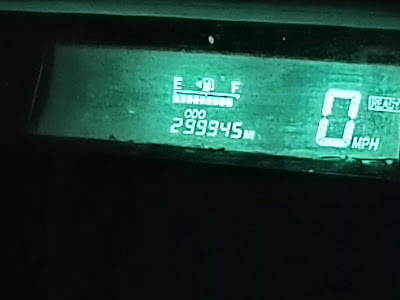
I set out two weeks ago on an impromptu excursion with my son to West Yellowstone, Montana. We would look at geysers in the snow, and celebrate his Prius clicking over 300,000 miles, which we calculated would happen somewhere on the NYS Thruway as we returned to Albany, NY.

I was last in Yellowstone 26 years ago with a baby in a backpack saying “bub-ble”. On this trip, her younger brother was more erudite. He’s a newly-minted geologist. I now know more about the Yellowstone Supervolcano than I ever thought possible.

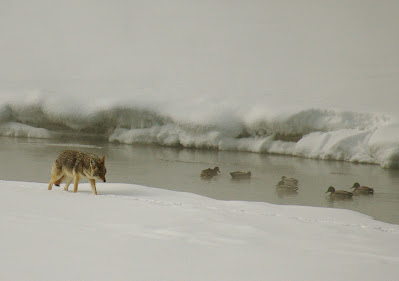
Coyote at Yellowstone, photo courtesy Dwight Perot.

On Monday of last week, my husband told me he had COVID. I was starting to develop cold symptoms myself, but according to the CDC we’d been apart too long for me to have been exposed with him. However, by Tuesday morning, it was apparent that my son and I also had COVID. We decided to beat feet back home.

If you’re not feeling well, a car provides a strange insulation. You stop at roadside rest stops, you eat fast food, you sleep, and then you do it all over again. It’s amazing how fast you can travel 2600 miles when you’re self-quarantined.

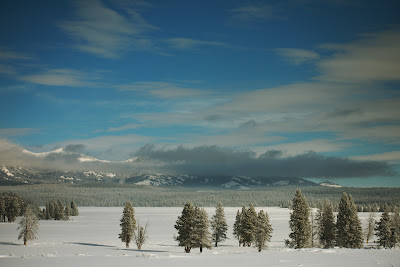
Yellowstone in the snow, photo courtesy Dwight Perot.

One problem became evident as we approached Ohio. We would be 55 miles short of our 300,000-mile goal. “No problem,” I said. “We’ll just take a fast run up the Northway when we get back to Albany.”

Except that we couldn’t. Even in its Omicron form, COVID has a wicked kick. I left the boy on his sickbed, drove home and slept all weekend.

Yellowstone River, photo courtesy Dwight Perot.

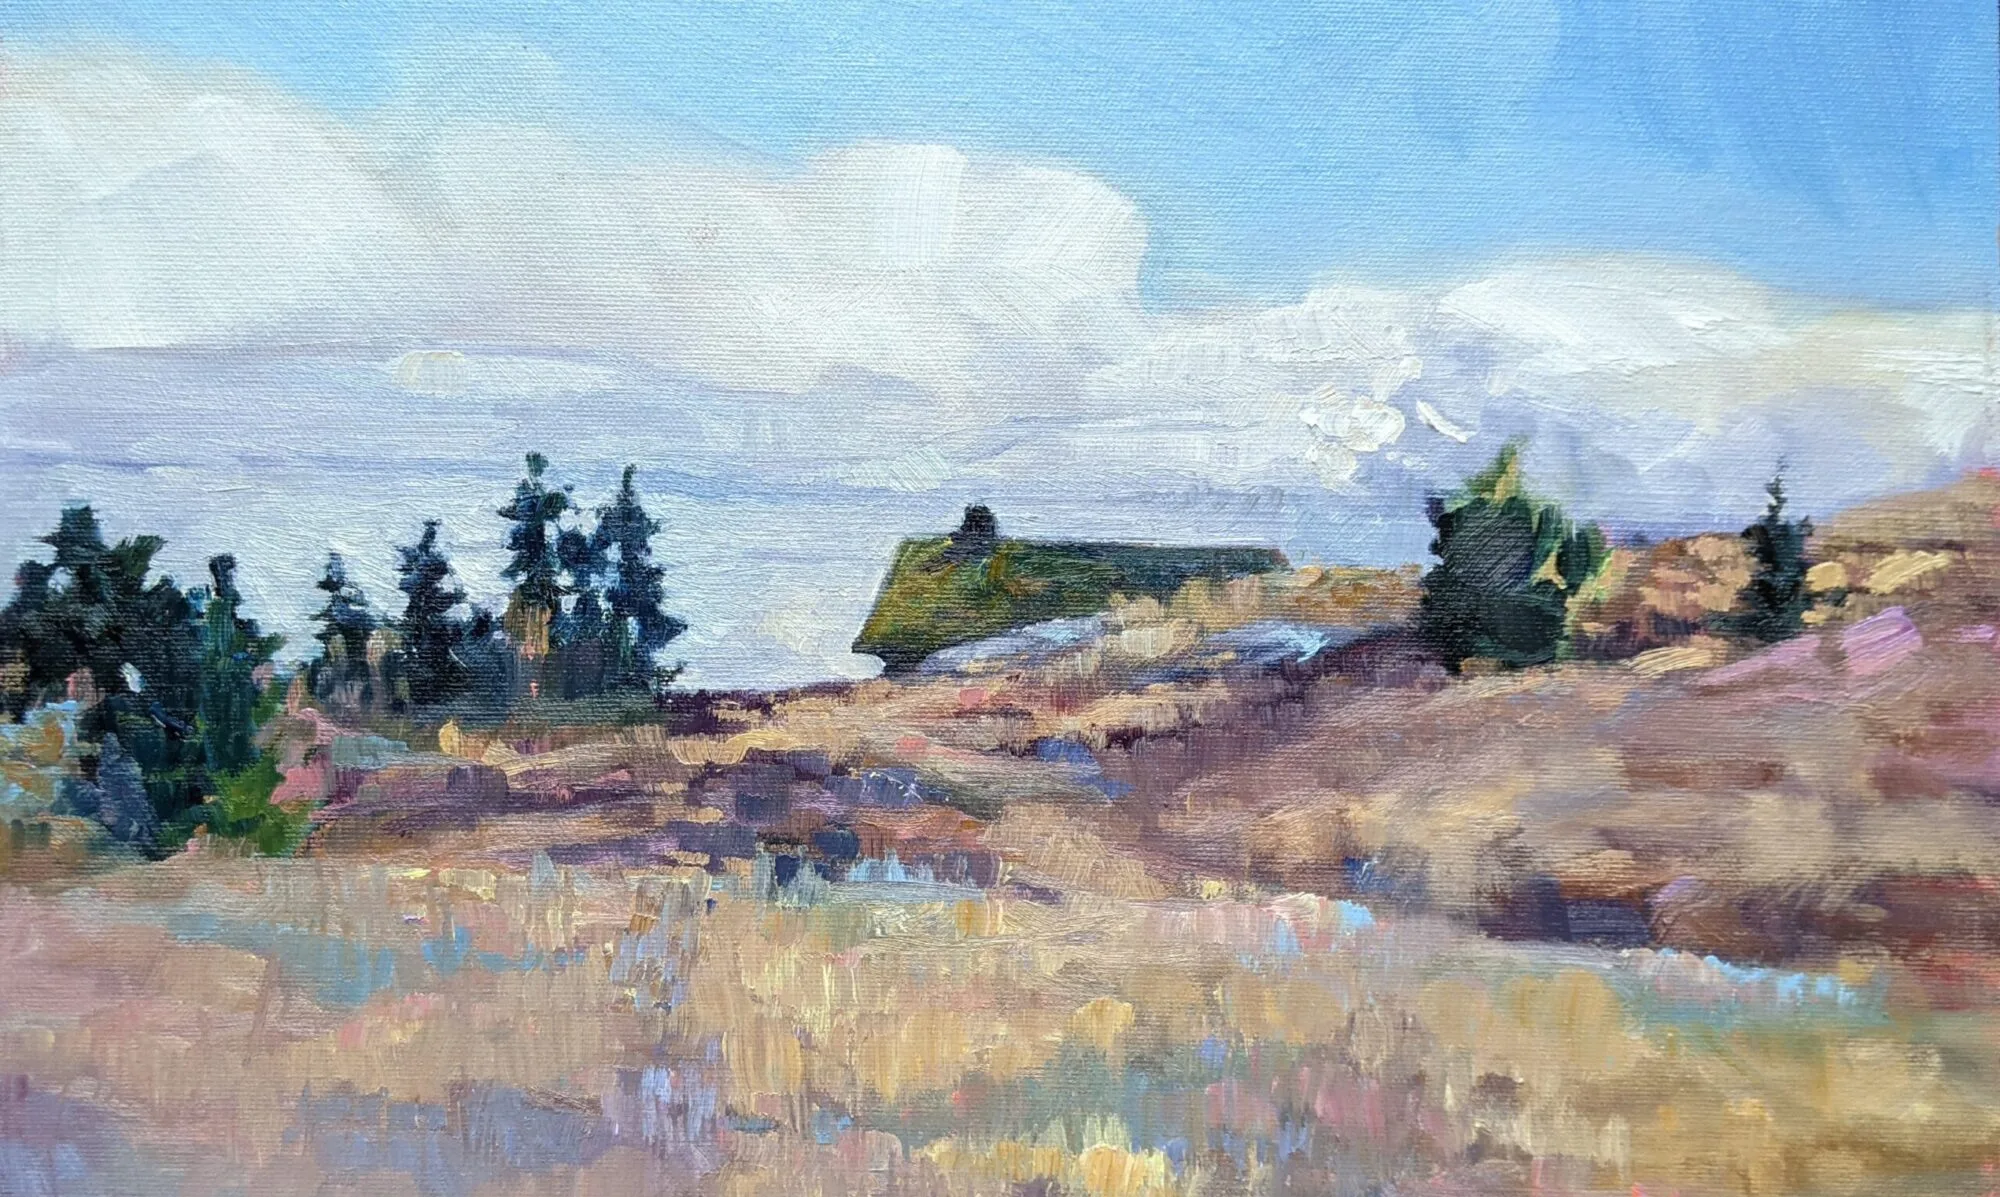
That’s why I’m just getting around to telling you about my openings for my next session of Zoom classes. There are three seats open in each class. (My current students always have first dibs on returning.)

These classes are open to intermediate painters in watercolor, acrylics, pastels and oils. What do I mean by that? You have a basic understanding of how to apply paint, but want to learn more about how to paint boldly, use fresh, clean color, build commanding compositions, and draw the eye through your paintings. (If you need a beginner class, contact me and I’ll put you in contact with some excellent teachers.)

The great thing about Zoom classes is that they’re one place you can’t spread a virus. And having just done COVID myself, I think that’s an awesome thing.

ZOOM Tuesday morning Session

We meet on Tuesdays from 10 AM to 1 PM EST, on the following dates:

February 22

March 1, 8, 15, 29 (off week of March 21 for Sedona workshop)

April 5 

ZOOM Monday evening Session

We meet on Mondays from 6 to 9 PM EST, on the following dates:

February 21, 28

March 7, 14, 28 (off week of March 21 for Sedona workshop)

April 4

For more information, see here.

Marsh paintings and why they can be truly terrible

I don’t begrudge people painting for fun, but I assume you read this blog because you’re interested in being the best painter you can be.

Beach Erosion, 8X10, Carol L. Douglas, available through Ocean Park Association.

I had finished writing a lecture I’d mentally subtitled “why am I torturing you like this?” That’s hard work, so I whirled away a few minutes on the internet. I came across a painting that took my breath away, for all the wrong reasons. It had no focal points, no energy, no depth of field. At the same time, the brushwork was easy and assured. It was obviously not this painter’s first rodeo.

I’m not interested in embarrassing another artist, so I made a fair copy of it while teaching my class. (That way you can laugh at my bad painting, not someone else’s.) I did mine on cheap demo paper, which means there isn’t much staccato in the scumbling, but that’s really the only difference. That I could copy it while talking about something else is a good indicator of its lack of complexity.

My fair copy of a boring marsh painting.

This is an example of what I call “marsh painting.” I really need a better term, for there are brilliant painters of marshes. My pal Mary Byrom is a great example. She reduces the salt marshes of southern Maine into simple shapes that are dynamic, colorful and evocative. The secret, of course, is that Mary draws brilliantly and works tirelessly at her craft.

The bad marsh painter is visually lazy. He or she does not look at the marsh as a surface that recedes in space, but as a series of flat bands that overlap the horizon. Norman Rockwell and Winslow Homer demonstrated that it’s possible to do this very well, but neither of them did it in lieu of drawing.

Inlet, 9X12, available through Camden Public Library.

A marsh painter may have heard that he “needs a path into the painting,” and will put a stream running back in S-curves to the distance. This recommendation was meant as a visual, not a literal, recommendation. It really means that you need some kind of compositional structure to anchor your painting. If that’s an S-curve, it ought not be as blatant as a lazy river.

The marsh painter shies away from anything difficult. Houses, people, automobiles, and boats are all tough to draw. It’s far better to stick to trees and grasses. And there—they believe—they’ve found their métier, in the tireless (and tiresome) representation of blades of grass and branches. But detail is never a substitute for good painting.

I don’t begrudge people painting for fun, but I assume you read this blog because you’re interested in being the best painter you can be. Learning to draw is the first requirement. Anyone who’s not mentally handicapped can learn to draw. Period. And drawing will give you the courage to tackle more difficult subjects in paint. Since I can’t teach everyone, I recommend this book.

Prom Shoes, 6X8, Carol L. Douglas. $435 framed. It’s all about that negative space, baby!

But, moving beyond drawing, there are basic principles to good painting:

I’ve just given you a reading list that will keep you out of the bars until Thanksgiving. Enjoy!

Monday Morning Art School: shiny baubles

When drawing bling, start with the mechanical measurements and work your way down to the details.

Happy New Year! by Carol L. Douglas

Student Samantha East noticed that I sometimes repeat blog posts. This is one of those times. As I jokingly said to Bruce McMillan in Friday’s comments, the lessons in painting are simple. It’s a question of when we’re ready to receive them. But to keep it interesting, I’m more interested in the reflections than the round shapes this year, although both are important.

I like shiny baubles, so I’ve asked my students to paint Christmas decorations this week. This post will give them a heads up on the lesson.

The ornaments we chose: a simple sphere for me and a globe-spider for Sandy.

By now, Christmas decorating is in full swing. We’ve at least located the boxes and asked our families to help carry them down from the attic. (Good luck with that, by the way.) Find a simple, round, reflective ornament. That’s your subject for today.

Those of you who don’t believe in Santa Claus or haven’t found the ornaments can find a reflective spherical object to substitute. The back of a metal soup spoon will work just fine. In my example above, I used a plastic toy horn.

Noting the axes.

Sandy Quang was my painting student in Rochester. She went on to get a BFA from Pratt and an MA from Hunter and now works at Camden Falls Gallery. She’s working on her MBA from University of Maine.

I asked her if she wanted to draw with me. Of course, she had her sketchbook tucked in her backpack. “Which one do you want?” I asked her. She chose the spider ornament.

We both added details. Mine were the ellipses on the collar of the ornament; Sandy’s were the beaded legs of the spider and her first markings for reflections.

wrote about drawing a glass dish, which is a series of ellipses on a central axis. A circle is easier to draw than an ellipse; it’s an ellipse that is symmetrical on all sides. A sphere appears to be a circle when it’s viewed in two dimensions. This is an unbreakable rule.

Both of us started with the axis of our drawing. For me, that was the vertical axis; for Sandy it was the axis holding her circles together. I mention this because when people say “I can’t draw!” they seldom realize how much of drawing is mechanical, simple measurement. It’s best to learn this from life, since the measurement has already been done for you when you work from a photo. You can easily work back from life drawing to working with pictures, but it’s harder to go the other way.

Marking out the outlines of our reflected shapes.

Next, we both put the appendages on our spheres. For me, that meant measuring the ellipses in the collar. For Sandy, it was the beaded spider legs. Sandy was starting to note the overall areas of reflection in her spheres.

We both worked on shading next. I finished my shading with an eraser, Sandy couldn’t do that because her paper was too rough.

Sandy and I chose different approaches in the next step, dictated by the paper we were working on. Because I had a smooth Bristol, I was able to blend my pencil line into smooth darks with my finger. Sandy could only work light-to-dark on the rougher paper she was carrying. That gives you the chance to see two different approaches to shading.

Our finished drawings: mine on the left, Sandy’s on the right. From there, it’s just a hop, skip and a jump to painting them.

Sandy has a shadow under her final drawing because the ornament was sitting directly on my coffee table. I put the reflection of myself in my ornament. Those final details were the fun and easy part of the drawing exercise.

All drawing rests on accurate observation and measurement. Get them right and the shading and mark-making is simple.

This post originally ran in 2017 and 2019. It’s been edited.

Monday Morning Art School: using angles for measurement

Measurement and angles are the basis of drawing. Learn how to use them, and you can draw anything.
Geraniums, by Carol L. Douglas, pastel. Available, but has to be collected in person as it’s glazed in non-reflective glass.

Last week’s lesson on the pencil and thumb method was easy to teach in person, but difficult to write out in steps. Today’s lesson, on using angles, is easier to write, but will be a little trickier to master.

This has to do with how our brains are wired, not how ‘talented’ you may or may not be—that’s mostly, as Mr. Edison pointed out, a matter of persistence anyway. But the human mind simply doesn’t ‘read’ angles and negative space when it’s not focusing on them. This is why we use our pencil as a visual aid. It forces our brains to pay attention.

The good news is that you can rapidly teach your brain to notice angles and negative space.

Two pieces of silverware and a coffee cup: a surprisingly tricky thing to draw. But when you’re done, you’ll have the basic tools to draw anything.

Once again, close one eye and focus on the pencil, not the object you’re measuring. Hold the pencil along an imaginary plate glass window in front of you, and tilt it to match the angle you’re measuring. Then reproduce the line on your paper.

If at first you screw up, it’s probably that you’ve canted one end of the pencil away from you. Straighten it up and try again.

Once you’ve mastered measuring with the pencil and thumb method and learned to see and copy angles on to your paper, you can draw anything from portraits to animals to landscapes to figure.

Start by measuring the basic shapes using the pencil and thumb method we learned last week. Mark off the  heights and widths of all the basic shapes.


Use your pencil to determine the angles at which the silverware, the sides of the cup, and the handle are traveling. Draw them in as straight lines. This takes a little practice, so be patient and take your time looking at each one.


Use your measuring and angle hash marks to block in the major shapes.


Often, you can see distortions, objects that are too close together, etc. more easily in the negative space than you can in your drawing of the positive objects. It’s best to check this before you go on to finish your drawing.

You can use angles to check your work. Here I checked the angle from the right tine of the fork to the handle of the cup, and the angle across the top of the two pieces of silverware.

Note: last week I wrote about the difficulty of decision-making in the age of coronavirus. My workshop in Pecos is now on, thanks to the Herculean efforts of Jane Chapin. The statewide 14-day-quarantine is expected to be lifted on September 1, but that doesn’t do travelers or hoteliers much good for trips immediately after that, which must be booked now. Jane figured out a great solution. We won’t be breaking quarantine, and we will be able to paint out in the field.

Jane cleaned her studio so we have a backup location in case of rain. Isn’t that gorgeous?
San Miguel County, where the workshop will be held, remains one of the safest places in America, with zero deaths from coronavirus. We’re going, using all the safety methods we can employ—masks and hand sanitizer in the airport, frequent handwashing, etc. And we expect to have a lovely, lovely time, paint in some gorgeous spots, and learn lots.

Ironically, airfares are so low right now that the total cost of the workshop has plummeted, at least for me, coming from the northeast.

At this point, the limiting factor isn’t the number of people I can teach, but the number of beds I can rustle up. Jane still has a few up her sleeve. So if you’re bold* and love the western landscape, you’re welcome to join us. Email me to initiate a conversation.

On the road again. I can barely contain my excitement!

*Jane and I have a history, and it always seems to include adventure… and lots of laughter.

Monday Morning Art School: Perspective

Every landscape painter should understand two-point perspective, but don’t draw those rays in the field.

Midsummer, by Carol L. Douglas. It’s important to understand perspective, but don’t use those vanishing points when drawing in the field.

A door is commonplace, but it’s also a series of repeating shapes that can teach you a lot about perspective. If you have a choice, use a door with panels like this one. A flat slab door will be so much less fun to draw.

I left mine slightly ajar, but it doesn’t have to be. Seat yourself as far away as you can get from it. The closer you are, the more difficult it is to keep your measurements straight. Position yourself at an angle to it so you can think about perspective.

This is intended to be a fast drawing, taking you no more than 15 or 20 minutes. The same rules apply to a careful drawing, of course; you’d just be more meticulous in your measuring and marking. But you’ll learn just as much going fast.

My first task is to figure out the angles of the top and bottom of the door. (My camera distorts perspective so what’s in the photo won’t match what’s on my drawing.) I do that by holding my pencil along the bottom of the door and figuring out the angle.

I find that setting my pencil down on my paper at the appropriate angle helps me see it better.

Then I do the exact same thing on the top.

Note that the shelf at my eye level is completely horizontal. Any level surface at eye level has to be horizontal; that’s a hard-and-fast rule. 

Two-point perspective, courtesy Luciano Testoni. All those lines traveling off to the vanishing points on the left and right? Let’s call them rays.

The picture above is classical two-point perspective with a lot of extra bells and whistles. I don’t want you to get bogged down in it; I included it so you can compare the rays in that drawing to what you see in your room. Notice that when you look at lines high in your room, the ‘rays’ travel downward to the sides, where the so-called ‘vanishing points’ are. When you look at objects near the floor, the rays travel upward to the vanishing points. That’s because the vanishing points are always at the viewer’s eye level. 

Every landscape painter should understand two-point perspective, but should never draw those rays in the field. Like every other kind of 3D projection, it’s useful in drafting, but it is a falsehood when it comes to what you’re actually seeing. That’s because the vanishing points would be so far away in the real world as to be rendered useless.

But you can take away some useful information from two-point perspective. The farther away an object is, the less perspective distortion there is. And perspective works the same way above the horizon line as below it, so clouds are arrayed the same way trash cans are.

Next, I do that nifty measuring thing that involves holding my pencil in front of my eye and using it as a ruler. Since the height is already determined by my angled lines, I just need to figure out how wide the door is relative to the height. I figured the door is a little less than half as wide as it was tall. Later, I’ll find out just how off I was.

This shape is called a trapezoid, and there’s an easy way to find its center. Just draw an X from corner to corner as shown. That’s very useful information in perspective drawing, because it helps you place windows, doors, roof peaks, etc. correctly. Make a habit of finding it.

And here’s a quick-and-dirty way to get the perspective right. Divide the two side lines into equal units—thirds, quarters, eighths, or whatever other units you can mark off by eye. Then just draw lines connecting the corresponding sides. The 1/3 point on the left gets attached to the 1/3 point on the right, etc. You’ll have the perspective rays right in one try.

I never get my measurements right on the first try, so I’ve learned to not fuss too much on my initial measurements. The great thing about repeating shapes is that your mistakes are easy to see. I realized the door was slightly too short and wide, so I adjusted them slightly.

I can’t draw a straight line without a ruler, and my initial drawing had a free-hand curl on the right-bottom corner. I took a moment to correct that. Note how useful the center point is in placing the central spine of the door. I know that the moulding around the glass is the same width all around, so this is one of those repeating shapes I can use to check my work. (Of course, it’s going to be ever so slightly wider on the side closer to me, because of perspective.)

My final drawing. You can finish yours to your heart’s content, but the important part is learning how to use your pencil as a marker to see angles and distances.

This post originally appeared on November 17, 2017.

Paint in beautiful Pecos, New Mexico, September 13-18, 2020

New Mexico’s a vastly different landscape, yet has the same long views and limpid light that so captivate me about Maine.

Dry Wash, by Carol L. Douglas

It takes a lot to get me to teach anywhere but Maine these days. But there’s another place I love to paint. I haven’t taught in New Mexico in more than a decade, and it’s time to go back.

The village of Pecos, NM lies along the Pecos River, which flows out of the Santa Fe National Forest. Nearby, Pecos National Historical ParkGlorieta Pass, and Pecos Benedictine Monastery provide superb mountain views. Ranches and small adobe settlements dot the landscape. This is a landscape of colorful skies, hoodoos, dry washes, pine wildernesses, horses, and pickup trucks. Yet it’s within commuting distance of Santa Fe, so accommodations, necessities and world-class galleries are just a short drive away.
Horses at a ranch in Pecos, NM. Photo courtesy Jane Chapin.
I first painted in the Pecos area during a plein airevent in 2018. I was supposed to range all over the state, but I loved Pecos so much I stayed right there. Then I came back the following winter. I’ve explored the ridges and canyons, the river valley, horse pastures, fallow bottomlands, and I think I have a great itinerary planned for you.

Old farmyard, Pecos, NM, by Carol L. Douglas. If I were going to buy a second home, this would be it.

I’m delighted to offer this opportunity in conjunction with the brand-new Pecos Art Center (about which I’ll be telling you more soon). This organization was founded to bring arts and culture to the local community. Each workshop instructor is asked to present a program for local school students before or after their workshop. This augments local art education and gives back to the local community. “In Pecos, we believe we live in a unique and authentic place and want to give something back to the community who has welcomed us to paint there,” said organizer Jane Chapin. “We want to preserve its character while leaving a footprint of opportunities for the next generation.”

Adobe and beautiful mountains. Photo courtesy Jane Chapin.
This workshop is aimed at helping painters refine their personal technique in plein air. All media are welcome: watercolor, pastel, oils and acrylics. This is an intensive class, with morning and afternoon on-site painting sessions and lunch-time demos. Classes are kept small so every student gets the attention they deserve.
My friend Jimmy Stewart critiquing my painting along the river bottom. Photo courtesy Jane Chapin.
Opportunities for accommodations are varied. There are seasonal rentals in the area, or commute up from Santa Fe if you want a more urban setting.
The workshop fee is $600. That includes five days of highly-personalized instruction and a social gathering on Sunday evening, where you’ll meet your classmates. Email me here for more information.
Snow at higher elevations (downdraft), by Carol L. Douglas
Carol Douglas has 20 years’ experience teaching students of all levels in watercolor, oils, acrylics and pastels. “Some teachers are good artists, and some artists are good teachers, but it is rare to find a good artist who is also a good teacher. Carol is one of them. She will teach you the fundamentals you need to know, which a lot of teachers gloss over without explanation, but she also takes you to the next level, wherever you are on the learning curve.” (David Blanchard)

Uncovering your mark and more

Two opportunities to learn in mid-coast Maine
Meeting Up, by Ann Trainor Domingue, acrylic on canvas
Baby Joshua and his mom are doing great, so I can concentrate on work again. There are several things I should have told you about and missed with the excitement of the last two weeks. Here are two very important ones.
I’m bringing Ann Trainor Domingue to teach a day-long workshop in my studio because she does something that seems magical to me, and I want to know how. Ann paints lyrical, mysterious, narrative paintings, seemingly drawn from within her own psyche. “I love the same things you do about New England. I just reflect on them in a different light,” she says. Annie’s developed a series of exercises to loosen up our thinking, and they will be good for everyone, no matter what their style.
Here’s Annie!

Uncovering Your Mark, with Ann Trainor Domingue

Sat June 6th, 10-4
Carol L. Douglas Studio
394 Commercial Street, Rockport, ME 04856
Cost $95 per person.
Confused by too many options? Feel uninspired? Need help to get back to your artmaking? Uncovering Your Mark workshop could be just what you need to find your way!
Discover personally meaningful imagery and ideas through a fun guided exploration of things you love. Bring clarity and focus to help make sense as you implement fresh ideas for this phase of your lifelong art journey.
Think quietly about what kinds of things energize you. Sort and combine insights to form something new that feels more authentic by finding your mark.
Take time to work on loose sketches to explore these exciting new ideas and directions to help you stay on your path.

This workshop is a hands-on class aimed at artists of all levels. The first part of the class is a process of guided inquiry. Then, students will apply their self-discoveries through small scale sketching exercises and preliminary color play. It’s strictly limited to twelve students so you’ll get lots of attention. Every style is welcome.
Ann Trainor Domingue is a graduate of Rhode Island College with a BA Studio degree in painting. Her career has included working in adver­tising, as a teacher and as a painter. She is represented in public collections and galleries nationwide.
Download a flyer here or a registration form here.

Tin-foil hat, by Carol L. Douglas. You don’t have to learn about painting reflections by looking at a vase!
Next session of weekly classes in my Rockport studio starts next week.
Some people wonder what we paint when the winter weather drives our class indoors. I build still lives, but they aren’t typical. For example, yesterday’s creation was a clash of greens including pine boughs, gift bags, wine bottles and more. The idea was to learn to mix and use a medley of greens without using any green out of a tube. That’s excellent preparation for spring, which really is just around the corner.
Marie told me, “I always come in and see a still life and think, ‘ugh’, but then I get into it and it’s great.” I’m not interested in still-life as a genre either, but I think painting from life is critically important, so I make an effort to make them unusual and interesting.
Back it up (hard drive and bubble wrap), by Carol L. Douglas
Working in my studio gives us a great opportunity to focus on color theory and technique. We have more time to concentrate on mixing colors and brushwork than we do in the field, where the demands of the scene takes over.
Our next mid-coast Maine painting session will meet on Tuesday mornings, from 10-1. The dates are:
February 25
March 3
March 10 (followed by a two-week break while I hare off to Argentina)
March 31
April 7
April 14
Peppers, by Carol L. Douglas
Painters are encouraged to broaden their skills in drawing, brushwork and color. Your own individual style will be nurtured. We’ll learn how to paint boldly, with fresh, clean color, to build commanding compositions, and to use hue, value and line to draw the eye through our paintings.
Watercolor, oils, pastels and acrylics are welcome. Because it’s a small group, I can work with painters of all levels. The fee is $200 for the six-week session, and we meet at 394 Commercial Street in Rockport.

Monday Morning Art School: start with drawing

Before you can paint successfully, you have to learn to draw.
I love drawing in church, especially when there are sleepy teenagers. This drawing started with simple analysis of shape.

One of the problems with writing about ‘how to do art’ is that you’re speaking to all levels of experience. Today we’re going right to the beginning of measurement. Almost everyone can get the details of a drawing right. Where they go wrong is with overall proportion. Drawing is, first and foremost, a technical exercise in seeing size relationships. Get that right, and the details hardly matter.

All objects can be broken down into simple shapes and angles.

You’ve all seen artists holding a pencil up to an object. What they’re doing is rough measuring. It’s simple to do, but tough to photograph. Hold your pencil up like a ruler in front of the object you’re drawing. Move it around to see the relative height and width of the thing. For example, the toy truck below is about 1.5 times as wide as it is tall. Figure that out by holding your pencil first along the vertical access, then along the horizontal access, and comparing where the lengths stop along the pencil.

It’s not just an affectation; it’s really how artists measure.

A common beginner error is thinking that you have to transcribe the lengths exactly to the paper. The drawing can be any size you want. Start by figuring out how big you want the object to be on your paper, and make two hash marks to represent that. Then, if your object is half as wide as it is tall, figure out that relationship and mark it too.

Start by measuring out the simple shapes and angles.

You can also use your pencil to figure out the other important thing in drawing: the angles of lines. Formal perspective is important, but not as important as learning to see angles. If you develop the ability to see angles, you’ll have better natural perspective than if you try to fit up what you see to a theory.

Next, rough in the values. That means the lights and darks.

Do your measuring with one eye closed, especially if you’re working in a tight space. Art books will tell you to measure with your arm straight out. That’s not always practical. Instead, try to have the pencil the same distance away from your eye each time you take a measurement. I do that by noting how my arm is cocked.

Today’s exercise is based on a tissue box I drew in church. It had lovely angles. However, what you see in the photo isn’t what I saw while working. A drawing from life will never match what the camera records. Cameras lie just as much as artists do.

Begin to refine and strengthen the light and dark shapes.

All drawing starts with simple shapes. After laying them down, I check and correct them. I do this by analyzing each large shape. Where does the back of the box intersect the tissue column? Is the curve of the cutout fat enough? I discovered that my cube wasn’t really tall enough, so I added some to the bottom. 

The next step is to establish some overall values.  “Value” just means how light or dark something is. This box was sitting on a south-facing windowsill behind a person who was casting another shadow. Thus, the window-frame behind the box was in deep shadow, but not nearly as dark as the photograph. I roughed in those darks first. They helped me know how to shade the box properly.

If you’re using graphite or charcoal, you can blend with your finger. Otherwise, use a stump, a tortillon, or a bit of rag.

Next, I set shadows on the tissue box itself. I am more concerned with the column of tissue, so with each pass, I spend more time on that.

Finally, I did some blending, using the handiest tool I carry: my finger. You should use a stump or tortillon on work you care about, but in a pinch, your finger works great. But don’t blend pigments other than graphite or charcoal with your finger; they may contain toxic metals.

Voila! I have a tissue box drawn and my pastor is just winding down his peroration.
Note that I never bother much about my mark-making. It can take care of itself. I’m mostly interested in applying accurate values. I did this drawing with a mechanical pencil, which will never be as luscious as a good graphite stick, but it survives banging around in my purse week after week.
Some general rules:
  • Draw everyday objects. The better you get with these, the better you’ll be with complex subjects. There’s amazing beauty in everyday things.
  • Draw any time you get the chance. I did this drawing in church, and I didn’t miss a word. Drawing and language don’t use the same channels of your brain.
  • Measuring is the most important part of drawing. Keep checking and correcting sizes.
  • Start with big shapes and break them down into little shapes. If the big shapes are right, the smaller parts will slip into their spots just fine.
  • Value is relative. How dark something is, is only important in terms of how dark its neighbor is.
  • Constantly recheck shapes and values as you go.

Monday Morning Art School: the architecture of trees

To paint trees, you have to know trees. That doesn’t mean you need to memorize species, but you do need to be able to see the differences.

Along the Ottawa River, by Carol L. Douglas. You don’t need to be able to identify species at 200 paces, but you do need to be able to recognize how trees differ.
Trees, clouds and rocks are all frequently abused in the same way: the oblivious painter never thinks about their individual characteristics but paints them interchangeably. That’s a mistake.
There is a major division in the forest world between conifers (the trees with needles) and broadleaf trees. Most, but not all, conifers are evergreens; the biggest exception being the larches (tamaracks), which turn a delicious yellow-gold in autumn. Which are dominant in your landscape? Even in the Pine Tree State, the distribution of conifers to deciduous trees is about 50/50.
Old Bones, by Carol L. Douglas

For broadleaf trees, the most important distinguishing characteristic is the branching pattern of the tree, which defines the shape of its canopy. Silver maples are large trees with open, vase-like canopies. Oaks have large spreading crowns; beeches have similar crowns that appear to have melted. Most broadleaf trees branch alternately but maple, ash, dogwood and horse chestnut branch in opposite pairs.

Pines have fewer branches than spruces or firs, and their branches grow in circular whorls on the trunk. As they age, they develop an open, jagged canopy. Spruce branches grow in an upturned direction; as youngsters, they look the most like ‘Christmas trees’. In their dotage, they turn a fine, weathered figure to the wind. Firs have wide lower branches and a downcast mien. Notably, their cones point upward.
Most scenes will include a variety of canopy shapes.
(Something that puzzles me: why do people find ancient trees more beautiful than their offspring, but prefer looking at young people over the elderly?)
Conifers are most easily identified by their needles. Pine needles grow in clusters of two, (red pines), three (yellow pines), or five (white pines), held onto the stem with a tiny papery wrapper. Spruce needles are short, stiff and grow individually from twigs. Fir needles are soft and flat. Cedars have flat, scale-like leaves and stringy bark. Junipers (including, confusingly, the Eastern Red Cedar) have berrylike, bluish cones on the tips of their shoots.
Along Kiwassa Lake, by Carol L. Douglas
Many people can identify the common broadleaf trees by their leaves, and I’ve included a chart to help you. The important part for the painter, however, is to see the differences in color. Silver maples have a lovely grey-silver color. Sycamores are garbed in military-fatigue green. Black spruces are dark while Eastern White Pines are fair and soft in their coloring.
This is why I discourage my students from using tube greens and encourage them, instead, to mix a matrix of green colors.
Basic broadleaf leaves.
Too often, we painters ignore young trees, something I tried to rectify (with varying success) last season. Young trees often look radically different from their aged ancestors, but they have a beauty of their own.
To be a convincing painter, you don’t need to memorize the species of trees, but you do need to learn to distinguish between them. Any plausible landscape will contain a variety of them, with different bark, branch structures, and leaf colors.
Baby black spruce and pines, by Carol L. Douglas
It’s almost the end of Early Bird discounts for my summer workshops. Join me on the American Eagle or at Acadia National Park this summer.

This column was originally published on May 18, 2018. 

Monday Morning Art School: drawing a globe

Start with the mechanical measurement and work your way down to the details.
All illustrations are by Carol L. Douglas (left) and Sandy P. Quang (right)
By now, the long slog to decorate for the Christmas holidays is in full swing. If you haven’t got your tree up, you’ve at least located the boxes and asked your family to help you carry them down from the attic. (Good luck with that, by the way.) Find a simple, round, reflective ornament. That’s your subject for today.
Those of you who don’t believe in Santa Claus or haven’t found the ornaments yet can find a spherical object to substitute. A ball or a snow-globe will work just fine.
The ornaments in question.
Some of you might know Sandy Quang; she was my painting student in Rochester. She went on to get a BFA from Pratt and an MFA from Hunter and now works at Maine Media Workshops and Camden Falls Gallery. And, she just enrolled in an MBA program at University of Maine. The girl never sleeps.
I asked her if she wanted to draw with me. As my students do, she had her sketchbook tucked in her backpack. “Which one do you want?” I asked her. She chose the spider ornament.
Noting the axes.
Recently, I wrote about drawing a glass dish, which is a series of ellipses on a central axis. A circle is easier to draw than an ellipse; it’s an ellipse that is symmetrical on all sides. A sphere appears to be a circle when it’s viewed in two dimensions. This is an unbreakable rule.
We both added details. Mine were the ellipses on the collar of the ornament; Sandy’s were the beaded legs of the spider and her first markings for reflections.
Both of us started with the axis of our drawing. For me, that was the vertical axis; for Sandy it was the axis holding her circles together. I mention this because when people say “I can’t draw!” they seldom realize how much of drawing is mechanical, simple measurement. It’s best to learn this from life, since the measurement has already been done for you when you work from a photo. You can easily work back from life drawing to working with pictures, but it’s harder to go the other way.
Next, we both put the appendages on our spheres. For me, that meant measuring the ellipses in the collar, as I demonstrated in detail in an earlier post. For Sandy, it was the beaded spider legs. Sandy was starting to note the overall areas of reflection in her spheres.
Marking out the outlines of our reflected shapes.

Sandy and I chose different approaches in the next step, dictated by the paper we were working on. Because I had a smooth Bristol, I was able to blend my pencil line into smooth darks with my finger. Sandy could only work light-to-dark on the rougher paper she was carrying. That gives you the chance to see two different approaches to shading.

We both worked on shading next. I finished my shading with an eraser, Sandy couldn’t do that because her paper was too rough.
Sandy has a shadow under her final drawing because the ornament was sitting directly on my coffee table. I put the reflection of myself drawing in my ornament.
All drawing rests on accurate observation and measurement. Get that right and the shading and mark-making is simple.
This post originally ran in December, 2017. It’s been edited.