Monday Morning Art School—drawing from the inside out

There are times when you have to dance backwards in 2-inch heels. Or at least do the equivalent in pencil. Here’s how.


My soap dish and towel. These are very small drawings, by the wayabout three inches across.

If you’ve been reading this blog for a while, you know I stress working from big shapes to little shapes.  We start with generalizations and move to detail. This is such a fundamental rule of drawing that it seems almost inviolable.

Yet there are times where the reverse can work brilliantly. There are artists—Albert Handell, for example—who work from their focal point outward. It’s a good trick to have in your kit. Practicing it occasionally helps you see composition differently.
Don’t hate me for the state of that soap dish. At least I wash my hands!
Your assignment this week is to draw a small still life, starting from whatever detail first catches your eye. I used my grimy soap dish. For me, the most attractive thing was the elliptical shadow thrown by the bar of soap, so I started there.
The soap and its shadow. That would soon change.
When is a still life not a still life? When it’s a-travelin’, man. The soap and brush were still wet. As the towel settled down into its pose of casual insouciance, it deflated somewhat. All the pieces moved, imperceptibly at first, and then faster. The soap and brush slithered across the table and on to the floor. This happened three times before I got them to sit and stay.
Finding the arcs of the soap dish around the soap.
One of the advantages of drawing the what interests you first is that it helps you avoid losing your subject. This is particularly important if you draw people on the subway, or lobster boats in harbor. Both will leave on their schedule, not yours.
Fit the dish shapes around the soap like puzzle pieces. Note that the brush has mysteriously flipped over.
If you were drawing this big-to-small, you would start with the ellipse of the dish and its placement on the bigger shape of the towel. You would then break the dish down into its parts. Reversing that, I started with the bar of soap and its shadow. I then built the dish around those objects. To do that, I figured out how they fit around my brush and soap, like pieces of a puzzle, paying careful attention to the so-called negative shapes that resulted.
Brush and soap in their bowl.
(Remember that what you see in the photo isn’t what I saw in real life. Photos distort reality.)
After that, it’s just a question of continuing the process outward. At the end you’ll want to spend a few moments integrating everything and setting a few final, strong lines to hold the composition together.
Growing a shadow.
Where might I use this technique? If there’s one object that’s the focus of my piece, like a beautiful tree, I might start by positioning it elegantly on my canvas and working around it. I sometimes draw hanging coats from small-to-big, since it can be difficult to get the parts to flow together. I always work small-to-big when the object of my attentions is in danger of moving along soon. 
I developed the drapery from the inside out, as well, like little puzzle pieces.
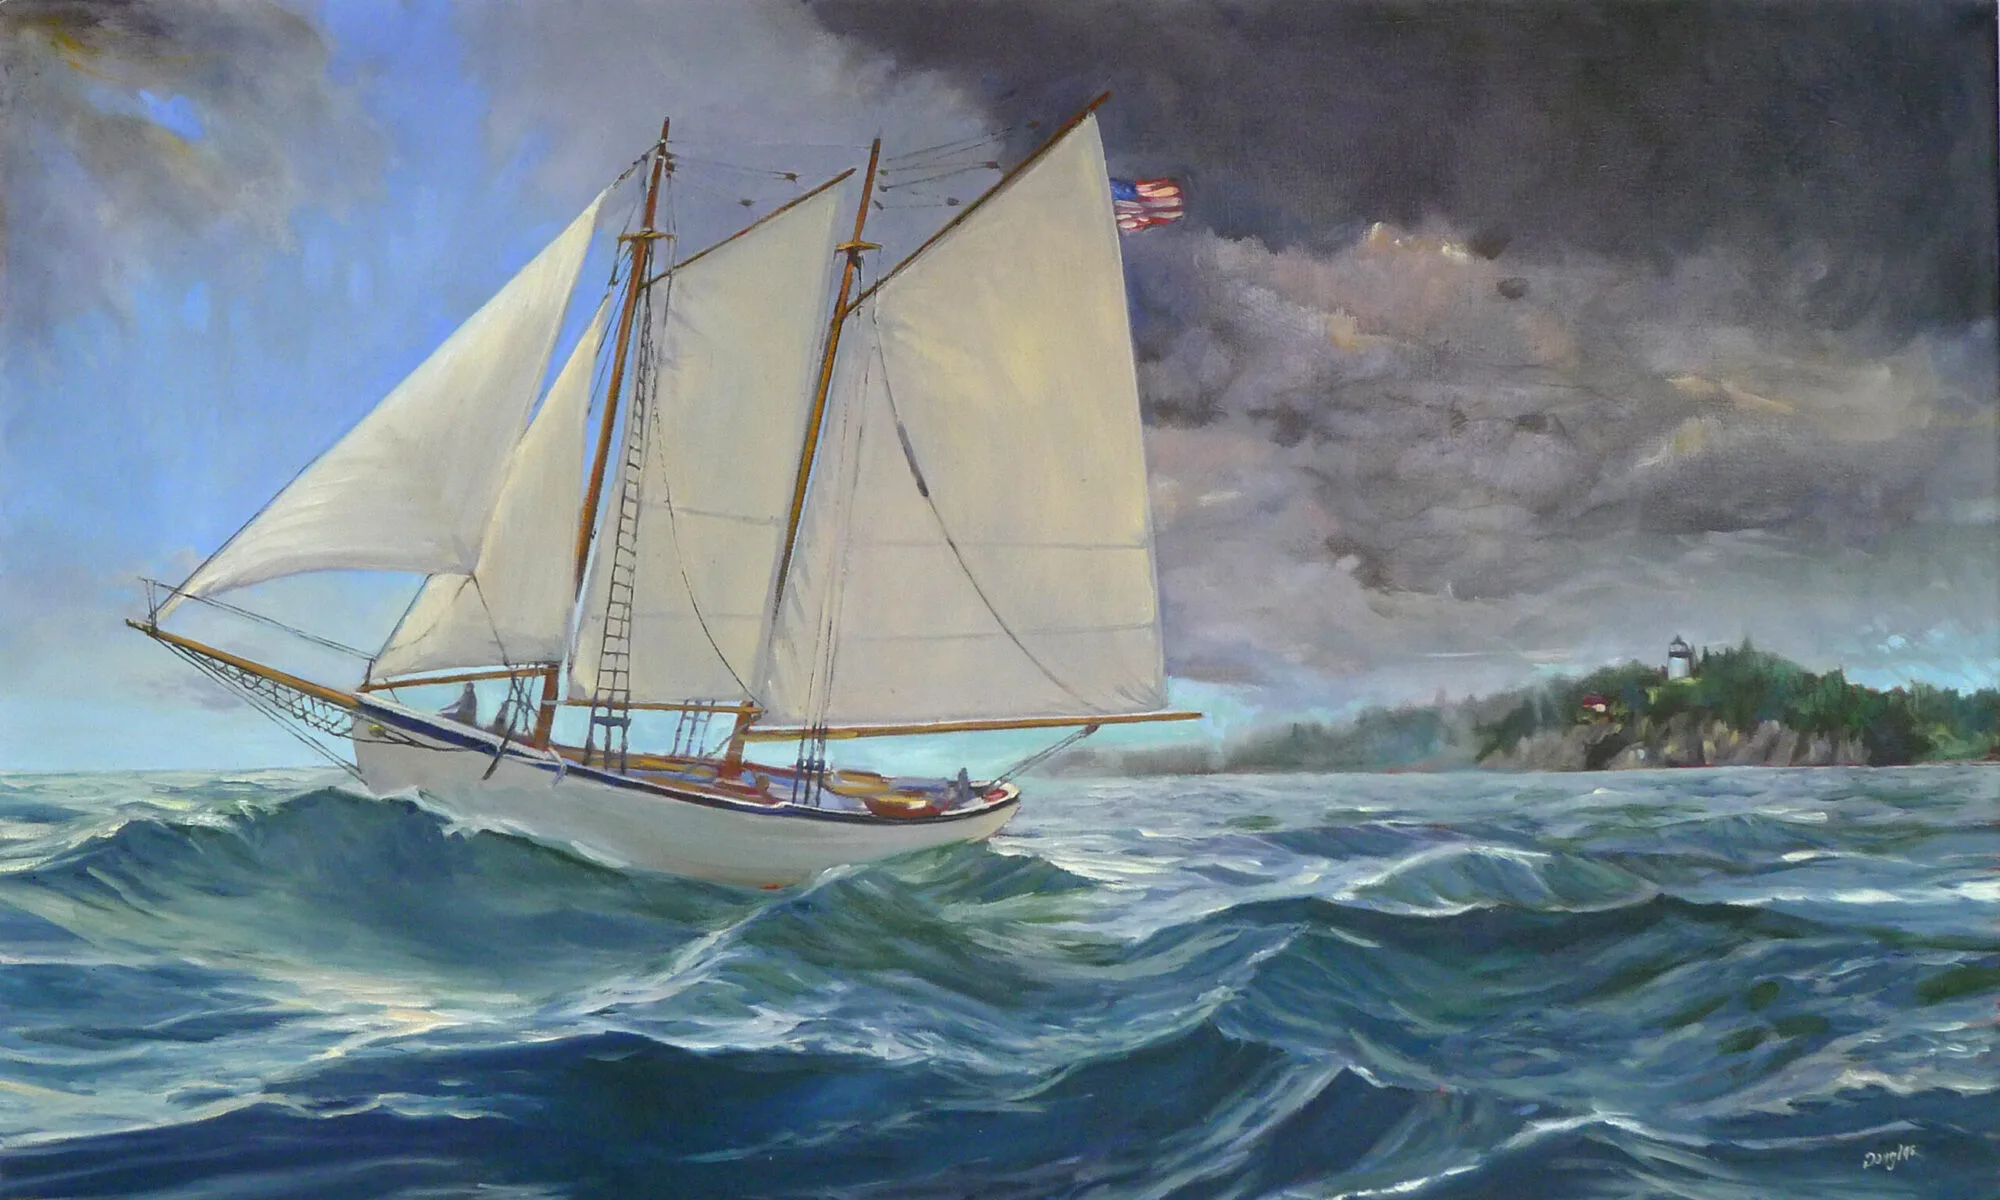
This is a technique applicable to drawing, for the most part. The only time I do it when painting is when my subject is a boat and I’m concerned it will soon be off to sea. Oil paintings can’t be cropped as easily as watercolor or pastel. Making an error of placement at the beginning is a difficult mistake to work around. In oils, it makes the most sense to do a careful drawing and tuck it away against the possibility of losing your subject.
This technique works well for drapery. This is someone’s jacket, draped over a chair.

(This post originally appeared on January 15, 2018.)

Monday Morning Art School: mixing greens

The rookie error for summer is to paint all foliage using the same basic color. You lose more points if it’s sap green.
Hazy mountain afternoon: Keuka Lake, by Carol L. Douglas. Available.
I have a student who reacts to my pulling out black paint by making the sounds of a rattlesnake at me. She’s been fully inculcated into the idea that black should be banned.
Michael Wilcox published a famous watercolor pigment guide called Blue and Yellow Don’t Make Green. Most of what it tells you can now be found on the internet, but it’s where I first got the idea to add back the banned black.
His point was that there are many routes to the same destination, and that to really mix colors, you need to understand what pigments you’re using, not work from trade names for colors. Consider sap green, for example—a staple of many plein air painters’ toolkit. It’s really a convenience mix made of a phthalo blue and some kind of yellow. The same is true of Hooker’s Green.
Chart courtesy of Victoria Brzustowicz
The single-pigment (‘true’) greens available are chromium oxide green, viridian, and cobalt green. Chromium oxide green is a lovely, heavy, natural green. Unfortunately, it outweighs everything it’s mixed with. Viridian and cobalt green are lovely, but expensive. Beware viridian hue—it’s just another phthalo in disguise.
By now, foliage has settled into a deeper, more uniform tone. The rookie error of August is to paint all your greens using the same basic color, modulating lighter or darker for highlights and shadows. You’ll have much more life in your trees if you know all the different ways you can get to leafy green. One of the most useful greens is black plus cadmium yellow lemon (or Hansa yellow).
Mixed greens, in oils.
The best way to navigate the colors of foliage is to avoid greens out of a tube altogether. A system of paired primaries gives you more options, avoiding the acidity of phthalo, the weight of chromium oxide green, or the soul-sucking darkness of sap green.
In my experience, bad paint mixing causes paintings to go wrong faster than anything else. Constantly over-daubing to modulate the paint color distorts the original drawing and makes a grey mush. If you’re confident of the color, you can apply it fast and accurately.
I make my greens on a matrix, which I’ve shown you both mixed (at top) and on a chart (below). I’m leaving for Castine Plein Air, but if I were teaching, I’d be drilling my students on green this week.
Swatches by Jennifer Johnson
First mix greens according to the chart, and then modulate your resulting greens with tints (meaning a mix of white and a color). The specific tints are unimportant, but the most useful one for landscape is a mix of white, ultramarine and quinacridone violet, making a pale lavender. It is great for atmospheric perspective.
Note that blue/black pigments are much stronger than the yellows. You need about half the amount of blue or black as you do yellow.
Your assignment is to hit paint swatches as closely as you can. 
The second exercise involves stopping at your local hardware store for a few paint swatches. These are Benjamin Moore brand, but you should be able to find similar ones elsewhere. There are two off-whites: one cool and one warm. There’s yellow, green, and two soft blues. Your assignment is to mix until you think you’ve hit the exact color. Then put a dot of it on the card to see how close you got. (If you’re working in watercolor, the dot goes on paper instead.)
Jennifer’s neutral swatches, up close.
I also have my students make neutrals using combinations of ultramarine blue with burnt sienna and raw sienna. I use ultramarine blue and burnt sienna as my standard dark-neutral, because it can go to the warm or cool side depending on how it is mixed. Raw sienna plus ultramarine is my go-to starting point for granite and the sands of our northern beaches.

Monday Morning Art School: Add back the banned black

A color exercise that can be done with anything from a dime-store watercolor kit to a professional palette.
The Servant, by Carol L. Douglas
Back before black was banned from the palette, we had shades and tints. Shades are made by adding black to a pure color. Tints are an admixture of white to a pure color. Shades aren’t an effective way to make something darker, but they often make nice new hues.
What we consider acceptable in color-mixing is style-driven, just like everything else. For example, see the Permanent Pigments Practical Color Mixing Guide of 1954, below. It’s all about making shades and tints. That’s a hint about why mid-century paintings looked so grey. A little shading goes a long way.
A mid-century guide to mixing colors.
Today’s exercise is to make a paint chart playing the warm tones on your palette against the cool tones. Both of these examples were done in class by students. My definition of warm vs. cool has shifted over time. Ten years ago, I included quinacridone violet among the cools; last month I had my student stick it in among the warms. That’s because warm-vs.-cool is an arbitrary designation.
The chart in watercolors.

The instructions are a little different for solid-media students than for watercolorists. In either case, start by marking off your paper or canvas with 1” squares, allowing enough room for the cool colors on the left and the warm colors across the top.

Watercolorists (and users of fluid acrylics) just need to mix the colors. Oil painters need to tint their colors with a little bit of white. I’ll get to that below.
In watercolor, the column on the far left should be pure pigments straight from the tube: blues, greens, black, and violets if you want to call them cool. The row across the very top should also be pure pigments, but in the warm tones: reds, oranges and yellows.
The boxes in the middle of the chart are all mixtures. For example, the second-row-second-column box on Sheryl’s chart is black+raw umber. The third-row-second-column box is ultramarine blue+raw umber. The bottom right box is sap green+quinacridone violet, and so on.
The greatest difficulty for watercolor painters is to try and keep the color balance equal. Pigments differ in density, and it’s hard to control dilution. Still, try to use the same amount of each in your mixtures.
Sheryl was doing something my friend Poppy Balser calls “licking the paper.” (That’s partly because she was using a very cheap paper.) That means she was fussing after she put the first brushstroke down. That gave her final chart a mottled appearance. Try to get the mixture down in one brushstroke and leave it.
The chart in oils.
Solid media (oil, gouache, and acrylic) painters have a slightly different assignment. They need to add white to their mixtures. I always add it on the cool side of the chart, by mixing a large clump of the cool-plus-white colors and using that to work across, modulating the warm colors. Working this way, your second-row-second-column box will be (black+white)+raw umber. The third-row-second-column box will be (ultramarine blue+white)+raw umber, and so on.
Note that there is one three-way mixture on the left column. I do not typically paint with a tubed violet, so row five started with a mixed violet to which I added white. If you use a dioxazine purple, it belongs here.
Your last task for this week is to use color temperature, rather than value (lightness or darkness) to define the volume of a sphere, as in Sheryl’s example, below. Her shadows are warm, and her light is cool. Experiment with reversing that as well.

The shape of this sphere isn’t defined with value (lightness or darkness) but with a shift in color temperature. Try it!

This blog post was originally published on November 13, 2017. I’m traveling today.

Monday Morning Art School: drawing a boat

This exercise is like learning perspective. You’ll never draw this way in the real world, but practicing it will improve your harborside skills.
Cadet, by Carol L. Douglas

I tell my students that it’s best to paint a boat from the deck of another boat or a floating dock. If you can’t, then keep your distance. The tides in Rockport average about 12 feet. That means that if you stand on the public landing painting the lovely and graceful Heron, her angle is going to shift more than 20° over six hours. That’s an impossible perspective shift to manage.

There aren’t tides on lakes, obviously, but the waterline-view of a boat is still often the loveliest view.
Two figure eights. The top one is going to be stern-facing; the bottom one is going to be bow-facing. Thus the lines on the right are straight for the sides of the transom, curved for the bow. I made the bow loop slightly bigger because in practice the bow is likely to be higher.
I learned to draw boats based on figure eights. This is simple. You can master it in the studio before you go out to tackle the real thing. Since the bow of a boat is generally higher than the stern, I draw that end of the figure eight higher. The figure mustn’t be two circles, but you can make it as short or long as you wish. There’s no reason the two loops must be equal, although you should try it that way first. It’s easiest to do this when you’re not trying to be overly precise.
The fattest points of your figure eight are going to be the stern and bow of your boat. The keel curves in the front, so that line is drawn as a curve. The stern may curve in a fantail or be a flat transom. That varies by the boat.
The next step is to erase the extra lines and add a little shading. I took the liberty of adding a little extra height to the bow on the bottom.
In the top example, I put the transom forward; in the bottom drawing I put the bow forward. The important thing to realize is that the figure-eight is just like an optical illusion: it can go either way. Once I draw the curve or cut off the transom, I just erase the extra lines and gussy it up with some shadows. 
In the very old days, small boats were sometimes clinker-built, meaning they had overlapping planks that made for beautiful curving lines beloved of artists. If you see those planks on a modern boat, they’re molded. I halfheartedly faked them in on my drawing, because I no longer entirely believe in them.
The actual direction of the boat is like an optical illusion; it can flip either way. The Scrumpy’s notch is a little crooked; sorry.
Drawing boats like this is like drawing perspective. You need to know how to draw 2-point perspective but you’ll never really draw those rays on your canvas while you’re working. It’s an exercise that teaches you a principle that you then incorporate into your work.
Dinghy, by Carol L. Douglas, shows how fast that can be done in practice. This was a workshop demo.
The same with this kind of boat drawing. The take-away lesson is this: as long as you have the relative heights of the pieces of your boat right, it can swing on its anchor all afternoon without significantly messing up your painting. Block it in with initial measurements and let it go from there. The parts will stretch out or grow shorter, but their heights will always remain the same. 
Once you see it as a process of squeezing and lengthening the horizontal shapes while leaving the heights the same, drawing moving boats is easy.
That liberates you from worrying when your boat—as it will—wanders around its mooring. I did the little sketch above to demonstrate that.
This was first published on February 12, 2018, but some things bear repeating.

Nobody owns technique

One can learn a lot from books, but one can’t learn everything.
This recipe doesn’t spell anything out for you; it presumes you understand how to bake. (BTW, confectioners sugar no longer weighs out at 2.5 cups to the pound. I’d guess it’s milled differently today.)
In 1954 a woman named Doris passed this cookie recipe along to my mother. Its telegraphic style always makes me smile. In the 1950s, baking technique did not need to be explained by one married woman to another. Today, those of us who learned to bake from our mothers or through 4H can follow this recipe without a problem. Those who didn’t, probably can’t. It presumes a basic understanding of baking that is no longer common today.
Once a friend was fretting about how she couldn’t find an uncomplicated muffin recipe. “But they’re all just lists of ingredients,” I said. “You always assemble them in the same order: sift the dry ingredients together, beat the wet ingredients together, and then fold the two mixtures into each other.”
I showed this recipe to Jane Bartlett, who remarked that when she teaches Shibori she frequently tells her students that nobody owns technique. This is a very apt observation for both baking and the fine arts. There is nothing one can patent about artistic technique, any more than one could patent the order of operations for baking.
Dance of the Wood Nymphs, by Albert Pinkham Ryder. It was probably a lovely painting when he finished it, but his disregard of commonly-accepted protocol meant it was an archival disaster.
Painting is so straightforward that departing from the accepted protocols is often foolish. A few years ago, some of my students attended a workshop teaching painting into thin layers of wet glaze. The tonalist Albert Pinkham Ryder did that in the 19th century, and his works have almost all darkened or totally disintegrated.
One can learn a lot from books, but one can’t learn everything.  A kid in my studio announced her intention of making an apple pie the other day. (She is an excellent cook but her food heritage is non-western.) I gave her a cookbook and the supplies and left her to it. Imagine my surprise when this was what she came up with:
Elegantly layered, but it’s not an apple pie. Not everything can be learned from books.
To make an apple pie, one needs to know what an apple pie looks and tastes like, but it also helps to have assembled an apple pie under someone else’s tutelage. The same is—of course—true of painting and drawing. Yes, one can learn something about them from books, videos, and the occasional visit to an art gallery, but a good teacher really does help.
This post was originally published on October 4, 2013. If you live in mid-coast Maine and are interested in painting classes, my next session starts January 8. Email me for more information.

Monday Morning Art School: seeing abstract shapes

If you start with a shed, you can ramp yourself up to Windsor Castle in no time.

It all comes down to abstract shapes.
This week I gave my painting class the assignment of doing three thumbnail sketches of their own home or the view from it. This is an assignment with two goals:
  1. To see beauty in the everyday;
  2. To learn how to draw better thumbnails.

Most of us, including me, think we live in uninspiring houses. My first reaction when I started these drawings was that the shrubberies at the front of my house really need attention. I also realized that I have only a vague sense of what my house looks like from the outside. And it’s nothing special, just an old house that also needs its shutters painted.

My house, shivering in the first frost of the season.
Ultimately, though, everything comes down to a pattern of light and shadow. Will my viewers know I have vinyl siding and replacement windows, and that my house is located on busy Route 1? Or will they see it in its bones, as an old Maine farmhouse at the top of a hill? Unless I’m remarkably picayune with the details, it’s the essence that shows.
I think I like this view better. It’s what I used for the drawing at top.
A big part of learning to paint is learning to see. In my class we don’t use viewfinders. I also discourage doing thumbnails in pre-drawn boxes. That means creating a bounding box in the same aspect ratio as the final painting, and then drawing your thumbnail inside it. (If you don’t know what aspect ratio is, see here.)
Those devices defeat the purpose of the thumbnail, which is exploration.  A good thumbnail sprawls without boundaries, even though it’s quite small. When it’s finished, you can figure out how you want to crop it. Or, as in my example below, you may find that you need to crop it more than once to get it right.
First, figure out which border is critical. In my example, it’s the top; I don’t want that much tree. What’s the next most-important border? Since I want a little light sneaking into the background, it’s the right side. The bottom crop is at a natural point, below (but not too close to) the shed. After that, I approximated where the left line went to make the drawing fit a 12X16 canvas.
You may take a ruler to my drawing and determine that it’s not exactly the right aspect ratio. That doesn’t matter; it’s easy enough to make fix that on the fly. 
That wasn’t too hard, was it?
Let’s build on this exercise and do marker sketches of the same three views. By doing so, we start to see them as abstract shapes. That’s actually tricky to do, but it’s the key to all good drawing.
You must force yourself to stop thinking of the object you’re looking at as “my shed” and start to see it as a series of shapes. First, draw a series of pencil lines to indicate the overall shape. Then, using a pen or marker, doodle in the dark values. If you catch yourself thinking “window,” or “door,” stop and force yourself to relabel your object as merely a light or dark shape. Your brain will catch on, I promise.
If I painted my house from this angle, it would be about the shadows of the tree, which I didn’t even notice when I was drawing the thumbnail.
All objects can be reduced to a certain, limited number of shapes, which build on each other to make a whole. When you see things as abstract shapes, you expand your possible subject matter. A plastic pencil case is not inherently much different from a shed, which in turn has the same, simplified, forms as a house. If you start with a shed, you can ramp yourself up to Windsor Castle in no time.

Like this post? Monday Morning Art School is a weekly feature. Subscribe at right!

Monday Morning Art School: how to do a gesture drawing

Fast, effortless drawing is the artist’s most important skill. It’s easy to learn and lots of fun.

Michelle reading, by Carol L. Douglas

Drawing sometimes seems like the “eat your vegetables” of art lessons. It’s what students need most, but they believe its unpalatable. So we teachers are always hiding it in our painting lessons. Once you start drawing from life, however, you realize it’s tremendous fun. I’m constantly sneak-drawing in unlikely places: the train, waiting rooms, or in church.
The single best exercise you can do to get better at figure-drawing is the one-minute gesture drawing. When I taught figure, I started my class with ten of these, progressed to a five-minute drawing, then to a twenty-minute drawing, and from there to the long pose everyone believed they were most interested in.
Gesture drawings not only free up your hand, they teach you how to measure painlessly. If you’ve never done one, conscript a friend or family member to model. The more twist and curve in the pose, the better. After all, they only have to hold it for a minute.
Gesture drawings are conventionally done nude, but that’s not really necessary. You’ll still benefit from drawing clothed figures. The important thing is that you use a timer and not exceed one minute per drawing.
The paper and pencil you use are unimportant. In fact, gesture drawings of your co-workers are the best possible use for your pre-printed meeting notes.
There is no right or wrong way to do a gesture drawing. On the other hand, the method I outline below is fast, easy and accurate, so why not try it?

Draw a single line indicating the axis of motion. My model had an extreme torso twist, so I got a little more engaged in this line than I usually do. Usually this is just a simple angled or curved line.

Next, scribble in the shapes of the pelvis and the shoulders. One of my students called these “atomic string balls.” The term fits. The two most powerful joints in the human body are the pelvis and the shoulders. This is a fast way of indicating their angle. By scribbling a ball, you also give them volume and energy.

 I then make smaller power balls at each additional joint, locating them quickly in space. I don’t lift the pencil up much, but drag it along between joints. As rough as this looks, you already have most of the essential information about the pose.

From there, it’s a simple matter to add volume. Use the remainder of your time to shade and refine. However, you shouldn’t really take time to erase.

A gesture drawing by nature emphasizes the torso at the expense of details, extremities and the face. Once you’ve mastered the one-minute gesture drawing, you can move along to the five minute drawing, as shown below. That’s a continuation of a one-minute drawing, but it allows time to develop more detail.

Monday Morning Art School: drawing a face

Have trouble drawing people? Here’s a way to get a good likeness in a hurry.

Robbie, by Carol L. Douglas
Most artists don’t have trouble drawing individual features. They run into trouble hooking all those parts up into a plausible whole. Sadly, a person’s likeness starts with the overall structure of their head, not with the details. This is a fast and easy way to measure features so you get them straight. The hardest part, I think, is that I’m showing you in words and pictures instead of in person. But if you take the time to practice it, your portrait drawings will improve.
I seldom work from photos, but I’m at the Joseph A. Fiore Art Center this month. That means I can’t conscript any family members to model. Instead, I found this old photo of Sandy Quang on my laptop. (It’s odd because she’s not laughing her fool head off.)
If you don’t remember the rudiments of measuring with a pencil, please brush up here and here before you start.
I start by drawing a line indicating the angle at which the head is cocked.

The second line goes right through the eyeballs. This is not absolutely perpendicular to the center line, but it’s usually close. Remember, you are measuring a 3-D object onto a 2-D surface. It’s easy to mistake these lines for a grid. They’re not; they’re just measurements.
From there, go on to measure the remaining distances as shown above. Eventually, you can add a line for the eyebrows and the bottom of the bottom lip, but I find them confusing at this early stage.
The angle from the bottom of the nose to the pupils is the most important measurement in the face. Check, double check, and then place dots where it intersects with your eyeball line.
Next, draw lines from the bottom of the nose through the center of the pupils. You should create a triangle from eyes to bottom of nose. That’s the most important measurement you’ll do, and the most confusing.
Why are we using an angle instead of straight measurements on the eyes? This is the most important dimension in a human face, and angles allow us to double-check our work. A triangle is a shape, and that’s just easier for the brain to process than a line. That’s why I use angles to measure whenever I can. (Brush up on angle-drawing here.)
Unless the model is looking right at you, each eye is not the same distance from the center line. Check and double-check.
This triangle is the most important measurement in the whole face.

Then draw lines down from the center of the eyeballs to the corners of the mouth. In most people, the mouth is about as wide as the pupils of the eyes, but Sandy’s mouth is narrower than her eyes.

I did the drawing freehand but added this because it’s so difficult to understand from just words.

My last measurement is from the center line to outside of her ear. Conveniently, it’s about the same distance as from her hairline to the bottom of her nose. Remember, all measurements are relative. “It’s slightly less than two noses long,” is how we measure in drawing.

I managed to drop her ear too low at this point; I corrected it as I went. There are always fine corrections to be made. To me, that refinement is the best part of drawing. It’s like doing a puzzle.
Having made all those measurements, I was ready to rough in the overall features. I drew the nose and chin as volumes. (The angled line from the nose was to figure out my ear error.)
The drawing guides are superfluous after this point. Time to erase them and start having freehand fun.
Block in the mass of hair. Your eye perceives shapes and sizes differently depending on value and the color, as we learned here. That dark shape is important.
Refine the features, erasing and redrawing as time allows.
Because I was working with a #2 pencil on a cheap sketchbook, I waited until the end to add the shadow masses. Otherwise, they’d smear.
Throwback Sandy, by Carol L. Douglas

We are taught to draw the human face in ‘perfect’ terms: the eyes are halfway down the head, the tear ducts line up with the edges of the nostrils, the face is divided into thirds, etc., etc. In fact, human faces are infinitely varied. 
These ‘perfect’ laws fall apart especially fast when the subject isn’t white. For example, everything you learned about drawing eyes falls apart with an Asian person with no epicanthic fold. It’s far better to start with what’s really there.

This is a system that works, but you’ll need to practice it a few times before it feels comfortable. If you have any questions, email me and I’ll try my best to answer them.

Monday Morning Art School: the architecture of trees

To paint trees, you have to know trees. That doesn’t mean you need to memorize species, but you do need to be able to see the differences.
Along the Ottawa River, by Carol L. Douglas. You don’t need to be able to identify species at 200 paces, but you do need to be able to recognize how trees differ.
Trees, clouds and rocks are all frequently abused in the same way: the oblivious painter never thinks about their individual characteristics but paints them interchangeably. That’s a mistake.
Old Bones, by Carol L. Douglas
There is a major division in the forest world between conifers (the trees with needles) and broadleaf trees. Most, but not all, conifers are evergreens; the biggest exception being the larches (tamaracks), which turn a delicious yellow-gold in autumn. Which are dominant in your landscape? Even in the Pine Tree State, the distribution of conifers to deciduous trees is about 50-50.
Most scenes will include a variety of canopy shapes.
For broadleaf trees, the most important distinguishing characteristic is the branching pattern of the tree, which defines the shape of its canopy. Silver maples are large trees with open, vase-like canopies. Oaks have large spreading crowns; beeches have similar crowns that appear to have melted. Most broadleaf trees branch alternately but maple, ash, dogwood and horse chestnut branch in opposite pairs.
Pines have fewer branches than spruces or firs, and their branches grow in circular whorls on the trunk. As they age, they develop an open, jagged canopy. Spruce branches grow in an upturned direction; as youngsters, they look the most like ‘Christmas trees’. In their dotage, they turn a fine, weathered figure to the wind. Firs have wide lower branches and a downcast mien. Notably, their cones point upward.
Along Kiwassa Lake, by Carol L. Douglas
Conifers are most easily identified by their needles. Pine needles grow in clusters of two, (red pines), three (yellow pines), or five (white pines), held onto the stem with a tiny papery wrapper. Spruce needles are short, stiff and grow individually from twigs. Fir needles are soft and flat. Cedars have flat, scale-like leaves and stringy bark. Junipers (including, confusingly, the Eastern Red Cedar) have berrylike, bluish cones on the tips of their shoots.
Basic broadleaf leaves.
Many people can identify the common broadleaf trees by their leaves, and I’ve included a chart to help you. The important part for the painter, however, is to see the differences in color. Silver maples have a lovely grey-silver color. Sycamores are garbed in military-fatigue green. Black spruces are dark while Eastern White Pines are fair and soft in their coloring.
This is why I discourage my students from using tube greens and encourage them, instead, to mix a matrix of green colors.
Baby black spruce and pines, by Carol L. Douglas
Too often, we painters ignore young trees, something I tried to rectify (with varying success) last season. Young trees often look radically different from their aged ancestors, but they have a beauty of their own.
To be a convincing painter, you don’t need to memorize the species of trees, but you do have to learn to distinguish between them. Any plausible landscape will contain a variety of them, with different bark, branch structures, and leaf colors.
It’s about time for you to consider your summer workshop plans. Join me on the American Eagle, at Acadia National Park, or at Genesee Valley this summer.

Monday Morning Art School: sketching with Inktense pencils

Inexpensive, portable, and way fun, you can use watercolor pencils anywhere you normally sketch.

One advantage of being a lefty is that nobody borrows your scissors.

I use Derwent Inktense pencils to draw my sketches in field paintings. On a gessoed board, you can erase with a damp cloth. When you start laying oil paint down, the watercolor drawing freezes in place. I’ve been doing this for so many years, I’d forgotten why I bought the pencils in the first place. That is, until Mary Byrom reminded me last week that they’re great for pocket drawings and value studies.

This and a multimedia sketchbook is all you need to carry.

I buy them in packs of six in burnt sienna and ultramarine. This is a warm-and-cool combination that makes great neutrals in every medium. I use it for watercolor value studies and for my dark neutrals in oil colors. I can flip from warm to cool instantly with this mix, making it perfect for setting darks.

I always start with a pencil sketch.
The simplest (and most important) value study looks at the ways in which you can translate an image into simple black and white. At the same time as you’re thinking about black and white, you can also think about cool vs. warm. This is the modern, post-impressionist way of looking at value.
All light has color. An overcast sky has a color temperature of about 10,000K (blue). A room lit by candles has a color temperature of about 1,000K (orange). The most neutral light is sunlight at noon.
This photo of Mission San Jose in San Antonio starkly demonstrates the color of light. All the walls are white.
Of course, the ambient light color is also affected by the objects it’s bouncing off. I took the photo above in Mission San Jose in San Antonio to demonstrate this. The walls are white, but there was incandescent light above the loft. The lower part of the room was lit by daylight or in shadow. The effect was to make it appear that the room had been painted in blue and gold.
An aqua-flow brush is the easiest way to move Inktense around.
The color of shadow is always the complement of the color of the light. Of course, this is all mutated by the color of the objects being lit. A red sphere in warm light will appear crimson in the light spots and more purplish in the shadows. That’s just red mixed with orange light and blue shadows. We simplify matters by saying that if the light is cool, the shadows are warm and vice-versa.
The principle’s the same whether the light is warm or cool, as long as it is consistent and matches reality.
Inktense pencils allow you to add in color temperature as you think about value. Ignoring their actual color and modeling, I made a simple contour drawing of my sewing scissors. I set the lighter half of my value range in blue. It’s simple to soften Inktense with a water-brush. Just fill it and run it over your pencil drawing. When that was done, I added my shadows in burnt sienna. You can get fairly intense darks with Inktense pencils.
Two different Inktense pencils can take you almost anywhere.
My fantasia was hardly inspired, but I’ve included it to show you how much depth you can get out of Inktense pencils. You can buy two Inktense pencils, a water-flow brush and a small pad of watercolor paper for around $20. The combination is no bigger than a sketchbook and pencil.

ADDENDUM: Susan Hanna points out that Derwent doesn’t havethose color names. I should have checked first. My burnt sienna WAS a color called Venetian Red; they don’t market it as that any more. Try Red Oxide. Try Deep Blue for ultramarine. Once again, caught in the trap of romance naming for pigments.

SECOND ADDENDUM: Another reader mentions that Inktense pencils are fugitive. She prefers Caran d’Ache watercolor pencils. I’ve not tried them so can’t comment.

It’s about time for you to consider your summer workshop plans. Join me on the American Eagle, at Acadia National Park, at Rye Art Center, or at Genesee Valley this summer.