
There’s now a Facebook group for you to post your homework, folks. 

You’ve all seen artists holding a pencil up like the clip art below. What they’re doing is rough measuring. It’s simple. Just hold the pencil up like a ruler in front of the object you’re drawing. Move it around to see the relative height and width of the thing. For example, a vase may be twice as tall as it is wide. That’s all you’re figuring out; you can make the vase any size you want on the paper.
 |
| It’s not just an affectation. |
You can hold your pencil up to figure out the other important thing in drawing: the angles of lines. I could give you a formal perspective lesson before we start drawing, but it’s not as important as learning to see angles. If you develop the ability to see angles, you’ll have better natural perspective than if you try to fit up what you see to a theory.
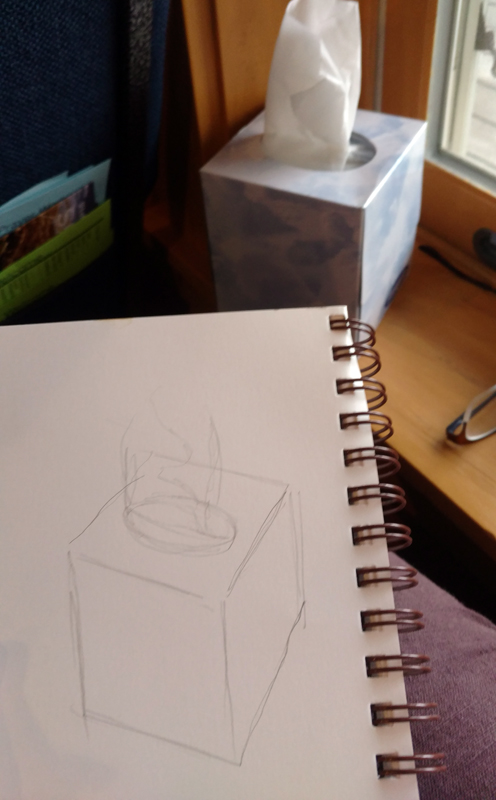 |
| I used my pencil as a measuring tool to get the relative sizes and angles right. |
The tissue box I was drawing in church yesterday had lovely angles. However, what you see in the photo isn’t what I saw while working. A drawing from life will never match what the camera portrays. Cameras are not as subjective as artists, but they lie just as much as we do.
You should do your measuring with one eye closed, especially if you’re working in a tight space, as I was. Art books will tell you to measure with your arm straight out. I find that uncomfortable. Instead, I just shoot for always having the pencil the same distance away from my eye as I work.
 |
| Then I checked the sizes and angles and corrected them. The box was taller than I originally thought. |
All drawing starts with simple shapes. After laying them down, I check and correct them. I do this by analyzing each large shape. Where does the back of the box intersect the tissue column? Is the curve of the cutout fat enough? I discovered that my cube wasn’t really tall enough, so I added some to the bottom.
 |
| After I was reasonably confident I had the shapes right, I added some overall values. |
The next step is to establish some overall values. “Value” just means how light or dark something is. This box was sitting on a south-facing windowsill behind a person who was casting another shadow. Thus, the window-frame behind the box was in deep shadow, but not nearly as dark as the photograph. I roughed in those darks first. They helped me know how to shade the box properly.
 |
| I added shadows to the box itself, and developed some detail. |
Next, I set shadows on the tissue box itself. I am more concerned with the column of tissue, so with each pass, I spend more time on that.
Finally, I did some blending, using the handiest tool I carry: my finger. You should use a stumpor tortillonon work you care about, but in a pinch, your finger works great.
 |
| Blending using the side of my finger. |
Note that I never bother much about my mark-making. It can take care of itself. I’m mostly interested in applying accurate values. I did this drawing with a mechanical pencil, which will never be as luscious as a good graphite stick, but it survives banging around in my purse week after week.
 |
| Time to go home! |
Some general rules:
- Draw everyday objects. The better you get with these, the better you’ll be with complex subjects. There’s amazing beauty in everyday things.
- Draw any time you get the chance. I did this drawing in church, and I didn’t miss a word. Drawing and language don’t use the same channels of your brain.
- Measuring is the most important part of drawing. Keep checking and correcting sizes.
- Start with big shapes and break them down into little shapes. If the big shapes are right, the smaller parts will slip into their spots just fine.
- Value is relative. How dark something is, is only important in terms of how dark its neighbor is.
- Constantly recheck shapes and values as you go.
Great lesson and advice.
Nice drawing too.
Bobbi Heath points out that I didn't actually assign you homework. OK, then. Your homework is to find some simple object and draw it using the steps I gave you, above.
This is tremendous, exactly what I was looking for to begin to help me recreate on canvas the scene I captured on film recently. I'll take my time and learn from you, maybe sketch the Formica cubes Dad made that are sitting here, near my desk. See how that goes.